Red Dead 2 Clothes Guide: Every Outfit And Where To Find Them
Red Dead 2 Clothes Guide: Every Outfit And Where To Find Them — GameSpot
By
Matt Espineli
on
Red Dead Redemption 2 has a ton of clothes for you to wear. Instead of fulfilling certain conditions to unlock them, you can now walk into any of the general shops scattered throughout the world and purchase some new clothing from their catalog. While you can grab a certain outfit set as a whole, you can also purchase their parts to mix-n’-match the pieces you like best.
Another new mechanic relating to clothes is the ability—or requirement—to manage your temperature. There are varying climates in Red Dead Redemption 2’s world, so you’ll have to outfit yourself with the appropriate attire—or else Arthur’s health will be affected. If the weather is hot, you’ll need wear light clothes in order to prevent your Health Core from draining; the same occurs during colder climates where you need to wear heavier clothes suitable for cold weather.
- Red Dead Online’s Game-Breaking Patch Has Been Rolled Back
- Red Dead Redemption 2 Easy Money Guide: How To Get Cash Quickly
- Red Dead Redemption 2 Legendary Bear Pelt: Here’s What To Do With It
There’s a wealth of clothes you can purchase and even craft throughout your journey. If you’re curious about all the different sets you can get and where you can find them, then you’re in the right place. We’ve gathered together every outfit we’ve found so far, their locations, what you need to craft them, and details on the weather conditions they can worn in. We’ll be adding to this guide in the coming days with even more outfits and details, so be sure to check back often.
Red Dead Redemption 2 has been out on PS4 and Xbox One since October 2018, but now PC players will be jumping in for the first time. For our full thoughts on how Rockstar’s latest open-world adventure turned out, read our RDR2 review. Though, if you’ve never played the original Red Dead Redemption and are curious if you’re going to be able to jump into this sequel with no problems, be sure to read our feature answering that question. On the guide front, check out our feature offering beginner’s tips you should know, as well as our money guide. We’ve also got articles detailing how long the game is and how gun customization works.
But before you jump into all that, tell us which outfits you think are the coolest! Go ahead and voice your opinions in the comments below.
All 31 Marvel Cinematic Universe Movies Ranked, Including Ant-Man & The Wasp: Quantumania
10 Best Minigames In Like A Dragon: Ishin
Diving Deep Into New Zelda: Tears Of The Kingdom Lore And Details (No Leaks)
Brawler’s Outfit
Location: Included in your initial outfit selection
Wearable Climates:
- Average Weather
- Hot Weather
The Grizzlies Outlaw
Location: Included in your initial outfit selection
Wearable Climates:
- Average Weather
The Gunslinger
Location: Included in your initial outfit selection
Wearable Climates:
- Average Weather
- Hot Weather
The Innocent
Location: Included in your initial outfit selection
The Pursuer
Location: Included in your initial outfit selection
Wearable Climates:
- Average Weather
- Hot Weather
The Rebel
Location: Included in your initial outfit selection
Wearable Climates:
- Average Weather
The Ruffian
Location: Included in your initial outfit selection
Wearable Climates:
- Average Weather
- Hot Weather
The Summer Gunslinger
Location: Included in your initial outfit selection
Wearable Climates:
- Average Weather
- Hot Weather
The Winter Gunslinger
Location: Included in your initial outfit selection
Wearable Climates:
- Cold Weather
The Chevalier
Location: Rhodes General Store
Wearable Climates:
- Average Weather
- Hot Weather
The Corson
Location: Rhodes General Store, Saint Denis Tailor, Strawberry General Store, Velntine General Store, Wallace Station General Store
Wearable Climates:
- Average Weather
- Hot Weather
The Earl
Location: Rhodes General Store
Wearable Climates:
- Average Weather
- Hot Weather
The Gambler
Location: Rhodes General Store
Wearable Climates:
- Average Weather
- Hot Weather
The Heartlands
Location: Rhodes General Store
Wearable Climates:
- Average Weather
- Hot Weather
The Bretagne
Location: Saint Denis Tailor
Wearable Climates:
- Average Weather
- Hot Weather
The Deauville
Location: Saint Denis Tailor
Wearable Climates:
- Average Weather
- Hot Weather
The Saint Denis
Location: Saint Denis Tailor
Wearable Climates:
- Average Weather
- Hot Weather
The Bear Hunter
Location: Saint Denis Trapper
Components:
- Legendary Bear Hat ($40): Legendary Bear Pelt x 1
- Legendary Bear Coat ($28): Legendary Bear Pelt x 1, Perfect Bison Pelt x 1
- Legendary Bar Roper ($34): Legendary Bear Pelt x 1, Perfect Bull Hide x 1
- Boar Riding Gloves ($15): Perfect Boar Pelt x 1, Perfect Rabbit Pelt x 2
Wearable Climates:
- N/A
The Beast of Prey
Location: Saint Denis Trapper
Components:
- Legendary Cougar Flop Hat ($19): Legendary Cougar Pelt x 1, Turkey Feather x 2
- Legendary Cougar And Wolf Vest ($42): Legendary Cougar Pelt x 1, Legendary Wolf Pelt x 1
- Legendary Wolf Batwing Chaps ($34): Legendary Wolf Pelt x 1, Perfect Goat Hide x 1
- Bull Fowler Boots ($29): Perfect Boar Pelt x 1, Perfect Bull Hide x 2
- Legendary Cougar Riding Gloves ($20): Legendary Cougar Pelt x 1, Perfect Boar Pelt x 1
Wearable Climates:
- N/A
The Bounty Hunter
Location: Saint Denis Trapper
Components:
- Plantation Slouch Hat ($15): Perfect Bison Pelt x 1
- Beaver Hunting Jacket ($21): Perfect Cow Hide x 1, Perfect Beaver Pelt x 1
- Sheepskin Vest ($20): Perfect Sheep Hide x 1
- Pronghorn Half Chaps ($7): Perfect Pronghorn Hide x 1
- Buck Riding Gloves ($5): Perfect Buck Pelt x 1
Wearable Climates:
- N/A
The Bronco Buster
Location: Saint Denis Trapper
Components:
- Elk Flop Hat ($12): Perfect Elk Pelt x 1
- Coyote Scout Jacket ($20): Perfect Ox Hide x 1, Perfect Coyote Pelt x 1
- Huntsman Vest ($25): Perfect Sheep Hide x 1, Perfect Deer Pelt x 1
- Boar Fringed Shotgun Chaps ($25): Perfect Boar Pelt x 2
- Pigskin Rifleman Gloves ($8): Perfect Pig Hide x 1
Wearable Climates:
- N/A
The Rattler
Location: Saint Denis Trapper
Components:
- Ram Sombrero ($10): Perfect Ram Hide x 1
- Outdoorsmen Vest ($22): Perfect Pronghorn Hide x 1
- Javelina Half Chaps ($18): Perfect Collared Peccary Pig Pelt x 1, Perfect Snake Skin x 1
- Iguana Range Gloves ($27): Perfect Collared Peccary Pig Pelt x 1, Perfect Iguana Skin x 2
Wearable Climates:
- N/A
The Death Roll
Location: Saint Denis Trapper
Components:
- Legendary Alligator Gambler’s Hat ($22): Legendary Alligator Skin x 1, Perfect Snake Skin x 2
- Legendary Panther Cloak ($45): Legendary Alligator Skin x 1
- Legendary Alligator Fowlers ($35): Legendary Alligator Skin x 1
- Legendary Panther Ranger Gloves ($30): Legendary Panther Pelt x 1, Perfect Gila Monster Skin x 2
Wearable Climates:
- N/A
The Desperado
Location: Saint Denis Trapper
Components:
- Beaver Drifter Hat ($20): Perfect Beaver Pelt x 2
- Wolf Coat ($25): Perfect Ram Hide x 1, Perfect Wolf Pelt x 1
- Billy Vest ($32): Perfect Armadillo Skin x 2, Perfect Goat Hide x 1
- Boar & Bull Fowler Boots ($31): Perfect Ox Hide x 1, Perfect Boar Pelt x 1
- Winter Calvary Gloves ($25): Perfect Rabbit Pelt x 1, Perfect Muskrat Pelt x 2
Wearable Climates:
- N/A
The Dreamcatcher
Location: Saint Denis Trapper
Components:
- Legendary Beaver Flop Hat ($22): Legendary Beaver Pelt x 1, Legendary Boar Pelt, Cardinal Feather x 1
- Legendary Bison Vest ($30): Legendary Tatanka Bison Pelt x 1
- Legendary Bison Batwing Chaps ($32): Legendary Tatanka Bison Pelt x 1
- Legendary Boar & Bison Fowlers ($37): Legendary Boar Pelt x 1, Legendary Tatanka Bison Pelt x 1
- Legendary Beaver Calvary Gloves ($18): Legendary Beaver Pelt x 1
Wearable Climates:
- N/A
The Ghost Bison
Location: Saint Denis Trapper
Components:
- Legendary White Bison Hat ($45): Legendary White Bison Pelt x 1
- Legendary White Bison Coat ($29): Legendary White Bison Pelt x 1
- Option 1 — Legendary Elk Half Chaps ($16): Legendary Elk Pelt x 1, Perfect Sheep Hide x 1
- Option 2 — Legendary Elk Moccasins ($30): Legendary Elf Pelt x 1, Perfect Goat Hide x 1
- Legendary Elk Range Gloves ($13): Legendary Elk Pelt x 1
Wearable Climates:
- N/A
The Huntsman
Location: Saint Denis Trapper
Components:
- Legendary Coyote Mountain Hat ($23): Legendary Coyote Pelt x 1
- Legendary Pronghorn Coat ($35): Legendary Pronghorn Hide x 1, Perfect Moose Pelt x 1
- Option 1 — Legendary Coyote Half Chaps ($20): Legendary Coyote Pelt x 1, Perfect Fox Pelt x 2
- Option 2 — Worksman’s Pride Boots ($28): Perfect Cow Hide x 1, Perfect Goat Hide x 1
- Legendary Pronghorn Range Gloves ($17): Legendary Pronghorn Hide x 1, Perfect Muskrat Pelt x 1
Wearable Climates:
- N/A
The Marauder
Location: Saint Denis Trapper
Components:
- Muskrat Calvary Hat ($15): Perfect Rabbit Pelt x 4, Perfect Muskrat Pelt x 1
- Principal Vest ($18): Perfect Cow Hide x 1, Perfect Dear Pelt x 1
- Bull Fringed Shotgun Chaps ($18): Perfect Bull Hide x 1
- Smoke Skin Calvary Gloves ($26): Perfect Boar Pelt x 1, Perfect Snake Skin x 1
Wearable Climates:
- N/A
The Mountain Man
Location: Saint Denis Trapper
Components:
- Grenadier Hat ($24): Perfect Muskrat Pelt x 1, Perfect Beaver Pelt x 1
- Ram Shotgun Coat ($45): Perfect Ram Hide x 1
- Country Vest ($25): Perfect Buck Pelt x 1, Perfect Beaver Pelt x 1
- Elk Riding Gloves ($12): Perfect Elk Pelt x 1
Wearable Climates:
- N/A
The Night Wrangler
Location: Saint Denis Trapper
Components:
- Coyote Gambler’s Hat ($16): Perfect Coyote Pelt x 2
- Cougar Cutaway Coat ($39): Perfect Cougar Pelt x 2, Perfect Black Bear Pelt x 1
- Wilderness Vest ($28): Perfect Wolf Pelt x 1, Perfect Panther Pelt x 1
- Moose Half Chaps ($10): Perfect Moose Pelt x 1
- Badger Rifleman Gloves ($10): Perfect Badger Pelt x 1
Wearable Climates:
- N/A
The Stalker
Location: Saint Denis Trapper
Components:
- Legendary Ram Hat ($17): Legendary Ram Hide x 1
- Legendary Moose Hunting Jacket ($24): Legendary Moose Pelt x 1, Perfect Wolf Pelt x 1
- Legendary Ram Batwing Chaps ($33): Legendary Ram Hide x 1
- Legendary Moose Moccasins ($22): Legendary Moose Pelt x 1, Perfect Cow Hide x 1
- Legendary Ram Rifleman Gloves ($12): Legendary Ram Hide x 1, Perfect Boar Pelt x 1
Wearable Climates:
- N/A
The Trophy Buck
Location: Saint Denis Trapper
Components:
- Raccoon Mountain Hat ($21): Perfect Raccoon Pelt x 1, Perfect Beaver Pelt x 1, Hawk Feather x 2
- Legendary Buck Vest ($26): Legendary Buck Pelt x 1, Legendary Ram Hide x 1
- Legendary Fox Moccasins ($40): Perfect Elf Pelt x 1, Legendary Fox Pelt x 1
- Legendary Buck & Fox Range Gloves ($28): Legendary Buck Pelt x 1, Legendary Fox Pelt x 1
Wearable Climates:
- N/A
The Wrangler
Location: Saint Denis Trapper
Components:
- Goat Flop Hat ($12): Perfect Pronghorn Hide x 1, Perfect Goat Hide x 1
- Trapper’s Cloak ($32): Perfect Sheep Hide x 1
- No Man’s Vest ($27): Perfect Panther Pelt x 1, Perfect Goat Hide x 1
- Two Toned Moccasins ($15): Perfect Buck Pelt x 1
- Moose Range Gloves ($22): Perfect Moose Pelt x 1
Wearable Climates:
- N/A
The Cumberland
Location: Strawberry General Store
Wearable Climates:
- Average Weather
- Hot Weather
The Dolton
Location: Strawberry General Store
Wearable Climates:
- Average Weather
- Hot Weather
The Faulkton
Location: Strawberry General Store
Wearable Climates:
- Average Weather
- Hot Weather
The Millesani
Location: Strawberry General Store
Wearable Climates:
- Average Weather
- Hot Weather
The Clairmont
Location: Valentine General Store
Wearable Climates:
- Average Weather
- Hot Weather
The Dewberry Creek
Location: Valentine General Store
Wearable Climates:
- Average Weather
- Hot Weather
The Valentine
Location: Valentine General Store
Wearable Climates:
- Average Weather
- Hot Weather
The Vaquero
Location: Valentine General Store
Wearable Climates:
- Average Weather
- Hot Weather
The Calumet
Location: Wallace Station General Store
Wearable Climates:
- Average Weather
- Hot Weather
The Drover
Location: Wallace Station General Store
Wearable Climates:
- Average Weather
- Hot Weather
The Estate Boss
Location: Wallace Station General Store
Wearable Climates:
- Average Weather
- Hot Weather
The Roscoe
Location: Wallace Station General Store
Wearable Climates:
- Average Weather
- Hot Weather
View Comments (1)
The Best Outfits In Red Dead Redemption 2
In addition to participating in the ultimate cowboy fantasy, one of the main reasons for playing Red Dead Redemption 2 is to try on all those outfits. All kidding aside, there is a wide variety of outfits to choose from in Rockstar’s best open-world game to date. It can be hard for a gamer to decide what to force their protagonist to wear.
If personal opinions can’t narrow down your favorite outfits from all those tailor shops for you, let this list help you. Bear in mind, only complete outfits are considered and not separate pieces of clothing. (Otherwise, the list would be incredibly extensive. There are more than one hundred items of clothing in the game.) Read on if you want to know which RDR2 outfits are right for you.
RELATED: 10 Ways To Earn Money Fast In Red Dead Redemption 2
Updated August 20th, 2021 by Amanda Hurych: Even years after Red Dead Redemption 2’s release, countless players are still diving into Arthur Morgan’s cowboy boots to live out their life as an outlaw in the Wild West. There is such a wonderful replayability factor when it comes to crafting a unique open-world adventure like this, and it is assisted by having the option to wear a multitude of great outifts.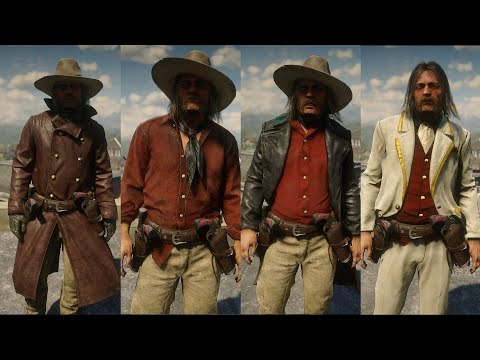 More details on how players can acquire these get-ups have been provided.
10 The Legend Of The East
-
How To Obtain:
Unlocked by completing all challenges -
Cost:
N/A -
Temperature Considerations:
None
Without a doubt, the Legend of the East outfit is the most stylish set of clothing players can unlock in Red Dead Redemption 2. Not only can it be worn in any kind of weather without any detriments, but it is also definitively earned by completing every challenge in the game. The only downside to this outfit is the fact that, since it’s unlocked by finishing every challenge, it can only be worn by John Marston. Luckily, there are cheats to rectify that.
9 The Gunslinger
-
How To Obtain:
Unlocked after completing the mission «Eastward Bound» -
Cost:
N/A -
Temperature Considerations:
Best worn in hot or average weather
You can’t go wrong with the default outfit. Whether you decide to sport the Summer Gunslinger look or the Winter Gunslinger look, that specific outfit has been crafted to be Arthur Morgan’s default appearance.
RELATED: Red Dead Redemption 2: The 10 Most Powerful Weapons, Ranked
It costs nothing since it is already in Arthur’s wardrobe at the start of the game, and Arthur looks dang good in it. While it doesn’t have any fancy trappings on it, there’s no fuss or muss in choosing that as your favorite outfit.
8 The Trophy Buck
-
How To Obtain:
Purchased at the Trapper’s -
Cost:
$115.00 -
Temperature Considerations:
None
Hunting down the Legendary Buck, Fox, and Ram can give players the Trophy Buck outfit. The jacket smartly reminds one of the default Gunslinger jacket, but the raccoon-skin hat makes this get-up stand out from the crowd. Though it takes a bit of assembling, the Trophy Buck outfit is one of the better choices of dress available from the Trapper. It does not require too many pelts and it does not look as ridiculous as other options.
7 The Bear Hunter
-
How To Obtain:
Purchased at the Trapper’s -
Cost:
$117.00 -
Temperature Considerations:
None
Nothing screams fashion like wearing a bear head on top of your own head. During an early hunting mission with Hosea, Arthur gets the opportunity to bag the Legendary Bear.
Related: Things That Are Historically Accurate In Red Dead Redemption 2 (& Things That Aren’t)
In addition to the Legendary Bear Pelt, the Trapper will need Perfect Bison, Boar, Bull, and Rabbit pelts in order to craft the Bear Hunter outfit. While this might seem like a lot to work for, the astounding sight of Arthur walking around with a grizzled bear’s face on his head make it worth it.
6 The Saint-Denis
-
How To Obtain:
Purchased at the Saint Denis tailor’s -
Cost:
$98. 75
75 -
Temperature Considerations:
Best worn in hot or average weather
This particular outfit can only be bought in the city of Saint-Denis, and it is even named after this location. Saint-Denis came as a visual shock to players given that most of the game had taken place in the wilderness with small towns sprinkled here and there.
Saint-Denis burst onto the scene with a city-like environment, complete with more polished outfits. The Saint-Denis outfit is a semi-affordable choice from the tailor shop that will have Arthur Morgan blending in with the crowds quite nicely.
5 The Ghost Bison
-
How To Obtain:
Purchased at the Trapper’s -
Cost:
$133.00 -
Temperature Considerations:
None
The words «ghost bison» sound terribly cool. If selecting an outfit only relied on hearing its name, then the Ghost Bison would win for sure. And once players get a look at the outfit in its entirety, they will not regret the time spent collecting those Legendary Elk Pelts and Legendary Bison Pelts.
RELATED: The Best Red Dead Redemption 2 Missions, Ranked
The white coloring of the Legendary Bison’s fur makes the hood the Trapper crafts for the outfit look like a ghostly top, complete with tiny horns. The snow-white pelt of the Legendary Elk is also used to make the coat and mittens of the outfit, completing Arthur’s transformation into an eerie hunter of the woods.
4 The Faulkton
-
How To Obtain:
Purchased in the Strawberry general store -
Cost:
$84.50 -
Temperature Considerations:
Best worn in hot or average weather
Of middling price at Strawberry’s General Store, the Faulkton is one of the better outfits you can purchase in the game. It does not cost as much as some of the other outfits sold at Strawberry (and nowhere near as much as those sold in Saint-Denis), and it does not require a high honor rating in order to purchase it at all.
Its look is understated. It has a nice long jacket, but it is still able to be worn in both average and hot temperatures. Though of course, it’s still a mystery as to why Arthur Morgan is allowed back into Strawberry in the first place.
3 The Beast Of Prey
-
How To Obtain:
Purchased at the Trapper’s -
Cost:
$144.00 -
Temperature Considerations:
None
The Beast of Prey outfit you can hunt down at the Trapper’s takes a lot of work to put together. You have to hunt the Legendary Cougar and the Legendary Wolf in addition to collecting a few other Perfect pelts.
As you might have sussed out, the Legendary Wolf and the Legendary Cougar will not come quietly. They’re some of the more vicious animals in the world of Red Dead Redemption 2. But if you do collect their pelts and get the Beast of Prey outfit, you’ll know it was worth it because you will look like one sharp hunter of predators.
2 The Dreamcatcher
-
How To Obtain:
Purchased at the Trapper’s -
Cost:
$139. 00
00 -
Temperature Considerations:
None
The Dreamcatcher looks like a helter-skelter collection of pelts meshed together, making it one of the most unique and distinct-looking outfits in Red Dead Redemption 2. The grey Legendary Bison chaps blend with the Legendary Bison vest.
However, the Legendary Beaver Pelt, Legendary Boar Pelt, and Cardinal Feather needed for the hat make it the best article of clothing in the outfit.The Dreamcatcher is a real feather in Arthur Morgan’s cap when it comes to his wardrobe.
1 Best: The Gambler
-
How To Obtain:
Purchased in the Rhodes general store -
Cost:
$123.25 -
Temperature Considerations:
Best worn in hot or average weather
A trip to Rhodes can give Arthur Morgan one of the sharpest appearances he can purchase outside of Saint Denis. The Gambler outfit outshines other purchasable looks, with a dark checkered jacket and bright red vest and shirt. It’s one of the most expensive pieces of clothing you can buy at Rhodes, but it pays itself back with how incredibly awesome it makes Arthur appear.
MORE: Hilarious Red Dead Redemption 2 Memes Only True Fans Understand
Page not found — PC Games
Nothing found at this address. Use search.
Latest Topics
- How to get a chainsaw in Sons of the Forest
- How to kill sharks in Sons of the Forest
- How to get a compound bow in Sons of the Forest
-
Marvel’s Midnight Suns: Venom’s best cards and skills guide
How to get the «Legend of the West» costume in Red Dead Redemption 2
In Red Dead Redemption 2 there are 90 additional challenges, divided into separate categories. Completing all challenges in a specific category will earn you rewards, including attribute boosts, cash, and upgraded equipment that can be purchased from the hunter.
Once you have a full set of clothes, add permanent bonuses to your main attributes.
 Each attribute is associated with three sets. So, for example, if you complete the «Rider», «Arrow» and «Weapons Expert» tests, you will receive a constant increase in the health bar. For the stamina scale, you will need to collect other sets by completing tests of other categories.
 After you complete them all, you can get the «Legend of the West» costume, which gives you several bonuses at once.
Trials in Red Dead Redemption 2
Most of these tasks are as simple as possible and are taken as tutorials for all the activities you can do in the game. For example, you will need to find any treasure map.
Objectives are completed in a specific order, so you must first complete the first challenge to unlock the second, and so on.
Challenges can be taken at any time, but it’s wise to start completing them early in the game so you don’t have to deal with them all at once.
Bandit Trials
- Detain five citizens.

- Rob two carriages or deliver two stolen carriages to the Fence Dealer.
- Rob cash registers in any four stores in one day.
- Increase the bounty on your head in one state to $250.
- Steal five horses and sell them to the horse dealer in Clemens Cove.
- Steal cash and jewelry from citizens and travelers for a total of $50.
- Loot seven wagons and sell them to the fence at Emerald Ranch.
- Tie someone up and leave them on the railroad three times.
- Complete 5 train robberies without dying or falling into the hands of the authorities.
Researcher Test
- Find a treasure map.
- Collect 9 treasures.
Gambler’s Trials
- Win five hands of poker.
- Playing Blackjack, double up and win five hands.
- Win three times in a knife game.
- Bankrupt one poker site at each location (Flatneck Station, Saint-Denis, Valentine).

- Win three rounds of dominoes without drawing tiles against two or fewer opponents.
- Beat the Blackjack dealer in two locations (Van Horn and Rhodes).
- Win a knife game in each of the three locations (Valentine, Strawberry, Van Horn).
- Win three hands of Blackjack with three hits or more.
- Win three domino games in a row.
- Win three poker games in a row.
Herbalist Trial
- Gather 6 Millennials.
- Pick up and eat 4 spicy berries.
- Craft 7 items with sage as an ingredient.
- Collect 5 mushrooms and feed them to the horse.
- Craft 9 items with Indian Tobacco as an ingredient.
- Gather 15 different types of herbs.
- Craft and use 5 special Miracle Tonics.
- Use oleander to craft six poison weapons.
- Gather one of each type of herb.
- Season and cook all 11 types of meat.
Rider test
- Kill five rabbits while mounted.

- Jump over three obstacles in 15 seconds.
- Hop from Valentine to Rhodes in less than 5 minutes.
- While on horseback, drag the prey 3300 feet with the lasso.
- Trample five animals while riding.
- Hop from Strawberry to Saint-Denis in less than 9minutes without coming into contact with bodies of water.
- Kill 7 enemies while on horseback and without dismounting.
- Kill 9 Predators while mounted.
- Ride from Van Horn to Blackwater in less than 17 minutes without touching any bodies of water.
- Catch every breed of horse.
Hunter Test
- Skin three deer.
- Collect three perfect rabbit skins.
- Track 10 different animals using binoculars.
- Attract the attention of an animal and perform a clean death 5 times.
- Skin three black bears or grizzlies.
- Kill 5 cougars (cougars) with a bow, then skin them.
- Use bait to lure and kill herbivore and predator.

- Catch three fish without using a fishing rod.
- Catch one of the two playable possums.
- Find and kill the legendary panther Giaguaro.
Marksman Test
- Kill three flying birds.
- Kill two different animal species in the same Dead Eye mode.
- Kill five flying birds while on a moving train.
- Kill someone with a tomahawk from 80 feet away.
- Kill 6 animals without changing or reloading weapons.
- Kill someone within 600 feet with a ranged weapon.
- Headshot 7 times in a row.
- Disarm three enemies without reloading or changing weapons.
- Shoot hats on three people using the same Dead Eye mode.
- Kill three flying birds with three consecutive shots from a long-range rifle with a scope.
Survival Test
- Catch three Bluegill Sunfish.
- Tame five animals in a camp or trap.
- Kill five animals with the Varmint Rifle.

- Create Dynamite, Fire, Enhanced, Poison and Small Arrows.
- Catch a fish in the Bayou while on a riverboat and standing on the railroad tracks.
- Kill five scavengers while they are eating corpses.
- Kill 8 small animals using consecutive shots and small arrows.
- Craft a Homing, Improved Tomahawk, Explosive Dynamite, and Fire Bottle (Molotov cocktail).
- Catch a fish weighing at least 19 pounds.
- Catch the same type of fish in all the waters in the world.
Weapon Expert Test
- Kill three enemies with a knife.
- Kill three enemies in 10 seconds using only throwing knives.
- Kill three Birds of Prey using only the Tomahawk.
- Kill 10 enemies with a shotgun using crafted ammo.
- Kill five mounted enemies using one throwing knife per kill.
- Kill four enemies at the same time using one stick of dynamite.
- Kill four enemies in a row by throwing and picking up the same tomahawk.

- Kill 15 enemies with a long barreled shotgun.
- Kill 9 unsuspecting enemies by sneaking up behind them and firing your bow.
- Kill a grizzly bear without taking damage using only throwing knives.
Red Dead Redemption 2 Legend of the West Costume Features
After completing each challenge, you will receive the «Legend of the West» costume, which gives a lot of bonuses and looks pretty stylish.
Cores
Reduces the core depletion rate for all three attributes (Health, Stamina, and Dead Eye) by 10%.
Damage
Reduces melee damage dealt to you by 10%.
Dead Eye
Decreases the rate at which the Dead Eye gauge drains by 10% for 3 seconds (also applies to Eagle Eye permanently).
Experience points
Increases experience gained for three attributes by 10%.
Horse riding
Reduces damage taken while riding a horse by 10%.
- Detain five citizens.
