Destiny 2 guide: How to get the Whisper of the Worm exotic sniper rifle
A secret mission on Io has been keeping Destiny 2 players busy recently. It involves Taken Blight and a secret quest into a Taken-infused dungeon. At the end, players will be tasked with a massive boss fight. But the reward for completing this activity is more than worth it: Whisper of the Worm, the exotic sniper rifle.
Whisper of the Worm is going to be a must-have sniper for any raider or strike enthusiast going forward in Destiny 2. (We’ll explain why below.) This guide will teach you how to get it, how to upgrade it, and what it does.
Note: You’ll want to have a Fireteam of three players to complete this mission, although you can technically do it solo.
Enter the Anomaly
-
Bungie/Activision
-
Bungie/Activision
The first thing to know about The Whisper of the Worm mission — just called The Whisper — is that it only appears to be available Friday through Monday morning’s 1 p. m. ET reset. You’ll need to take some weekend time if you want to get this mission completed.
Head to Io’s Lost Oasis landing zone and wait for a Taken Blight public event to spawn. This could take a very long time, so if you’re planning on simply waiting around, then you might want to have some exotic catalysts to farm kills with.
The Taken Blight spawn will look something like this, in the upper leftImage: Bungie
Once the event spawns — which can be any of the Taken Blight spawns on the map, but never the Cabal mining operations — a large Taken boss will appear over by the Grove of Ulan-Tan Lost Sector in the top left of the Lost Oasis. Sometimes he’ll be on a cliff, and other times he’ll be in a small crevice. Either way, find the boss and kill him. Feel free to use your Super and heavy ammo. You’ll probably need it.
Once the boss is dead, stay in the upper left of the map and look for a big Taken portal sitting on a rock. Have your Fireteam leader walk up to the portal and interact with it. This will teleport the entire Fireteam into The Whisper.
Through the maze
-
Bungie/Activision
-
Bungie/Activision
-
Bungie/Activision
-
Bungie/Activision
-
Bungie/Activision
-
Bungie/Activision
-
Bungie/Activision
When the load finishes, you’ll find yourself at the start of the Grove of Ulan-Tan Lost Sector. But now you’ll be on The Whisper quest, which comes with a 20-minute timer. When those 20 minutes are up, you’ll be kicked back to orbit and have to wait for another Public Event.
Move forward and look to your right immediately. Toward the way you came in, there is a rock ledge that leads to a small crevice in the wall. This is where you want to go. Jump up to where the chest is if you’re a Titan or Hunter. With jumping exotics like Lion Rampart or St0mp-EE5s, both classes can also just jump to the cave. Warlocks will have a tougher time, so try and jump to the tree and then up to the chest and then over to the cave.
Once everyone is up, walk forward and destroy the Taken Blight. Drop down the hole that has revealed itself and get ready to jump.
Run forward, crouching through the holes that appear in front of you. Eventually, you’ll come to a gap with red lights around it. Jump between the walls and onto the platform. Follow the red lights and jump down to the next area. Crouch to get through the hole in the wall.
-
Bungie/Activision
-
Bungie/Activision
-
Bungie/Activision
-
Bungie/Activision
-
Bungie/Activision
-
Bungie/Activision
-
Bungie/Activision
-
Bungie/Activision
-
Bungie/Activision
-
Bungie/Activision
-
Bungie/Activision
You’ll now be in a massive room. Stick to the right side and the red lights. Jump down the wall and watch out for the pinball levers ejecting to your right. If they hit you, it’ll ruin your day and likely kill you. Follow the red lights across the room’s platforms until you hit the center block.
From here, there isn’t a clear exit. Walk forward, past the glowing cracks and toward the room’s left wall — which should be directly in front of you when you land. You’ll need to jump around the corner here, to your right. You’ll land quickly on a small platform. Duck and start making your way through the crevice, waiting for the blocks to move back into the wall. Be patient here and don’t rush. Take each block one at a time until you reach the other side.
After the blocks, look left and jump across the canyon to the cliff face with the spheres on it. Follow the path right until you reach a small, square elevator. Jump on and ride the square up to the next platform, which should be red and right in front of you. Run forward along the wall and turn left into the white hallway.
-
Bungie/Activision
-
Bungie/Activision
-
Bungie/Activision
-
Bungie/Activision
-
Bungie/Activision
-
Bungie/Activision
-
Bungie/Activision
You’ll find yourself in a diamond-shaped death room. This all looks much scarier than it actually is. Jump through on the angle until you reach the diamond hole. Pop through into the next room, filled with slanted walls and explosions that push you.
Jump onto the ledges before you, waiting for their push explosion to erupt before hitting the ledge. Ignore the Taken Vandals shooting at you (only kill them out if you feel seriously threatened). Jump across the room, avoiding the explosions until you reach the wall with the white light. The door will open and shut, so time your jump into the room.
-
Bungie/Activision
-
Bungie/Activision
-
Bungie/Activision
-
Bungie/Activision
-
Bungie/Activision
-
Bungie/Activision
-
Bungie/Activision
-
Bungie/Activision
-
Bungie/Activision
You’ll now be staring at a bunch of similar looking portals, and Xol will begin speaking to you about drifting.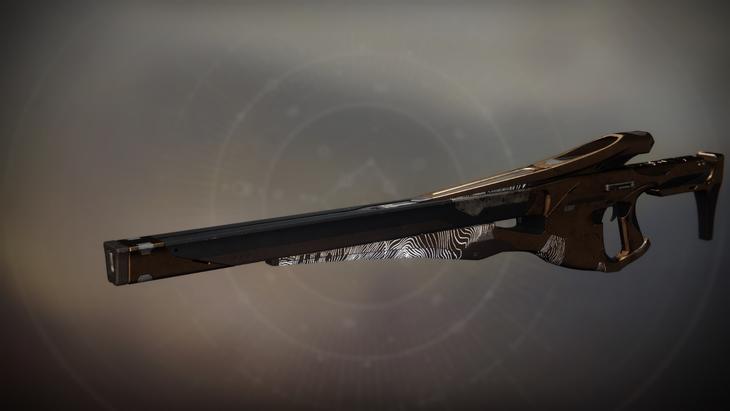 Jump to your right and hug the wall. Ignore all the portals until you reach the very end of the right wall. Take the top portal and drop into the room below.
This room looks scary — and it will be in the Heroic version — but the solution is easy. Walk forward until see a dip in the floor to the right. There will be a white strobe on the wall. Crouch and walk into the darkness until your Ghost’s flashlight turns on. Drop down and make your way through until you’re looking out into the darkness, with a big cylinder to your left.
Jump onto the cylinder’s edge and walk along the side. You’ll reach what looks like a diving board. Look far out and down to see the opening in front of you. It’s a long jump, so be sure to save your jump power until you’re close to the bottom. Once you safely land, move forward and crouch under the high ceiling. Drop into the room to your right to face the Taken.
Taken out the trash
This is where the mission gets tough, and you should ideally still have 12-14 minutes left on your clock. You’ll need to push through four rooms and take out enemies in each. Each room must be completely cleared, although the Blights can be left unharmed.
For this section, you’ll want a good loadout. Solar and Void damage will be great here, although having one person run Legend of Acrius for the Centurion’s arc shields is great as well. For Supers, Arcstrider, Sunbreaker, Dawnblade, and Nightstalker with Orpheus Rig are all excellent choices.
In your kinetic, take something long range that hits hard, like a pulse rifle or a scout — you’ll want something similar with either solar or void in your energy. The Polaris Lance exotic scout is actually excellent here, if you have it.
For a power, Legend of Acrius or a different shotgun can be great for the first rooms, but will need to be swapped for a longer range weapon in the end. D.A.R.C.I. is perfect for the boss room, as is Sleeper Simulant or any other long-range heavy.
Clear out the Taken in the first room, being careful to focus on the Fallen Vandals and the Goblins around the room. When everything is dead, a Taken orb will appear on the back door. Destroy it and move forward. This next room only has a few enemies but is very dense. Save your supers and try to use grenades and power ammo here to take out the melee enemies.
The third room is the hardest outside of the bosses. There are Taken hobgoblins at the back of the room, three Taken knights, and three Taken wizards. There are also a couple of Acolytes as well. It’s best to specialize, and have someone with a specific elemental weapon or subclass focus on each. The wizards and acolytes are void, while the knights are solar.
Clear the room and move into the final area. There is an interlude here that pits you against a bunch of Taken hobgoblins and thrall. There will also be two Taken Phalanx that come at you from behind. Kill everything with scouts and destroy the Blight covering the hole. Drop down.
This is the final arena. First, clear out all the Taken Blight except for the one in the very back of the room, where the bosses are floating. Then, you’ll need to kill the Centurions around the room. If you have Legend of Acrius, this is the time to use it. Arcstrider can also be great here. Once the Centurions are down, the bosses will populate the arena, as well as a ton of adds.
To kill the bosses, hang out in the back of the room, where you first dropped down. Use scout rifles and snipers to hit each of the bosses in the head until all three are dead. You should be able to do this in time.
Once all three bosses are dead, you’ll receive the Whisper of the Worm exotic sniper rifle.
What’s the Whisper of the Worm?
-
Bungie/Activision
-
Bungie/Activision
-
Bungie/Activision
-
Bungie/Activision
-
Bungie/Activision
-
Bungie/Activision
-
Bungie/Activision
-
Bungie/Activision
-
Bungie/Activision
The Whisper of the Worm is an Exotic sniper rifle with some very desirable perks. The intrinsic perk, White Nail, causes precision hits to deal bonus damage. Even better, hitting three precision shots in a row will refill the magazine for free, generating its own ammo until you start missing shots. For the accurate player, Whisper of the Worm is a must have.
Getting the catalyst
Once you’ve gotten your Whisper of the Worm, the mission will reappear on Io as selectable from the map screen. This version of The Whisper will be Heroic. Not only does it have hidden chests to discover, but it’ll also grant you the Whisper of the Worm exotic catalyst when you complete it. This version of the mission is the same, strategy wise. However, the enemies are much harder.
Once you unlock the catalyst, you’ll still need to upgrade it by running the mission each week and gathering chests. When it’s finally done, it’ll grant the weapon Box Breathing, which increases damage significantly after aiming down sites for a prolonged period of time.
Whisper of the Worm — Destinypedia, the Destiny wiki
From Destinypedia, the Destiny wiki
- «A Guardian’s power makes a rich feeding ground. Do not be revolted. There are parasites that may benefit the host… teeth sharper than your own.«
- — Weapon description.
Whisper of the Worm is an Exotic Sniper Rifle introduced in Destiny 2 with an update on July 17th, 2018. It is the successor to the Black Spindle, and by extension, the Black Hammer. It is the form that Xol took to feed upon the Guardian.
Contents
- 1 Gameplay
- 2 Lore
- 3 Acquisition
- 4 Upgrades
- 5 Trivia
- 6 Gallery
- 7 List of appearances
- 8 References
Gameplay[edit]
Whisper of the Worm is a heavy sniper rifle, unlike its predecessors Black Hammer and Black Spindle. The weapon shares the White Nail perk of the Spindle as it functioned after the release of The Taken King, pulling ammo from reserves. It focuses on sustained boss DPS without reloading, heavily competing with D.A.R.C.I. and Sleeper Simulant. The Catalyst obtained by running core playlist activities grants Whispered Breathing, which, after aiming down sights for three seconds, will increase precision damage and range until de-scoped.
Xol, the Will of Thousands, perished but was not destroyed. Death is a road, death is metamorphosis, the unsacred union between destroyer and destroyed. The might which defeats a god is also the ambrosia that god craves, the meat-sweet logic of Existence-Asserted-By-Violence, the binomial decision between two ways of being which deny each other. In dying, Xol fed richly.
Now came Xol unto the Taken upon Io, who fed Xol with plunder and tried to make of it an idol and a commanding will. Yet Xol was bound joyously to the very logic that sustained it in its death. It wanted the sword proof, the single proof. It wanted to become a rule which divided the mighty living from the mighty dead. So it whispered the Anthem Anatheme, the temptation to dominate the objective universe with the subjective will. It said, I shall be an engine to make your desire hegemon over your conditions. It said, WIELD ME, AND USE ME TO TEST YOUR FOE. This was its worship, Aiat.
Acquisition[edit]
Originally, to obtain the Whisper of the Worm, one had to complete a secret mission called The Whisper. As of January 29, 2019, the mission could be started on any day of the week, with any Public Event in the Lost Oasis on Io, by killing one of three Taken lieutenants. These lieutenants were called Drevis, Aspect of Darkness, Urzok, Aspect of Hate, and Ta’aurc, Aspect of War. Upon entering the anomaly, the player was taken to the Grove of Ulan-Tan Lost Sector location and would have to navigate through mazes and dark caverns, as well as fight through hordes of Taken that spawn through numerous blights. The player would eventually arrive in a large boss encounter featuring the lieutenants from before. If participants cleared these encounters within the twenty-minute time limit, they would be rewarded with the Whisper of the Worm.
After the weapon was obtained, the Whisper Catalyst could be obtained by running through the Heroic version of the same event. In order to fully unlock the catalyst, players needed to open six chests throughout the mission, including one that involved shooting Oracles not unlike those from Vault of Glass. The order for the Oracles, from left to right, was 1-3-5, 4-6-7-3-1, and finally, 7-3-1-6-4-2-5. Chests awarded 2% catalyst completion, while completing the mission rewarded 24% for a total of 36% per week.
After the removal of Io at the end of the Season of Arrivals, Whisper of the Worm was moved to the Monument To Lost Lights, where it can be purchased for 150,000 Glimmer, 250 Baryon Bough, 2 Ascendant Shards, and an Exotic Cipher. The catalyst can be obtained by completing playlist activities such as Strikes or Gambit, and fully unlocked by using Whisper of the Worm to kill enemies.
Upgrades[edit]
- White Nail: Higher base precision damage. Rapidly landing three precision shots will refill the magazine.
- Polygonal Rifling: Barrel optimized for recoil reduction. Increases stability.
- Accurized Rounds: This weapon can fire longer distances. Increases range.
- Mulligan: Missing a shot has a chance to return ammo directly to the magazine.
- Fitted Stock: This stock makes the weapon stable but heavy. Increases stability. Moderately controls recoil. Slightly decreases handling speed.
- Whisper Catalyst: Grants Whispered Breathing, which increases range and precision damage after a brief moment of aiming down sights without firing
- Whisper of the Worm is the third gun to naturally have a Taken appearance and the fourth weapon overall to appear as a Taken beside Stolen Will, the Cold Between Stars ornament for Black Spindle, and Dreadfang.
- The three Taken Ultras you fight within the final area of «The Whisper» mission are Taken variants of three enemies encountered within Destiny:
- Valus Ta’aurc from the Cerberus Vae III strike.
 Now known as «Ta’aurc, Aspect of War» in «The Whisper» mission.
 - Urzok, the Hated from public events in Skywatch. Now known as «Urzok, Aspect of Hate» in «The Whisper» mission.
- Drevis, Wolf Baroness from a bounty obtained during the Queen’s Wrath event, or from Petra Venj in the Vestian Outpost. Now known as «Drevis, Aspect of Darkness» in «The Whisper» mission.
- Valus Ta’aurc from the Cerberus Vae III strike.
- Whisper of the Worm appears to be heavily based upon two similar weapons from Destiny, Black Hammer and Black Spindle. All three weapons have the «White Nail» perk, and all are closely connected to the Hive.
- Commonly seen as its third iteration, it is technically the weakest when compared to the other three. Even in its original state with the infinite ammo version of the «White Nail» perk, it was in the Power Weapon slot. Thus, compared to both Black Hammer and Black Spindle less combinations of weapon loadouts could be used.
Gallery[edit]
List of appearances[edit]
- Destiny 2
- Warmind (First appearance)
References[edit]
StarCraft 2 WoL Campaign: Mission 12 Whisper of Fate
StarCraft 2 Wings of Liberty Campaign, Expert walkthrough with all upgrades:
Mission 12 Whisper of Fate
Upgrades have no effect on missions with protoss, so there is no point with them pull, perform to get technologies for the next missions.
Quest : Find 3 temples with prophecy, Zeratul must survive.
Achievement 1 Picnic on Ulaan: On Fighter difficulty, 3 or more stalkers must survive.
Achievement 2 It doesn’t hurt me: On Veteran difficulty, complete the mission without Zeratul losing health.
Achievement 3/Optional Objective: Destroy 3 Zerg hatcheries.
Zeratul is invisible, can blink and immobilize 1 enemy (both a unit and a building, and it loses its detector ability). I immediately skip all the moments where there is 1 detector and you only need to use the ability and kill everyone. In all battles, in order to save the stalkers, try to flick them off. Zeratul has 100 shields, damage on which can be safely taken, it is the loss of lives that knocks down the achievement.
Kill the ultralisk.
We kill the muta, if the ultralisk is suddenly aggroed, then we use the ability on it.
The first more or less difficult task, first we block the overseer and kill the whip, then we kill the first ford.
We are waiting for the rollback of the ability, we block and kill the second broodlord.
In this location at the beginning of the battle, just attack the muta / overseer, and then save the stalkers from cockroaches.
We destroy air units with stalkers, we block the ford. Next, we talk oversire and finish off the whips. Be sure to kill the house.
In ambush, we do the same.
We kill the Bailings by linking back and forth. If you blink too early, you won’t have time to wait for the second blink.
Never hit banelings with Zeratul or he will take damage.
Then there will be an inconspicuous fork, you need to go down and find a hidden hut.
Kill 2 hidden ultras with your ability, and if anything, flick back over the abyss with stalkers.
When the whips start to creep, focus the sporka with the Zeratul. This way you can easily kill everything else by using the ability on the overseer.
If it doesn’t work out, then you will have to throw the ability on the sporka, and at the moment the overseer leaves, kill the lashes.
When fighting protoss allies, use the ability on ultral and then kill the nydus with Zeratul.
Do not rush to enter the 3rd prophecy, the last hidden base is hidden below.
Lure roaches with stalkers, then use the whip ability.
After that, the last task remains, quickly run to the ship with a zeratul and 3 stalkers. To do this, you just need to blink 3 times through the stones and use the ability on the whip along the way.
If you do it quickly, the units won’t even take damage.
3 stalkers survived, Zeratul took no damage, incubators destroyed, temples explored. GGWP!
Corner of Bronze (tips for those who can’t complete the mission even with the guide):
- Complete 1 on fighter difficulty.
- Complete 2 Achievements on Veteran difficulty.
- On Expert, you need to run to Exit 1 with Zeratul.
Furios Paul speedrunner:
Normal 0 false false false RU X-NONE X-NONE
Primary Objective : Hold out until evacuation.
Bonus Objective : Rescue friendly troops
Achievements :
Not one step back (Complete the mission without losing or dismantling any buildings),
The best defense is. .. (Destroy 4 enemy incubators on Veteran difficulty)
Criticism(CLOSED🥺) — «Whisper of Fate» — Page 2
 Let's go over the standard set (such a road) story/idea/Persians.
 Well, as you understood from the brief retelling, the plot is banal. We all understand what will happen in the future and so on. (I so hope that in the end Dimon will marry Arina (not gg), and there will be glass). However, a banal plot is not a stigma, there are many books with a similar plot, therefore, just as a given, just as a fact.

                              Unfortunately, this image does not comply with our guidelines.  To continue posting, please delete the image or upload another one.
 Again, cutlets can be prepared in different ways, but cutlets will remain cutlets. (If there is something left of them in the pan).
 Following from the previous paragraph, there is no point in discussing the novelty of the idea.
 Did the plot hook me? In principle, I just recently read something similar, so I will say yes. But I would not have been hooked by the first chapters (more on that later). That is, when a banal plot, you either read for the sake of sex, because you understand that there is nothing transcendental, as in science fiction, a detective story, for example, or the characters of the work are juicy and tasty.
 Speaking of them.  At the beginning of Whisper of Fate, the characters were swaying from side to side. Either Alena is shy, or, it seems, a girl with a rod. That the main character is a little weakling, then he does not care. In short, it was stormy there, the Kraken was raging, the sailors were crying ... But by the 10th chapter there was a calm. Each hero wore his "suit". Dimas finally got some eggs. And everything became very nice.
 And now pike jump into the pool with triggers.
  I know for sure that the impossible is possible
 We understand that this is a love story. We understand that shura-mura comes first. But this is no reason to send reality into three letters. Now you will understand what we are talking about.
 Literally at the beginning I was questioned by Ronnie's thinking.  They have a real tragedy in their family, where every minute, hour, day counts. My brother needs pills, an operation, and all this needs money. But, from my point of view, Ronnie is acting recklessly, wasting time: she finished her work day early and could spend the rest of the time looking for a job, but Veronica goes home to listen to her mother's lamentations. Who knows, maybe during this time she would have already agreed to several interviews? But they sit with their mother, suffer at home. Plus, the question was raised about two works: this is the right idea, but for some reason it is discarded. If you really need money, then what's the problem with working multiple jobs? Seriously. Let someone take care of Sasha, and someone plow. You can take turns. But why, knowing that they need money, that their brother is sick, they only sadly think how to find at least one job. Tears of sorrow will not help. There would be two: there would be no need to think. I admit that everyone has a different way of thinking, but simply, thinking about a sick child, I immediately sort through all the possible options for earning money.

