20+ Modelle im Test ⋆ delamar.de
In unserer Marktübersicht und Soundkarten-Test erhältst Du einen Überblick über die wichtigsten Funktionen und technischen Daten von 21 Audio Interfaces im Vergleich. Wir haben uns gemäß der Maxime, kaufinteressierten Musikern und Produzenten eine nützliche Orientierungshilfe zu verschaffen, Modelle in einer Preisspanne bis 1000 Euro herausgesucht und sie gegeneinander antreten lassen.
Der große Soundkarten-Test & Vergleich: 21 Modelle mit allen Specs, Preisen und Infos auf einen Blick!
Von Felix Baarß
anzeige
Studio Soundkarten im Vergleich
Nur diejenigen Geräte, die uns die Hersteller liefern konnten, tauchen in unserer Marktübersicht und unserem Soundkarten-Test auf – unser Anspruch war es, alle 21 Modelle in unserem eigenen Studio ausführlich auf ihre Verarbeitung, die Latenzwerte und die Klangqualität zu prüfen.
Studio Soundkarten-Test & Vergleich
So viel vorweg: Klanglich und in Sachen Verarbeitung können alle Geräte zufriedenstellen.
Neben der Anzahl und der Art der Ein- und Ausgänge sowie den sonstigen elementaren Features, die in einer extra dafür vorgesehen Zeile zu finden sind, lohnt sich ein Blick unter »Bemerkungen & Extras« in unserem Homestudio Soundkarten-Test. Vielleicht findest Du erst dort eine weitere Entscheidungshilfe, da die meisten Geräte gewisse Spezialitäten aufweisen, die für den einen sehr wichtig, für den anderen wiederum unwichtig sein können.
In dieser Marktübersicht mit Audio Interfaces für das Homerecording wirst Du deinen Favoriten finden, um schon bald loslegen zu können. Und natürlich brauchst Du nicht im Regen zu stehen, wenn Du dich erst noch darüber informieren willst, was denn nun überhaupt wichtig bei einem Audio Interface ist. Einen auf das Wesentliche verdichteten und dennoch umfassenden Einblick in alle wichtigen Aspekte dieses Gerätetyps findest Du in unserer Übersicht Audio Interface.
Hier findest Du die Übersichtstabelle unserer Marktübersicht, die wir für unseren Soundkarten-Test erstellt haben. Klick auf das Bild hier unten, um zu einer Großansicht zu gelangen und alles gut lesen zu können:
Audio Interfaces bis 200 Euro
Im ersten Teil unseres Soundkarten-Vergleichs findest Du Modelle bis 200 Euro. (Zum Vergrößern bitte einfach auf das Bild klicken.)
Soundkarten bis 600 Euro
Diese Soundkarten für dein Studio bekommst Du mit einem Budget von bis zu 600 Euro.
Soundkarten bis 1000 Euro
Wenn Du ein größeres Budget zur Verfügung hast, solltest Du dir auch die Modelle bis 1000 Euro anschauen.
Soundkarten-Test & Vergleich mit folgenden Modellen:
- Apogee One
- Apogee One for Mac
- Apogee Duet
- Audient iD14 Testbericht
- Focusrite iTrack Solo Testbericht
- Focusrite Scarlett 2i2 Testbericht
- Focusrite Scarlett 2i4 Testbericht
- PreSonus AudioBox 22VSL Testbericht
- PreSonus AudioBox 44VSL Testbericht
- PreSonus AudioBox iOne Testbericht
- PreSonus Studio 192
- Shure MOTIV MVi
- Tascam US-16×08 Testbericht
- Tascam US-20×20 Testbericht
- Tascam US-2×2 Testbericht
- Tascam US-4×4 Testbericht
- Universal Audio Apollo Twin USB Duo
- Zoom UAC-2 Testbericht
- Zoom UAC-8 Testbericht
- ZOOM U-24
- ZOOM U-44
Weitere Studio Soundkarten bzw.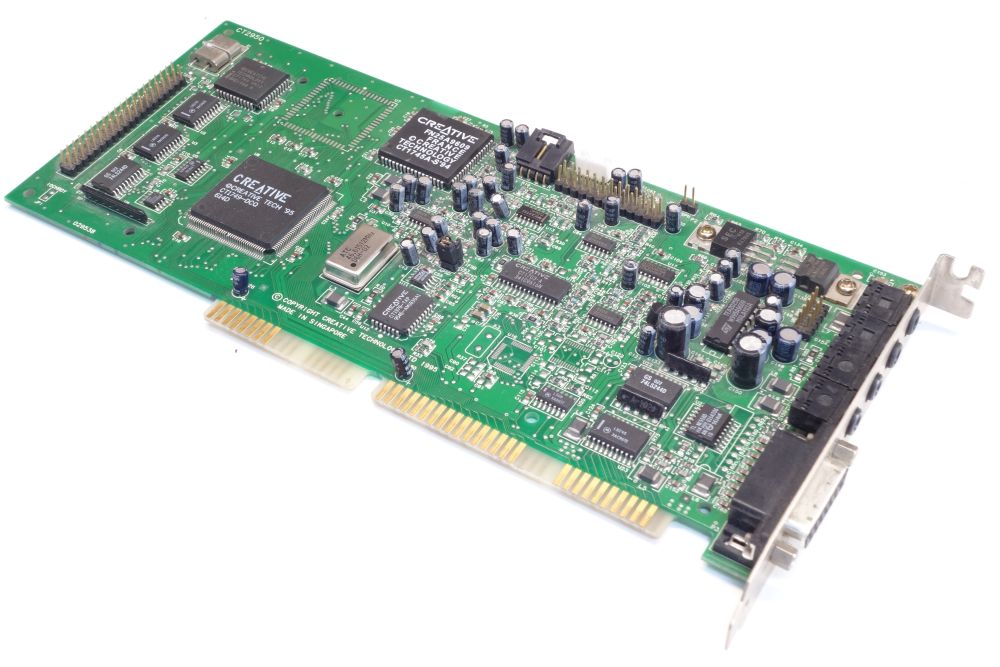 Audio Interfaces findest Du hier:
News & Testberichte zu Audio Interfaces »
Soundkarte ✔️ » die BESTEN im Test & Vergleich (2022)
Dein PC besteht aus kleinen technischen Wundern, die eigentlich nichts anderes machen, als elektrische Signale so umzuwandeln, dass du es verstehst und sie benutzen kannst. Alles was im PC geschieht ist eine Kombination aus Einsen und Nullen, die am Ende für deine Augen oder deine Ohren als grafische oder akustische Signale erscheinen. Prozessoren berechnen Eingaben und Aufgaben, der Arbeitsspeicher speichert diese Daten zwischen und die Soundkarte sorgt dafür, dass aus dem Daten-Dschungel ein Klang aus deinen Lautsprechern ertönt. Dafür verwenden die kleinen Karten eigene Soundprozessoren, die sich um die Umwandlung kümmern. Ältere Onboard-Soundchips auf dem Mainboard haben für diese Umwandlung noch die Leistung des Prozessors benötigt. Moderne Onboard-Chips, aber auch interne oder externe Soundkarten, berechnen die einzelnen Signale und Befehle mithilfe eines eigenen Chips. Doch sind diese Soundprozessoren, je nach Preisklasse, sehr unterschiedlich, was zu unterschiedlichen Klangeindrücken führen kann, je nach Soundsystem oder Kopfhörer. Aber auch dein Gaming-Mikrofon kann von einer starken Soundkarte profitieren, indem das Hintergrundrauschen, das viele Mikros mitbringen, gänzlich eliminiert wird.
Wofür brauche ich eine Soundkarte?
Die Anwendungsgebiete einer Soundkarte sind vielfältig, denn die Karten sind nicht nur dafür da, Sound zu übertragen. Verwendest du mehrere Soundausgabe-Geräte wie Lautsprecher, Kopfhörer und evtl. noch Mikrofon, dann lassen sich deine Anschlüsse am PC einfach mit einer Soundkarte erweitern, vor allem, wenn dein aktuelles System lediglich drei analoge Anschlüsse bietet. Viele Soundkarten liefern dir neben den einfachen 3,5mm-Klinke-Ports noch zusätzliche digitale Ausgänge. Besonders wichtig wird eine Soundkarte, wenn du dir einen hochwertigen HiFi-Kopfhörer oder ein Surroundsound-System zulegen möchtest. Einige Kopfhörer arbeiten lediglich mit Verstärkern oder Soundkarten, die mehr als 250 oder sogar 600 Ohm bieten. Surround-Systeme lassen sich wiederum nur effektiv beitreiben, wenn die Soundkarte alle Kanäle einzeln ansprechen kann. So benötigst du bei einem 7.1-System dringend eine Soundkarte, die diese Kanäle auch ansprechen kann. Dabei ist es völlig egal, ob du dich für ein externes oder ein internes Modell entscheidest. Einige Anwender und Spieler vertrauen auch immer mehr auf einen A/V-Receiver an ihrem PC, doch dazu später mehr.
Die wichtigsten Hersteller für Soundkarten
| Hersteller | Besonderheiten |
|---|---|
| Creative | Die Marke Creative ist schon recht lange für hochwertige Soundkarten bekannt. Dabei unterstützen die Produkte sowohl das PC-Gaming als auch den Unterhaltungsklang. Gleichzeitig arbeitet Creative mit Mainboardherstellern zusammen und verkauft hier seine professionellen Onboard-Chips.
|
| Asus | Asus ist ein direkter Konkurrent von Creative.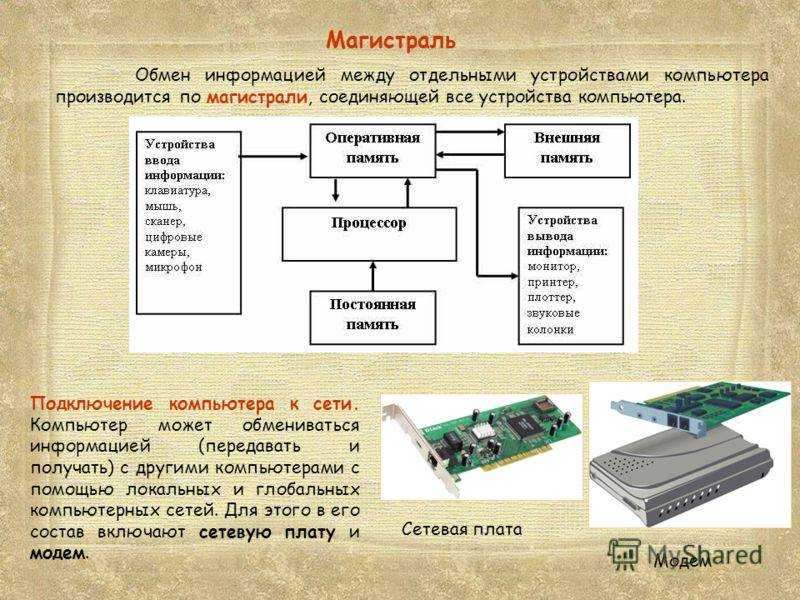 Die Soundkarten machen einen sehr guten Klang und sind mit umfangreichen Abschirmungsmaßnahmen ausgestattet. Hintergrundgeräusche werden optimal eliminiert, was im Gaming ein echter Vorteil sein kann. Die Soundkarten machen einen sehr guten Klang und sind mit umfangreichen Abschirmungsmaßnahmen ausgestattet. Hintergrundgeräusche werden optimal eliminiert, was im Gaming ein echter Vorteil sein kann.
|
| Beyerdynamic | Beyerdynamic ist eher aus dem hochwertigen HiFi-Bereich bekannt. Das Unternehmen hat sich jedoch auch bei Gamern einen gewissen Stellenwert erarbeitet und liefert beispielsweise hochwertige Kopfhörerverstärker. Die kleinen USB Soundkarten sind beispielsweise auch für Musikinstrumente geeignet.
|
Die unterschiedlichen Bauarten von Soundkarten
Auch wenn der Markt, nicht wie bei anderer PC-Hardware, von Soundkarten überflutet ist, hast du dennoch eine große Auswahl unterschiedlicher Bauweisen. Neben der internen und der externen Soundkarte, kannst du dich auch noch für die vorinstallierte Onboard-Variante entscheiden oder komplett auf einen externen Kopfhörerverstärker vertrauen. Im Folgenden stellen wir dir die unterschiedlichen Bauarten einmal näher vor.
Onboard-Sound
Die am häufigsten verwendete „Soundkarte“ ist der Onboard-Chip. Hierbei kommt keine separate Karte zum Einsatz, sondern der Audioprozessor wird direkt auf dem Mainboard verbaut. War der Onboard-Sound in den frühen 2000ern noch schlecht ausgestattet und schwach, so kommen heute sehr hochwertige Soundchips zum Einsatz, je nach Mainboard natürlich. Entscheidest du dich für ein sehr günstiges Modell, wird auch der Soundprozessor nicht viel leisten. Als Anschlüsse kommen hier meistens nur drei analoge-Klinke-Ports zum Einsatz. Teure Mainboards hingegen liefern dir bereits hochwertige Audio-Prozessoren, deren Leistung sich kaum von Soundkarten für nur 80 Euro unterscheidet.
Interne Soundkarten
Die interne Soundkarte ist die beliebteste Form von vielen PC-Gamern, da sie keinen Platz auf dem Tisch wegnimmt und die meiste Ausstattung bietet. Zudem lässt sie sich für einen geübten Bastler mit nur wenigen Handgriffen einbauen. Einige Modelle können sogar den Front-Anschluss des Gehäuses ansteuern, was für deine Einstellungen ein großer Vorteil sein kann. Einige interne Soundkarten liefern dir separat externe Module für die Steuerung oder Zusatzplatinen für die Berechnung von Surroundsound. Scheust du dich nicht, deinen PC zu öffnen und eine Karte einzubauen, solltest du diese Version nutzen. Interne Karten sind häufig auch günstiger als qualitativ gleiche externe Modelle.
Externe Soundkarten
Externe Soundkarten weisen häufig ähnliche Spezifikationen auf wie ihre internen Kollegen, doch lassen sie sich meistens noch einfacher anschließen. Hochwertige Modelle werden mittels eines USB 3.0-Ports mit dem PC verbunden. Außerdem hast du den Vorteil, dass du alle deine notwendigen Anschlüsse schnell zur Hand hast. Du musst nicht mehr an die Rückseite des PCs, sondern kannst bequem deine Lautsprecher oder Kopfhörer auf dem Tisch umstecken. Hinzu kommt, dass viele externe Soundkarten auch kompatibel mit Konsolen sind, wodurch du auch noch deren Sound „tunen“ kannst.
Analoge und Digitale Signale – was denn nun?
Kaufst du dir einen neuen Lautsprecher oder einen Kopfhörer, wirst du schnell feststellen, dass beide Geräte unterschiedliche Stecker haben. Das liegt daran, dass Audiosignale auf unterschiedlichem Weg übertragen werden können. Auf der einen Seite steht die analoge Übertragung und auf der anderen Seite die digitale Übertragung. Das analoge Signal wird ausschließlich über den 3,5mm Klinke-Stecker übertragen. Hierbei werden kleine Stromschwankungen ausgegeben, die zu schwingenden Membranen in den Lautsprechern führen. Diese Schwingungen kannst du dann letztendlich als Klang wahrnehmen. Eine der größten Einschränkungen der analogen Übertragung ist die geringe Anzahl möglicher Lautsprecher, die angesprochen werden können. Lediglich Stereo-Signale können damit verarbeitet werden. Möchtest du demnach ein Surroundsound-System anschließen brauchst du für jeweils zwei Lautsprecher immer einen analogen Anschluss. Bei der analogen Signalverarbeitung ist der D/A-Wandler auf der Soundkarte für die Klangumwandlung zuständig.
Etwas einfacher ist die digitale Übertragung, denn hier kommt lediglich ein einziges Kabel zum Einsatz. Außerdem ist für die Klangübertragung nicht mehr der D/A-Wandler der Soundkarte zuständig, sondern der Wandler im Lautsprecher oder Verstärker kümmert sich darum. Weiterhin kommt es nicht zu einer Übertragung von Stromschwankungen, sondern von Daten, die im Wandler des Lautsprechers umgerechnet werden. Die digitale Soundübertragung kann, muss aber nicht zwangsläufig besser sein als die analoge Übertragung. Das kommt sehr stark auf die einzelnen Komponenten an.
Tipp: Die Anschaffung einer Soundkarte macht nur dann Sinn, wenn du deinen Sound auch nur analog übertragen möchtest, denn hierbei kommt der Wandler auf der Soundkarte und nicht der Wandler im Lautsprecher zum Einsatz. Viele Anwender glauben immer noch, dass der Sound eines aktiven Lautsprechers durch eine Soundkarte besser wird, was allerdings ein Trugschluss ist.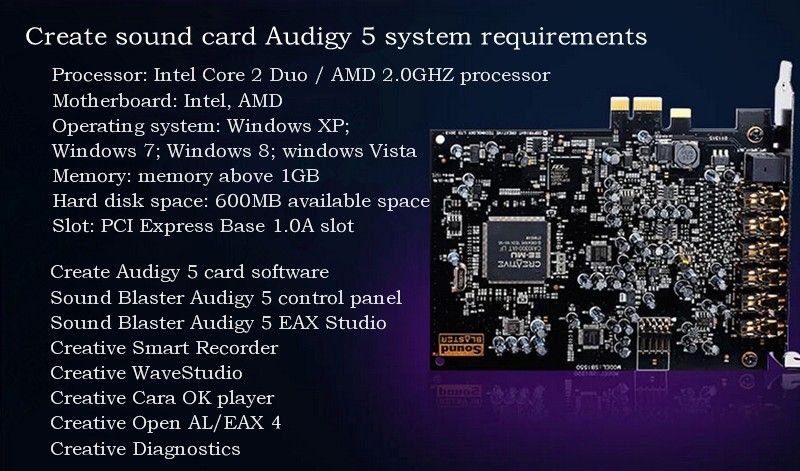
Surroundsound aus deiner Karte
Viele PC-Lautsprechersysteme, die nicht nur Stereo- sondern Surround-Sound bieten, nutzen analoge Anschlüsse für die Wiedergabe. Wie bereits im Abschnitt zuvor erklärt, macht es daher Sinn, wenn du auf eine hochwertige Soundkarte vertraust. Ein guter Soundchip arbeitet hierbei wie ein Audiokonverter, der deiner Soundanlage nochmals mehr Leistung entlocken kann. Besonders auffallend ist dies bei der Ansteuerung der einzelnen Lautsprecher. Viele Hersteller bieten dir eine umfangreiche Software, mit deren Hilfe du deine einzelnen Lautsprecher optimieren kannst. Das sorgt für einen besseren Surround-Klang aber auch für mehr Kraft im System. Beachte vor deinem Kauf unbedingt, dass die Soundkarte mehrere Kanäle unterstützen muss, um dein Soundsystem nutzen zu können. Manche Modelle liefern dir nur die Möglichkeit ein 5.1-Soundsystem zu nutzen, während andere Karten auf 7.1-Lautpsrecher optimiert sind.
Merke: Soundkarten sind stets abwärtskompatibel, das heißt, dass eine 7. 1-Karte auch ein Surroundsoundsystem mit fünf Lautsprechern und einem Subwoofer ansteuern kann. Dafür kann eine 5.1-Soundkarte aber maximal auch ein 5.1-Surroundsound-System ansprechen.
Die Treibersoftware entscheidet
Die Hardware einer Soundkarte sollte stets modern und hochwertig sein, damit der Soundprozessor die einzelnen Signale gut verarbeiten kann. Viele Anwender schauen daher ausschließlich auf die Hardware, doch ist die Software mindestens genauso wichtig. Viele Soundkarten und Lautsprecher kannst du hardwareseitig nicht optimieren, hier kommt die Software des Herstellers zum Einsatz. Mithilfe der Programme oder des Programms aktivierst du Zusatzfunktionen, steuerst deine Lautsprecher oder optimierst die Klangeigenschaften. Nahezu jedes Unternehmen spendiert der Software einen Equalizer, mit dem du Höhen, Mitten und auch die Tiefen feinjustieren kannst. Aber auch voreingestellte Modi für Gaming, Filme oder Musik kannst du in deiner Treibersoftware finden.
Die Ausstattung ist das A und O
Auch Soundkarten können einen ansehnlichen Lieferumfang und eine starke Ausstattung mit zu dir nach Hause bringen. Neben den wichtigen Anschlüssen wie 3,5mm-Klinke und Optischer Port kann deine Karte auch noch Anschlüsse für ein Coax-Kabel bereitstellen. Einige Modelle kommen als Kartenpaar zu dir nach Hause. Während eine Karte die analogen Anschlüsse liefert, kannst du an die Zusatzkarte die digitalen Kabel anschließen.
Aber auch in Sachen Analog-Digital-Wandler gibt es große Unterschiede bei den einzelnen Soundkarten. Besonders teure Karten um die 300 Euro arbeiten ähnlich effizient wie ein guter A/V-Receiver, was du vor allem bei der Beschallung mit einer Surroundsound-Anlage schnell feststellen wirst. Günstigere Karten bieten dir hingegen nicht die erhoffte Qualität, da die Wandler erheblich schlechter sind. Manch Mainboard verfügt mittlerweile über einen besseren D/A-Wandler als eine günstige Soundkarte.
Besonders wichtig für Gamer ist auch die Unterstützung von Dolby Digital Live oder DTS-Connect. Hierbei handelt es sich um eine Funktion, bei der der Stereo-Sound eines Spiels per Software als Surroundsound ausgegeben wird.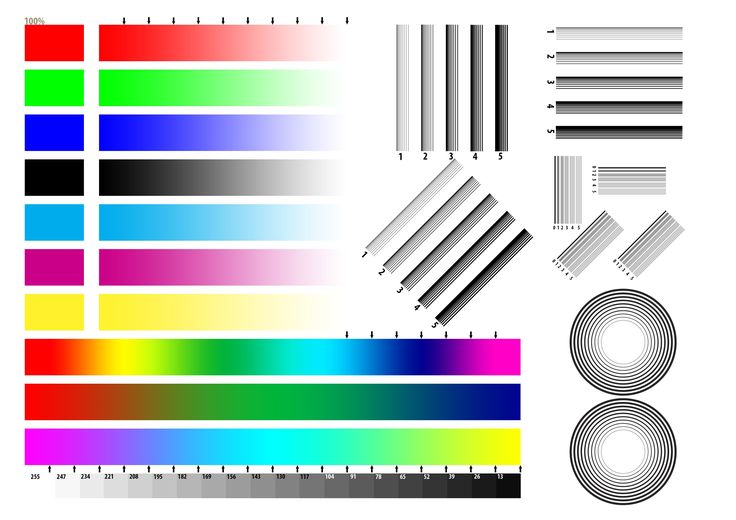 Das sorgt dafür, dass deine Surround-Kopfhörer aber auch deine Soundsystem vollständig angesteuert werden können, auch wenn das Spiel keinerlei Mehrkanal-Sound zulässt. Aber auch Filme profitieren davon, aber auch nur, wenn die Software es zulässt.
Die passenden PC-Lautsprecher zu deiner Soundkarte
Nachdem du schon einiges über Soundkarten in diesem Bericht gelesen hast, wirst du dich sicherlich auf die Suche nach einem Soundsystem begeben. Ob du dich für einen starken Kopfhörer, ein Stereo-Pärchen oder ein Surroundsound-System entscheidest, liegt letztendlich in deiner Entscheidung. Wichtig ist jedoch, dass es wenig Sinn macht, eine teure Soundkarte mit einem günstigen Soundsystem zu verwenden. Umgekehrt verhält es sich aber genauso, ein günstiger Onboard-Sound wird mit einem 1000 Euro teuren Soundsystem schnell überfordert sein. Kaufst du dir eine starke Soundkarte wie die Asus Essence STX II für 300 Euro, wählst aber gleichermaßen eine Anlage von Logitech für den gleichen Preis, wirst du kaum einen Unterschied zu einer günstigeren Soundkarte feststellen können.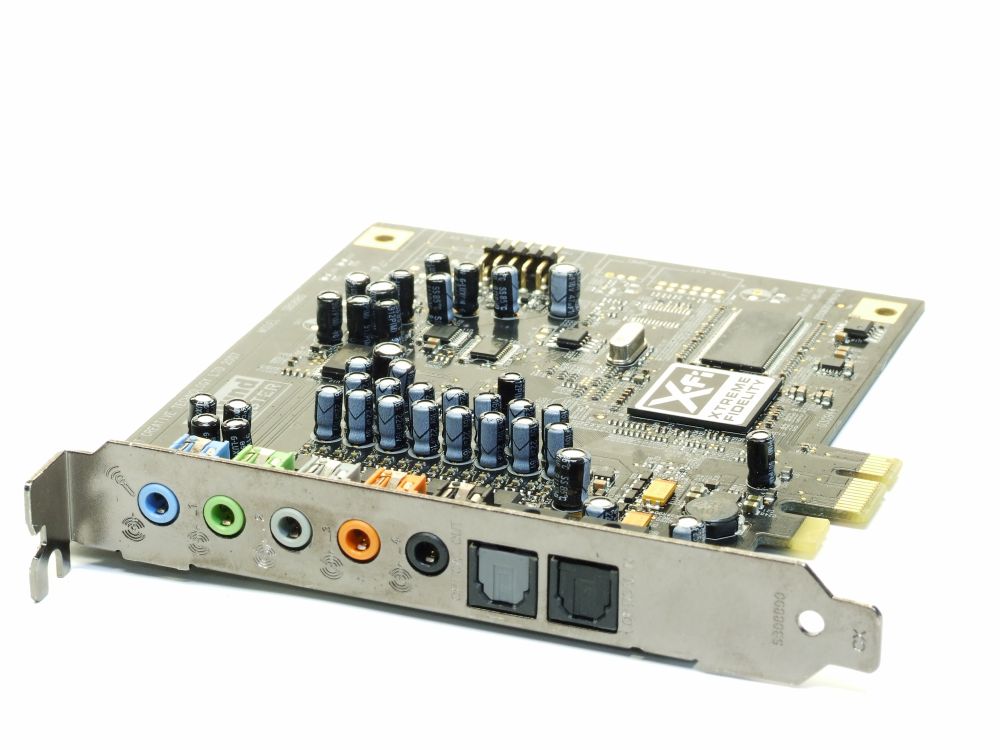 Hier limitiert letztendlich das System sowie die Technik, wobei gute Soundkarten noch den Vorteil bieten, dass sie die einzelnen Lautsprecher präziser ansteuern können.
Wichtig: Deine neue Soundkarte sollte stets mit der Hochwertigkeit deines Soundsystems skalieren. Besonders entscheidend ist dies bei Kopfhörern jenseits der 250 Ohm-Grenze, denn hier ist eine starke und zuverlässige Soundkarte Pflicht.
Gaming-Headsets und Kopfhörer
Nahezu jeder Spieler verwendet für seine Kommunikation mit Freunden oder Mitspielern ein Gaming-Headset. Hierbei handelt es sich um Kopfhörer mit integriertem Mikrofon, sodass du deinen Sound auf den Ohren hast und gleichzeitig mit deinen Mitmenschen kommunizieren kannst. Zahlreiche Gaming Headsets, die per USB-angeschlossen werden, profitieren nicht von einer separaten Soundkarte, da sie selbst einen eigenen Soundchip mitbringen. Ansonsten wäre die Soundübertragung vom USB-Port auf den Kopfhörer nicht möglich. Anders verhält es sich bei Modellen, die per 3,5mm-Klinke-Anschluss verbunden werden. Allerdings handelt es sich bei 98% aller Gaming-Headsets eher um mittelmäßige Kopfhörer, sodass der Sound hierbei kaum beeinflusst wird. Fast alle Onboard-Soundchips reichen für die meisten Gaming-Headsets auf dem Markt. Nur wenige Modelle, wie beispielsweise das Beyerdynamic MMX300, profitieren von einer besseren Soundkarte, da sie selbst hochwertige Lautsprecher mitbringen.
Wichtig: Viele USB-Headsets liefern dir ihre eigene Software, in der du dein Gaming-Headset steuern kannst. Nutzt du solch ein Headset, brauchst du die interne Software deiner Soundkarte nicht mehr bedienen, da die Schnittstellen nicht miteinander kommunizieren können.
Auch das Gaming-Mikrofon profitiert
Streamen und das Aufnehmen von Let´s Plays ist in aller Munde. Fast jeder Gamer möchte so sein wie Gronkh, MontanaBlack oder Shlorox. Damit das funktioniert, musst du in deinem Gameplay aber auch gut zu verstehen sein. Teilst du dein Gameplay per Livestreaming oder Video mit der ganzen Welt, bist sehr gut, aber dafür schlecht zu verstehen, wird der Erfolg immer ausbleiben. Eine gute Soundkarte kann hierbei weiterhelfen, denn sie sorgt für eine bessere Qualität. Mittels einiger nützlicher Funktionen, wie der Rauschunterdrückung deines Mikros oder der Verstärkung der Lautstärke, kannst du noch einmal erheblich mehr aus deiner Stimme herausholen. Das funktioniert allerdings nur mit Mikrofonen, die du an einen 3,5mm-Klinke-Port anschließen kannst. Wie schon bei den Gaming-Headsets, profitiert ein USB- oder ein XLR-Mikrofon davon nicht.
Tipp: Manche XLR-Mikrofone kannst du mithilfe eines Adapters zu einem 3,5mm-Klinke-Mikro machen und an deine Soundkarte anschließen. Damit umgehst du die Investition in ein teures Mischpult und kannst stattdessen deine Soundkarte verwenden.
Die Alternative: A/V-Receiver am PC
Nur wenige PC-Spieler oder Anwender wissen es, denn eigentlich ist der A/V-Receiver dem Heimkino vorbehalten. Aber tatsächlich hast du die Möglichkeit, anstatt einer internen oder externen Soundkarte auch einen klassischen HiFi-Verstärker zu nutzen.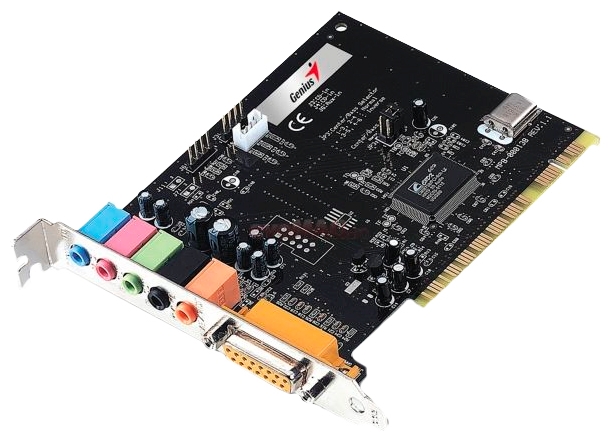 Über den HDMI-Port am Receiver und deiner Grafikkarte kannst du einen Verstärker zwischenschalten, der deine Soundverteilung übernehmen kann. Das sorgt dafür, dass du nicht nur mehrere Soundsysteme und Kopfhörer, sondern auch mehrere Quellen an deinem PC-Monitor nutzen kannst. Planst du die Nutzung eines hochwertigen Kopfhörers, kannst du diesen an den 6,3mm-Klinke-Anschluss am A/V-Receiver selbst nutzen. Bist du sehr audiophil und hast genug Platz auf dem Tisch, ist diese Möglichkeit die Beste für dich. Ein Receiver ermöglicht es dir deinen ingame-Sound über das teuerste und beste Surroundsound-System zu hören, das du finden kannst. Sogar Dolby Atmos, bei dem über 100 Lautsprecher zum Einsatz kommen können, ist mit diesem Aufbau denkbar. Der einzige Nachteil ist der hohe Kostenaufwand, denn während du eine gute Soundkarte schon für rund 100 Euro erwerben kannst, kostet ein guter A/V-Receiver mindestens 400 bis 500 Euro.
Die besten Soundkarten auf dem Markt
Creative Sound Blaster Z Soundkarte
( Rezensionen)
Besonderheiten
- günstig im Preis
- 116 dB Rauschabstand
- PCI-express Schnittstelle
- besonders reiner Klang
- Kopfhörer und Lautsprecher einfach gewechselt
Eine wirklich gute Soundkarte spielt nicht nur beim Gaming eine wichtige Rolle. Wenn du den minderwertigen OnBoard Sound auf deinem Mainboard leid bist, kannst du dich für die Creative Sound Blaster Z entscheiden. Sie ist mit einem professionellen Soundprozessor ausgestattet und bietet einen angenehmen Klang. Gleichzeitig wird deine CPU entlastet, sodass sie mehr Performance bieten kann. Angeschlossen wird das System einfach über PCI-Express. Die Karte Dolby Digital Live und das DTS Connect eignen sich als Surroundsound-System.
€
inkl 19% MwSt
Die Sound BlasterX AE-5 Karte
( Rezensionen)
Besonderheiten
- für Hi-Fi- Kopfhörer
- bis 600 Ohm
- 122 dB Dynamik
- inklusive Software
- schnell installiert
Diese Soundkarte kommt vor allem im Gaming Bereich zum Einsatz. Sie ist für einen verhältnismäßig günstigen Preis zu haben und besticht schon optisch mit der RGB Beleuchtung. Darüber hinaus gibt es einen Kopfhörerverstärker bis zu 600 Ohm, sodass Hi-Fi Kopfhörer problemlos an das System angeschlossen werden können. Somit tauchst du noch tiefer in das Spielgeschehen ein und lässt dich von nichts mehr ablenken. Im Vergleich zu einem externen Kopfhörerverstärker ist das ein recht gutes Angebot, wie die Kunden berichten.
€
inkl 19% MwSt
Die umfangreiche Sound Blaster X G6 7.1
( Rezensionen)
Besonderheiten
- lässt sich per USB ansteuern
- ohne Einbau nutzbar
- Soundkarte und Kopfhörerverstärker
- Nutzbar mit PC, Konsole und Handhelds
- Kopfhörer bis 600 Ohm
Bei einigen Gaming PCs gibt es einfach keinen freien PCI-Express Steckplatz mehr. Das heißt, es kann keine Soundkarte angeschlossen werden. Für diesen Fall ist eine externe Soundkarte wichtig, wie beispielsweise die Sound Blaster X G6 7. 1. Sie dient auch als externer Kopfhörerverstärker, sodass du hier problemlos dein Headset anschließen kannst und den vollen Klang genießt. Manche Einsteiger trauen sich aber auch den Einbau einer Soundkarte nicht zu, sodass sie lieber auf den USB Anschluss zurückgreifen. Profis sehen das etwas anders. Rein technisch hat nämlich eine externe Soundkarte nicht gerade den gleichen Stand, wie ein eingebautes Modell.
129,99 €
inkl 19% MwSt
Die professionelle Asus Essence STX II 7.1
( Rezensionen)
Besonderheiten
- einfach zu installieren
- viele Anschlüsse
- unterstützt das Heimkino
- 124 dB Signal-Rausch-Abstand
- großer Lieferumfang
Diese Soundkarte gehört wirklich mit zur Königsklasse. Sowohl Gamer als auch Klangliebhaber werden sich über dieses Modell sehr freuen und den guten Sound sofort unterscheiden können. Hast du beispielsweise einen kleinen PC an deinen Fernseher angeschlossen, so brauchst du kaum noch einen A/V-Receiver. Die verschiedenen Anschlüsse, die 7.1 Platine für mehrere Kanäle und die insgesamt moderne Technik lassen aus deinem kleinen PC eine wahre Hi-Fi-Zentrale werden. Dabei kann die Soundkarte mit und ohne diese Platine bestellt werden.
€
inkl 19% MwSt
90,000 Testing of the sound card using the Rightmark Audio Analyzer program according to the parameters
Contents 9000
References
Purpose of the work
To get acquainted with the state of sound cards at the moment, the structure of the sound card, the main parameters characterizing the quality of the sound processed by these cards. Based on the acquired skills, choose a program for testing, describe the methodology for testing sound cards. Test the test sound card according to this method.
Selecting a program for testing sound cards
At the moment, the software market offers a huge range of software tools that allow you to test various parameters of sound cards. The table below describes the most common programs in order to select the testing software for this particular case.
NameVersionFeaturesMeasured parametersDistributionWhere to downloadRMAA (RightMark Audio Analyzer)6.23Testing is carried out by reproducing and recording test signals that have passed through the studied audio path. The user can view and save the test results. For those who are not familiar with the measured technical parameters, the program gives a conditional verbal assessment on the following scale: «bad», «average», «good», «very good», «excellent». frequency response , Noise Level, Dynamic Range, THD, Intermodulation Distortion, Channel Interpenetration free0003
Total Harmonic Distortion (THD). It is equal to the square root of the ratio of the sum of the powers of all harmonics, except for the fundamental, to the power of the fundamental oscillation. According to established practice, a signal with a frequency of 1 kHz of maximum amplitude is applied. Characterizes non-linearity and usually strongly depends on frequency. Measured in percentage. For digital technology, when a digital signal goes beyond the bit depth of the digital grid (for example, with high positions of the volume controls in the mixer or incorrect algorithms), an abrupt increase in the THD value is characteristic.
Signal to Noise Ratio (SNR). Indicates the excess of the output signal amplitude over the RMS value of the noise power. It is calculated by subtracting the mentioned values in decibels, therefore it is a dimensional value. Very relevant for analog devices and ADC / DAC. Since the level of human exposure to noise depends on the spectrum of the noise itself, a standard A-weighting grid is used to account for subjective perception (and sometimes for marketing purposes). In this case, A-weighting should be indicated next to the parameter. Digital noise does not follow the law of geometric addition like analog noise does.
To evaluate noise and distortion together, the noise-adjusted total harmonic distortion (THD+N) is also measured. It combines the values of the two parameters described above.
The real signal includes frequencies that differ by an order of magnitude from each other in value. Due to the non-linearity of the audio path, parasitic modulation harmonics can form, making the sound unnatural and unpleasant. To take into account such an influence, the intermodulation coefficient (InterModulation Distortion, IMD) is introduced.
AFC, or amplitude-frequency characteristic (AFC, amplitude-frequency characteristic). It is a plot in terms of amplitude versus frequency, built by measuring the amplitude at the output of the system when applying a harmonic signal, usually a «floating» sine (swept sine) with a constant amplitude. Ideally, this graph should be a straight line. Allows you to judge how correctly the signal amplitude is transmitted at different frequencies of the spectrum. If necessary, it is adjusted by a multi-band equalizer. Unfortunately, analog equalizers introduce much more annoying phase distortion than frequency equalizers.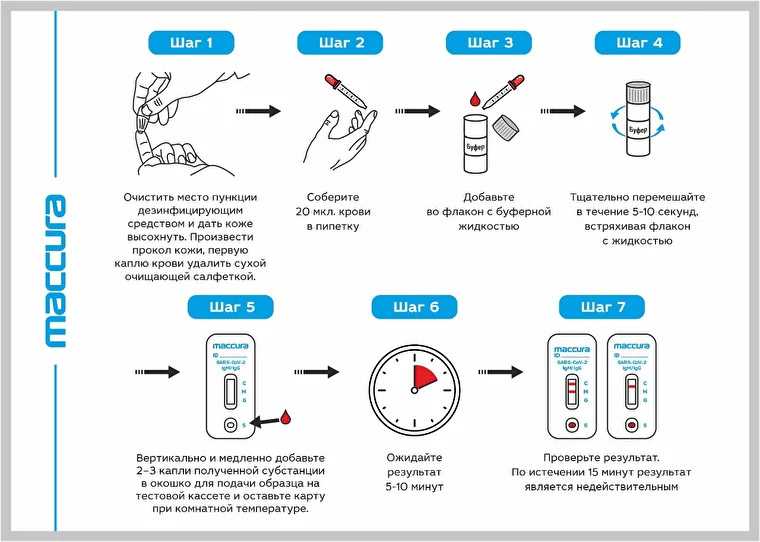
Quantization noise power during digitization can be reduced by several dB due to oversampling and subsequent filtering of inaudible frequencies, which is widely used in codecs and DACs. This is mentioned to explain the technological necessity of installing a high-order filter (which means a decrease in the frequency response at high frequencies). However, it is difficult to create an ideal filter (both cheap and effective), so developers often «climb» even into the audible region of the spectrum. The impact of this kind of engineering decisions on the sound quality must be evaluated in each case very carefully
Test procedure
Program start.
Select the menu item Start -> Programs-> RightMark-> RightMark Audio Analyzer 6.2.3
Then the main program window will open.
Setting test parameters
Generalresulting WAV files — saving a file with results. Used for debugging and detailed analysis of results in third-party programs. Must be off. noise and distortion only in 20 Hz — 20 kHz range — turn on the audio range filter, similar to the standard AES17. It is used to obtain results comparable with the passport data of the tested products. Must be enabled.amplitude of test signals before analysis — auto normalization of results by amplitude. It is used for comparability of measurement results of devices with different signal levels. Most important when testing AC’97/HDA codecs and MP3 players. Must be enabled.cardWDM drivers — WDM driver model is used in modern operating systems. Must be enabled. mode — mono mode. Removes the second graph from the spectrum, which can be useful when testing acoustics. Must be off. tone and sync tone frequency — select a test tone for adjusting the signal level. A useful option when performing a speaker test. The default is 1000 Hz.spectrum windows — this setting reduces the size of the spectra windows. Useful for screens with a small diagonal.
Must be off. full frequency range (up to Fs/2) — display the full frequency range, up to half the sample rate. Affects the generation of HTML reports. Must be enabled. only tops of spectrum on comparison graphs — plotting only the maximum values for the displayed spectrum points. The option allows you to better see the relative position of the spectra when comparing. Must be enabled. spectrum graph colors (for printing) — changes the background color from black to white, for printing on a printer or for printing. Must be enabled. line width — width of lines on charts.
Color slot # — selection of the chart color from the palette.
Tested characteristics. All must be selectedresponse (multitone) — frequency rangelevel — noise levelrange — dynamic rangeharmonic distortion (THD) — harmonic distortiondistortion (IMD) + Noise — intermodulation distortion + noisecrosstalk — channel crosstalk + Noise (Swept frequensy) — intermodulation distortion + noiseresponse (swept sine ) — frequency rangeharmonic distortion (set of tones) — harmonic distortion
Modes button — starts a test to check whether drivers support all possible sampling modes.
Ping — checking the current mode support. Mode support does not always mean correct operation in this mode. /recording devices
Must be selected: [MME] HD Audio rear output 2 and [MME] HD Audio rear input
Depending on the test being performed, the appropriate bit and sample rate parameters must be selected
Setting the recording and playback levels
Before starting testing, the program offers to adjust the recording and playback levels
It is clear that the recording and playback levels greatly affect the level of noise and distortion in the circuit under test. Therefore, before testing, it is desirable to adjust the levels so that the test results are the best. You can test several times and adjust the levels to achieve the best results.
Consider the most typical level setting when testing a complete circuit (DAC + ADC) of a sound card, when the «line out» output is connected to the «line in» input.
Only the «wave out» and «master» outputs must be enabled for playback in the sound card mixer.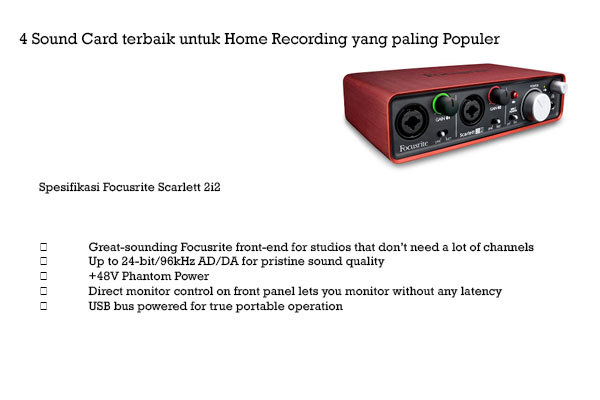 Only the «line in» input should be enabled for recording. For the most accurate results, turn off all equalizers, 3D effects, etc.
Levels «wave out» on playback and «line in» on recording should preferably be set to default positions. These are usually middle to high positions. Launch the RMAA program, select the required devices for playback and recording in the sound card settings, and enter the level setting mode (button).
Sound card level adjustment starts. In this case, a signal with an amplitude of -1 dB will be passed through the circuit under test. Adjust the record and playback levels in the mixer (exact match is not required, a difference of 1 or 2 dB is perfectly acceptable). It is recommended that you first try to adjust the levels with just one knob: the «master». If this fails, then you can also move the «wave out» and «line in» controls. When adjusting, it is necessary to ensure that there are no non-linear distortions in the spectrum of the input signal, the displayed spectrum window. Select the required test types in the main program window and click the «RUN TESTS!» button. After testing is completed, you can view the results in the «Test results» window or run tests that have not yet been run.
Testing
The following control buttons are used to perform tests:
playback/record — Testing the complete sound card circuit (the sum of recording and playback distortions)
This test does not require additional equipment. The only requirement is the ability of the tested sound card to work in duplex mode. For testing, you need to connect the output of the tested sound card (for example, «line out» or «spk out») to its input (for example, «line in»). The disadvantage of this test is that it is impossible to determine exactly by the result whether certain fixed interferences belong to the output or to the input of the sound card.
playback only — Testing the output (playback) of a sound card
For this test, you need to have a high-quality reference sound card that will be used for recording. Before testing, the output of the tested sound card is connected to the input of the reference one. RMAA reproduces the test signal through the output of the tested sound card and analyzes the result recorded through the input of the reference card. It is assumed that the reference card introduces practically no additional distortions into the signal (compared to the output of the tested card).
recording only — Testing the input (recording) of the sound card
For this test, you also need to have a high-quality reference card that will play test signals. The output of the reference card is connected to the input of the card under test. RMAA reproduces the test signal through the output of the reference card and analyzes the result recorded through the input of the card under test. This assumes that the reference card outputs a virtually undistorted signal (compared to the input distortion level of the card under test).
wav-file generation
wav-file analysis
spectrum analyzer
open sav/sac/mdf file
Pressing the corresponding button performs automatic testing. The speakers can hear sounds of different tonalities.
View result
When the automatic test is completed, information about the results is displayed. The «Test results» window contains information about all tests performed
The window is divided into 4 slots (4 vertical columns), each of which can contain the results of one set of tests. Thus, it is possible to simultaneously load the test results of four devices or four device modes, including the test files themselves generated by the program.
For each test, a short numerical result is displayed in the window. A more detailed report of the test results can be obtained by right-clicking on the numerical result.
The vertical row of buttons to the right of the numerical results allows you to view the spectrum graph for the corresponding test. The «Select» buttons below the slots allow you to select multiple slots to compare results.
The open and save file buttons allow you to load or save the result set to a SAV file for later viewing. The SAV file saves all report details and spectrum graphs.
The HTML report generation button allows you to generate an HTML file with test results or with comparison of results from several slots. The HTML report includes all detailed reports and graphs.
Spectrum window
Controls:
— zoom in
zoom out
Toolbar controls:
Graph anti-aliasing. Eliminates the aliasing effect on the screen.
Swap charts — draws the right channel in the background and the left channel in the foreground
Display settings setting.
Saving the graph in a graphic file on the disk.: Log/Linear/Mel — scale: logarithmic, linear, melodic files.
Pressing opens a standard WAV file selection dialog. It can be, for example, a generated and recorded non-standard signal that is not in the list of tests. Spectral analysis options:
Spectral analysis of the file is performed in blocks of size «FFT size», averaging the spectrum over the entire file. If you want to analyze the spectrum of only a part of the file, then it must be cut in an external audio editor and saved to a separate WAV file. Supports work with 16 and 32-bit WAV files and a wide range of sampling rates. size — FFT block size in samples. The number of frequency bands of the spectrum (bins) depends on this, i.e. detail of the frequency representation of the signal (important for signal analysis in the low-frequency region). The higher the FFT size, the longer the signal should be. The minimum time in seconds can be calculated using the formula FFTsize / Fs. — the width of one «frequency band» of the spectrum. For convenience, the frequency resolution is automatically calculated for the current sample rate. padding — padding the signal with zeros before taking the spectrum. Allows you to draw the spectrum a little more accurately (this leads, as it were, to interpolation of the spectrum in frequency). overlap — FFT window overlap in time (as a percentage of the window width).
More overlap results in slightly better spectrum averaging over time. window — the shape of the weight window. A trade-off between sidelobe suppression and peak expansion. window beta is a Kaiser window parameter that controls the degree of sidelobe suppression. If there are high peaks in the spectrum, you can increase to 13 — 15, if there are no high peaks, you can leave it alone or lower it to 5 — 7.
Test bench configuration
The system unit with the following specifications was used for testing:
Operating system: Microsoft Windows XP Professional Service Pack 3: AMI(American Megatrends Inc. (07/17/09))
Processor: DualCore AMD Athlon 64 X2, 3000 MHz (15 x 200) 6000+
Paging File: 1534
Memory: 1024
DirectX Version: 4.09.00.0904 (DirectX 9.0c)
0003
Sound VIA. Technologies Inc. HD Audio VT1705
Conclusions
In the course work, an experiment was conducted to test the sound card using the RightMark Audio Analyzer program for the parameters (Total Harmonic Distortion, THD), (Signal to Noise Ratio, SNR).
(AFC, amplitude-frequency characteristic) the results were recorded as HTML pages.
sound card distortion testing
References
Guk M.Yu. IBM PC hardware. Encyclopedia. 3rd ed., 2006
Petlin R. Petelin Yu., Sound studio in PC, BHV-St. Petersburg, 2nd edition, 2005
Tags:
Testing a sound card using the RightMark Audio Analyzer program by parameters
Coursework (theory)
Informatics, VT, telecommunications
Views: 31757
Find articles in Wikkipedia with the phrase: Testing a sound card using the RightMark Audio Analyzer program in terms of parameters
Review and testing of an external sound card Creative Sound Blaster GC7 — i2HARD
Alexey Lalitin
September 25, 2021
External USB sound card with headphone amplifier, combined with a functional control panel for all sound events in games.
Creative has released an external sound card designed for a mixing console. This product is primarily aimed at the gaming market.
The user is provided with convenient analog control of all sound processes using knobs, buttons, including customizable ones. Various inputs and outputs are supported, simultaneous playback of sound from two sources with their mutual adjustment.
It is possible to connect not only to a PC, but also to game consoles and mobile gadgets.
This device expands the possibilities of players not only due to its performance, but also due to the use of proprietary sound processing technologies.
Specifications
- Weight: 280 g;
- Dimensions: 47×114×173 mm;
- Dynamic range: 116 dB;
- Sound Processors: Super X-Fi Ultra DSP, SB-Axx1;
- Max. playback quality: DSP Mode: PCM 16 / 24-bit 48.0, 96.0kHz, 192 kHz, SPDIF Output: PCM 16 / 24-bit, 48.0 kHz;
- Recording resolution: SPDIF Input: 16 / 24-bit, 48.0, 96.0, 192 kHz;
- SPDIF passthrough: 16 / 24-bit, 48.0, 96.0, 192 kHz;
- Microphone input: 16 / 24-bit 48.
0, 96.0, 192.0 kHz;
- Optical input: 16 / 24-bit 48.0, 96.0, 192.0 kHz;
- Line-in: 16 / 24-bit 48.0, 96.0, 192.0 kHz;
- Interfaces: USB Type-C, 4×3.5 mm (line output, mobile input, microphone, headphone output), 2×SPDIF (input, output), Bluetooth;
- Headphone amplifier: 32-300 ohms;
- DAC: 125 dB (A-weighted), THD+N: ~0.0005%;
- ADC: 114 dB (A-weighted), THD+N: 0.0006%.
Packaging and contents
The external sound card comes in a cardboard box with a colored cover. On a blue background, there is a photo of the device, the name of the model, a description of the possibilities of connecting to various devices, and many icons of supported technologies.
More detailed descriptions are on the back of the package, here we also see the delivery kit and a photo of the interface panel.
The connection description with illustrations is on the inside cover, it is also available on the manufacturer’s website in PDF format.
The sound card is fixed in a box in foam form, pressed on top with an insert with an illustration and description of the controls.
The kit includes paper instructions and three cables:
- AUX with two gold-plated 3.5 mm 4-pin jacks;
- USB-A to USB Type-C;
- Optical cable.
Appearance
The Sound Blaster GC7 sound card is assembled in a prismatic case made of black matte plastic. The corners on the end faces are rounded.
There are controls on the top panel, due to them the sound card looks like a mixing console.
Along the edges are two cylindrical circular analog controls: on the left is the volume, on the right is the GameVoice Mix for adjusting the balance between the two audio inputs. The regulators have an illuminated position mark, the rotation is smooth, with end positions.
In the center is another universal analog regulator. It adjusts the parameter selected by the buttons located around the perimeter of the central LCD screen, which will display the volume figures. This regulator rotates with precise cutoffs.
There are buttons for setting treble, bass, microphone and two modes: virtual surround sound and SXFI mode.
The SXFI (Super X-Fi) button has four modes:
- green backlight – mode on;
- blue — Battle Mode;
- orange — the mode is off;
- flashing red — SXFI profile download via Bluetooth from smartphone.
On the bottom edge are four customizable buttons with RGB backlighting along the contour: C1-C4.
To the right is the microphone on/off button with a red backlit indicator.
There are four white indicators on the front panel along the left edge: three indicate the connection source, the fourth — Dolby Audio Decoder.
On the right side are two 3. 5 mm jacks: a microphone and headphones.
On the rear panel, in addition to the connection interfaces, there are several more switches.
From right to left: power button, connected devices switch, USB Type-C port, optical output, optical input, headphone gain switch, line-in and line-out.
The connected devices switch has three positions:
- PC — connection to a PC or laptop, while the sound will be input via USB connection.
- Console — the sound will be output from game consoles via an optical cable or via an AUX cable connected to the line-in, the sound card will also be powered via USB.
- Mobile — audio connection via the AUX line input or via the USB-C output of the gadget, in the first case, the power must also be connected via USB to the mains charger.
There are two legs on the bottom of the case for the entire length of the case, the front one is lower than the back one, due to this the case stands at a slight slope.
Rubber pads are glued on the legs, under them at the corners there are holes for screws.
Circuitry
Inside the case there is a board with soldered interfaces, buttons and controls.
On the front side, we see two sound processors: X-Fi Ultra DSP CUDSP600-B0W8NBC, which supports SXFI holographic sound technology, and a quad-core SB-Axx1 SBXA3E3 N83NHZ, which is responsible for multi-channel virtual sound.
Next to them is the XT25F64B-S chip — this is a 64-bit flash memory.
On the other side of the board is the N52810 chip, which is responsible for connecting the device via Bluetooth LE (low energy consumption).
A two-channel ADC Cirrcus Logic CS5381, 120 dB, 24-bit, 192 kHz, is soldered near the analog input, it also performs digital filtering and provides noise suppression.
The output amplifier is also located here: four JFET single-channel TL08 operational amplifiers.
Nearby is the AKM4377 DAC, this is a chip from the Japanese company Asahi Kasei Microdevices based on a 32-bit architecture. The converter supports PCM signal sampling rates up to 768 kHz, and DSD up to DSD256 (4xDSD), THD + N is brought here to the level of -107 dB, and the signal-to-noise ratio (SNR) is up to 125 dB. It has a built-in headphone amplifier, the output power is 60mW into 16 ohms.
Another two-channel ADC is designed for a microphone — Cirrcus Logic CS5345, 104 dB, 24-bit, 192 kHz. Includes a 32dB mic preamp. Near it is the only smoothing capacitor in the circuit and one operational amplifier TL08.
On the reverse side of the board there is only one microcircuit — a 32-bit ARM controller STM32F072 with 128 KB flash memory.
This controller provides communication via USB, is equipped with an ADC and a two-channel DAC. He also manages interfaces and I / O ports.
Software
To programmatically control the device, there is a Creative App utility. Immediately after installation and connection, it was proposed to update the firmware of the device.
The utility automatically detects the connected device.
On the main tab «Device» several widgets:
Sound Mode — separate headphone and speaker level settings in all Acoustic Engine modes and EQ. All changes can be saved as a new mode. There are also pre-installed modes, including various game projects.
Acoustic Engine — enable or disable the modes of special sound enhancers and change the levels in each.
Equalizer — 10 tuning bands, separate bass and treble, and a preamp. For the equalizer, there are presets in the form of an extensive list.
Crystal Voice — Microphone settings, background noise reduction, smart volume control, voice transformation with selected presets and microphone equalizer.
Scout Mode is a game mode that emphasizes high and mid frequencies to emphasize footstep sounds, reloading and other nuances in shooters. It is possible to assign hotkeys, but this is not relevant with this card.
Decoder — Sound in Dolby Digital is balanced between quiet and loud fragments in three levels.
Mixer – volume control for all interfaces. Optical output is also configurable — audio pass through or mix for line out and headphone jack.
Super X-Fi — launch of an external application SXFI App, which is responsible for the holographic technology that adjusts the sound to the shape of the user’s ears depending on the headphones used. We considered this technology and its settings in more detail in the article “Overview of the Creative SXFI Amp Headphone Amplifier”.
User Buttons — on this tab we can configure buttons C1-C4. You can assign device functions: sound modes (sequential switching between three pre-selected modes), enable Scout Mode, turn on the microphone, switch outputs (speakers, headphones, speakers with headphones) or system functions: media control (pause, switch tracks), navigation (launch the selected application or file), text and emoji (insert), pressing (assign an action to a button or keyboard combination).
Also, for each of the four buttons, you can choose your own RGB color, to turn off the backlight completely, you need to select black.
The second tab is responsible for playback — sampling settings for each output, setting audio effects, enabling virtual surround sound.
Entry – sampling setting for all inputs.
Settings tab — firmware update, autorun settings, switching between dark and light theme.
In the lower left corner, some functions are duplicated for quick change: output switching, output and input volume levels.
There is a mobile version of the application of the same name, it is it that connects to the device via Bluetooth LE. All features of the utility are identical and allow you to control the device remotely.
Testing
Test system:
- Motherboard: ASRock X570 Extreme 4;
- Processor: AMD Ryzen 7 3700X;
- RAM: Kingston HyperX FURY Black [HX426C16FB3K4/32];
- Drive: Goodram IRDM Ultimate X NVMe PCIe Gen 4×4 500 GB;
- Operating system: Windows 11 Pro 64-bit, version 21h3.
RMAA tests
The sound characteristics of the audio card were measured using Right Mark Audio Analyzer 6.4.5. The default settings, only the «one recording channel» or «two» mode was changed. The tests were run several times at different volume and recording settings.
The highest quality test signal of 1 kHz was obtained at an output volume level in the range of 20-25%, recording — 80%. On average at -120 dB and with the least interference. At higher volumes, noise and distortion increased by 10-20 dB or more.
The best performance was obtained in 24-bit 96 kHz mode. Overall rating — «Very good». On three counts, the map was rated «Excellent». A bad score for channel interpenetration does not need to be taken into account, the test was in mono mode.
Graphs received
The frequency response is uniform, at high frequencies the decline after 20 kHz. At low frequencies, the decline is no more than 0. 1 dB to 30 Hz. By ear, dips of less than 0.5 dB will simply be invisible.
The noise level and the coefficient of harmony are at a good level, it is slightly lower than the passport characteristics, but this is normal for measurements in such conditions.
Comparison of the operation of the card in different modes (16-bit 48 kHz, 24-bit 96 kHz, and 32-bit 192 kHz) showed almost identical results. The only thing is that there is a drop in the frequency response at low frequencies in the 16-bit 48 kHz mode.
In terms of noise and dynamics, the difference is insignificant.
Subjective assessment
Headphones of the same company were connected to the sound card: Creative SXFI Air C gaming headphones, Creative Aurvana Trio in-ear headphones, and Creative Aurvana Live! and Creative Aurvana SE.
Various musical compositions and a test disk «Multimedia FSQ» were listened to. The sound in games was evaluated on the example of the online shooter Warface and CS GO.
Creative Sound Blaster GC7 copes well with all musical genres, the sound is natural with excellent detail at all frequencies — this is enough for precise positioning in games even without the inclusion of special profiles. Almost all genres sound good, the dynamics are at a high level, there is no mess in rich compositions, everything is clear and detailed. Extraneous noise and interference are absent, there is no background noise when the sound is turned off.
In games, the inclusion of the Scout Mode profile produced very interesting effects: against the background of the sounds of battle, shots and explosions, details in the form of footsteps, reloading weapons, rustling, and movement were clearly distinguished. This allows you to better determine the direction of the sound in space, but at the same time, the volume in the sound is smoothed out and the distance is perceived worse.
The use of virtual multi-channel sound in games with active holographic settings in SXFI mode is also quite interesting, surround sound is clearly visible, the space is expanding.
With microphones, the sound card works at a good level, the recording is of high quality, without sound distortion, there are no extraneous noises. But here, first of all, everything depends on the quality of the microphone itself.
Operation
The idea of moving almost all sound control to an external remote control is not new, and in many cases it is really more convenient than software settings in the operating system environment.
This is especially true for games and streaming. To make changes, you do not need to minimize the game window and launch the sound control panel.
Also in the game itself, due to the GameVoice Mix control, we can change the sound balance between the two inputs.
If you connect a smartphone to the “mobile line in” input, and a headset to the microphone and headphones input, you can talk on the phone without leaving the game, simply by adjusting the volume level from two sources — lower the game sound and increase the sound from the smartphone, or vice versa.
The same input can be connected to a PC sound card and output sound from a player, for example, AIMP, through it. This will output game sounds via USB to the Sound Blaster GC7. With the help of a mixer, we can listen to both our favorite music and the game, amplifying the sound from the desired source at the right moments. In many game genres, the sound of the game is not so important.
To adjust the mutual balance of sound in the game and in the game chat, you need to have the chat not in the game itself, but through an additional application in which we also adjust the sound through the output on the PC codec connected to our sound card, as in the example above.
Another plus: in the game Warface it is impossible to switch the sound from the speakers to the headset by switching in the control panel. It will still be output through the speakers — the game must be restarted. There is no such problem with an external sound card — you press the button and the sound is already in the headset.
Although the Bluetooth interface is present, the sound is not transmitted through it. This connection is needed to control the device through a mobile application and to transfer an SXFI profile created in the mobile program of the same name from a smartphone.
The sound card can output sound to both speakers and headphones at the same time; this cannot be done with a conventional codec built into the PC motherboard.
Of the inconveniences, the lack of visual notification when changing modes on programmable buttons was manifested. If the button is assigned to change settings one by one, then it is not clear which mode is currently on, the color of the button does not change, and it is difficult to determine by ear. We think that it would be possible to attach a different color to each mode and it would change depending on the selected mode, because it’s not for nothing that the backlight on the RGB buttons.
Such a color change is provided only on the SXFI button, as we wrote about above.
There are restrictions on the use of the microphone. You cannot connect a USB microphone, and for a headset with a 3.5 mm combo plug, you will need a two-way splitter adapter.
Conclusion
We liked the Creative Sound Blaster GC7 external USB sound card and left a positive impression. Once you get used to using it, you become addicted to comfort. You don’t understand how you managed without such a convenient solution before, trying all the time to invent and use various “crutches”.
First of all, this is a gaming device. For serious work with sound, it will be of little interest, it does not have, like specialized sound cards, multi-channel outputs, additional inputs, analog interfaces are limited to 3.5 mm jacks. But for a gamer, when every nuance is important in the game and there is no time to be distracted, a convenient sound control panel at hand will be an important addition to other peripherals.
We see the price of this model as a little overpriced: the components underlying the circuitry are also found in more affordable sound cards, the plastic case does not look like a premium solution.
