‘Star Wars Jedi: Fallen Order’ Fan Puzzle Guide
Newsgeek
By
Andrew Whalen
Newsgeek
Star Wars Jedi: Fallen Order
After the Inquisitors sniff out Cal Kestis on the Imperial scrapyard planet of Bracca, the former Jedi Padawan joins up with a ship of rabblerousers determined to reunite the shattered Jedi Order. One of your first stops as Kestis in new game Star Wars Jedi: Fallen Order is the planet of Bogano, where Kestis hopes to find a wise Jedi who might be of help on the adventure ahead. While exploring the canyon platforms and trenches of Bogano, you’re likely come across a mysterious room with a golden orb in its center, cooled by spinning fans.
This early «Star Wars Jedi: Fallen Order» puzzle can drive you mad.
Lucasfilm / EA
Most tantalizing of all, across the fan room, perched on a high platform, is a chest, daring you to find a way up to it. Here’s how to solve the puzzle of the fan room and claim the treasure chest for yourself.
Yes, you too will one day make it to this chest.
Lucasfilm / EA
The room with the fans and the suspended golden orb is one of the earliest puzzles in Star Wars Jedi: Fallen Order where you can split off from the main pathway presented by the campaign and its objectives. Accessible via a narrow path of metal rebar, the fan room makes for an intriguing challenge early in the game—one you may find yourself determined to master. But here’s the simple truth: you can’t get that chest… yet.
You’ll need to return to the Bogdo Sinkholes after learning more Force powers.
Lucasfilm / EA
With its Metroidvania maps, Jedi: Fallen Order has many pathways, secrets and chests that will be unreachable until you’ve expanded your repertoire of Force powers, The room with the fans and the golden orb, however, looks more solvable than most impassable areas of Fallen Order. Part of the explanation is the wall of vines, which make it appear as if you should be able to jump over to the chest platform. But it’s also because there’s so many moving things to manipulate in the room. Once I learned to slow time with the Force (a prerequisite for gaining entry into the ancient sphere room), I tried everything: slowing the sphere, trying to slow each fan simultaneously or slowing fans in different sequences. But the ancient sphere simply isn’t part of the puzzle. Instead, you’ll need the ability to Force pull.
But there’s still one thing you can do in this room early on in the game: make it across the shallow waters to the Jedi worktables on the room’s far side, using your Force ability to slow time to halt the fan blades in your way. Here you’ll find research notes from a Jedi studying the sphere to gain Force Essence, which brings you one third closer to upgrading your Force meter.
The Jedi Eno Cordova is fascinated by the past.
Lucasfilm / EA
Anything beyond that discovery will have to wait for later in the game. Once you can Force pull, return to Bogano and make your way to the plateau adjacent to the room with the ancient sphere. If you’re coming from the sphere room, look for an opportunity to wall run and grab vines to climb up to the plateau. Across the way, you’ll see an inaccesible platform, which can be lowered with the help of a Force pull. Lower it.
The entrance to the ancient sphere room to the left and the pathway you’ll need to open on the right.
Lucasfilm / EA
Now you should be directly above the room with the fans and the ancient sphere. There are a handful of Bog rats and Splox up here, but nothing you can’t handle. From the far side of the plateau, you should be able to see a crane overgrown with moss. Use your Force pull to drag its dangling rope your way.
Use the Force to pull this rope your way.
Lucasfilm / EA
For a real combat challenge, use the rope to get to the plateau directly across, which is swarming with tongue-lashing Oggdos. But you’re here for the chest, right? For that, you’ll need to swing the rope out and back, then leap toward the fan blades and slow them in midair. Time it right, and you’ll find yourself on the platform. In the chest is a new paint job for the Mantis called Republic, with sexy red trim.
Your reward for finally solving the ancient sphere puzzle.
Lucasfilm / EA
You’ll also finally learn more about the sphere itself. «My Friend. I’ve unearthed a curious artifact,» the Jedi Eno Cordova will tell you. «An ancient sphere capable of storing and conducting massive amounts of energy. Whatever civilization crafted this must be the same that created the seemingly impenetrable structure nearby! I believe studying this sphere may yield the information I need to discover who they were and why they built such a landmark.»
Star Wars Jedi: Fallen Order is out now on Xbox One, PlayStation 4 and PC.
Request Reprint & Licensing, Submit Correction or view Editorial Guidelines
Star Wars Jedi Fallen Order walkthrough and guide
(Image credit: EA)
Having a Star Wars Jedi Fallen Order walkthrough to hand will help you navigate your way through the game, and this is basically essential due to the sheer size of it. There’s a huge galaxy out there, and thanks to the open world setting as you explore the various planets you’ll end up crossing them back and forth multiple times as you unlock fresh tools to help you progress further. The choice this affords you also means there are different routes that can be taken through early locations such as Bogano, Zeffo, Kashyyyk and Dathomir, and there are certain areas that give you no benefit until you have the right item for them. There’s definitely an optimal path you can follow for exploration, gear unlocks, and upgrades that will make life a lot easier.
This makes our Star Wars Jedi Fallen Order walkthrough useful, especially as it’s what we think is the optimal route through the game. However, in case you’ve already started, or want to go your own way, we’ve included all of the potential areas and paths, even if you can’t access them initially. If you can’t reach an area until you come back you’ll at least have learned where it is and what you need, so the decision is yours. These sections are marked in italics, and explain what’s needed before you can progress further down that path.
So, let’s start this Star Wars Jedi Fallen Order walkthrough and save the universe. Again.
Star Wars Jedi Fallen Order tips | Star Wars Jedi Fallen Order double bladed lightsaber | Star Wars Jedi Fallen Order length | Star Wars Jedi Fallen Order Stim locations | Star Wars Jedi Fallen Order Force Powers, abilities and upgrades | Star Wars Jedi Fallen Order Tomb Of Eilram ball puzzle | Star Wars Jedi Fallen Order Tomb of Miktrall lantern puzzle | Star wars Jedi Fallen Order Scomp link
Star Wars Jedi Fallen Order walkthrough — Bracca
(Image credit: EA)
The opening of Star Wars Jedi Fallen Order is a linear run through Bracca, the ship scrapping world Cal Kestus lives and works on. Follow the big guy, Prauf, to learn the basics of climbing and traversal. You’ll cover jumping, ropes slides and so on but other than that there’s not a lot to do here expect follow Prauf and watch the cutscenes.
Eventually Prauf will fall and you’ll have to use the Force to save him. This will alert the Imperial Inquisition who’ll interrupt your train ride home for a little galactic stop and search.
(Image credit: EA)
Once the cutscenes have played out you’ll have to fight your way through a train. Again, it’s a tunneled tutorial to that will teach you how to use your lightsaber, covering the basics of attacking, parrying and deflecting blaster bolts. You’ll also learn your Force Slow move to top a spinning wall so you can climb it.
(Image credit: EA)
Fight and climb your way through the carriages until a ship appears and starts shooting at you. You’ll have to sprint between the cargo in between bursts. Watch out for the narrow connection between rail cars as it’s easy to fall off. When you reach the next carriage you’ll have some more climbing to do and you’ll see a cutscene that introduces former Jedi Cere, flying alongside the train in the Mantis.
(Image credit: EA)
Continue along the train, climbing and fighting Stormtroopers as you go until Cere tries to rescue you from the Mantis. You’ll fall into a closed off area for a one on one with Second Sister. It’s an unwinable fight so just practise your blocking until the Mantis turns up.
(Image credit: EA)
You know have the Mantis as your base, as well as enabling you to access other planets as you unlock them, there’s a Bench you can use to customise your lightsaber as you find new parts, a Meditation Point to refill you life and level up, and a terrarium where you can grow collectible seeds you’ll find throughout the various worlds you visit.
(Image credit: EA)
Head into the main area and you’ll find a space guitar you can play where Cere will explain Force Echos. These are basically collectible audio diaries you can find in the world. Once that’s done you’ll go to your first planet, Bogano.
(Image credit: EA)
Star Wars Jedi Fallen Order walkthrough — Bogano, Fractured Plain
(Image credit: EA)
When you land on Bogano you’ll start in the Fractured Plain area and chat to Cere who will point out the giant Jedi temple in the distance you have to reach.
There’s an area immediately under the ship where you you can’t do anything until you unlock Force Push. If you use Force Push on the door you’ll gain a Bogling stowaway for the ship (keep an eye out for him hiding in vets and other places). The Ball puzzle is fiddly but you can use Force Push to get it up to the stone path and then use Force Slow to help you run around to the wall panel with a small pipe on and Force Push it along the concrete track, just as it’s about to touch the grass, so it rolls into the circular switch. The timing is fiddly so it’ll take a while.
As soon as you start exploring you’ll unlock a skill point so head forwards. You should see a path heading down towards to metal structure with red lights on. Look left to see a Meditation Spot you can use.
(Image credit: EA)
These Meditation Spots are basically your save points and you’ll always return to the last one you rested at, so get into the habit of using them as you progress to avoid having to go too far if you die. Resting will refill your health and Stim packs you have but also reset any enemies you’ve killed (yes, like Dark Souls).
(Image credit: EA)
Spend your point on an Overhead Slash attack and when you leave Meditation you’ll meet your new robot pal BD-1. He’ll unlock a gantry you can use to reacha Climbable Wall and at the top you’ll get a quick holomap tutorial.
Continue in the direction of the temple and you’ll see some platforms just below you that head to the right. Save the left turn for later as there’s more you can do once you have the Wall Run ability you’ll unlock shortly.
(Image credit: EA)
Follow the ledges right to a zipline which will take you down to a locked door and a Meditation Spot.
(Image credit: EA)
Star Wars Jedi Fallen Order walkthrough — frog monster Oggdo Boggdo
Head right and keep going along the pipe and you’ll find a room full of fans and another pipe to the right which will take you to an enclosed areas with a Legendary Beast Oggdo Boggdo, popularly called the frog monster, (one of four you can defeat to get a Legendary Beasts Trophy). Don’t go there just yet as you don’t have the skills or power to beat him. It’s best to come back later when you have a few more skills and power under your belt.
(Image credit: EA)
Instead head into the fan room using your Force Slow to stop the main fan. Use it again to stop the fans on the floor so you can get across to the other side where you can see a light on a desk. Interact with the light to gain 1 / 3 Force Essence — if you find three of these it’ll boost your maximum Force. You’ll also get a Force Echo about Jedi studying the Sphere in the room. There’s a switch behind you that will shut down all the fans to help you get back. There’s a Crate on a higher platform you won’t be able to reach until you have Force Pull to access it via a different area when the story brings you back here.
(Image credit: EA)
Star Wars Jedi Fallen Order walkthrough — Hermit’s Abode
Go back to the locked door with the Meditation Spot you zip lined to and you’ll see another pipe to the left that will take you around to a room called the Hermit’s Abode with some Bog Rats that will attack and damage BD-1 before you can kill them all. Look for a room on the right behind some vertical pipes with a glowing light inside, where you can find a Force Echo. Head out and use Force Slow to stop the fan and head in that room.
(Image credit: EA)
Go in and you’ll trigger a cutscene where you repair BD-1. Once it’s over, you’ll find a lightsaber customisation bench where all you can currently change is the blade colour.
When you leave this room BD-1 will slip through a gap and open a previously shut door you can now go through.
Inside is a panel you can open with the Overcharge ability when you have it which will open a hole in the floor where you’ll find a Crate with a Lightsaber Switch Eno Cordova.
(Image credit: EA)
Go up the Climbable Wall up to the next level and get electrocuted by the sparking electrical wires to trigger cutscene to unlock and teach you about Health Stims. Once through a small corridor you’ll see a pillar you can slash to release a rope Shortcut to the room below. Head left to find a chest with an Lightsaber Emitter Eno Cordova inside. You can head back down to attach it at the bench then use the rope to get back up. Head in the opposite direction from the chest, up the ramp and back outside where you’ll see a zipline in the direction of Temple.
(Image credit: EA)
Star Wars Jedi Fallen Order walkthrough — Great Divide
Use the zipline to reach the Great Divide. The the left you’ll see a rusty metal platform you can jump to but you’ll miss some stuff so instead look to the right where you’ll see Bog Rat below you that you can jump on and kill, and find a chest behind you containing a Poncho material Bogano Dawn.
(Image credit: EA)
Use the rope to cross the broken bridge to an area with a Meditation Spot, there’s a Force Echo in an alcove on the left to collect, then another zipline down to your right and kill the Bog Rat at the bottom.
(Image credit: EA)
Head around the corner and you find more Bog Rats and a toad like Oggdo. Kill the Bog Rats and then lead the Oggdo away so you can get to the Climbable Wall it’s guarding.
(Image credit: EA)
Star Wars Jedi Fallen Order walkthrough — Subterranean Refuge
If you have Force push you can also turn left to find a bridge you can push over to find a Scomp crate that requires a BD-1 Scomp link upgrade to open with a BD-1 Z’Gag wave skin inside. If you continue past the crate you’ll reach the lower level of the Abandoned Workshop. There’s a crate in the water you should be able to see from the surface, and reach when you have the rebreather that contains the Lightsaber Emitter Valor and Wisdom. There’s another crate underwater at the back that contains the LIghtsaber Switch Valor and Wisdom. Swim across to the Climbable Wall and climb up to find a door you can Slice with the Scomp Link if you have it, to reach a new room with a Force Essence and a Bench that will give you Lightsaber Eno Cordova hilt if you interact with it.
Head out and continue up to reach a door you can now unlock to open a Shortcut to the starter area near the fan room. However, if you go back out the way you came and carry on past the Abandoned Workshop you’ll hit a mudslide. Look out for a rope you can jump up to catch which will let you reach a platform where you’ll find a Force Echo by a pile of bones, and another Force Echo in a room full of monsters. Kill them and continue through the room, up the ramp and you’ll rejoin the mudslide which lead you to a Climbable Wall that takes you back to the elevator tower.
(Image credit: EA)
Star Wars Jedi Fallen Order walkthrough — Bogano Terrarium Seed
Head up to find a Meditation Spot and the Subterranean Refuge. Drop down to kill the Bog Rats and you’ll find a plant you can scan to unlock a Terrarium Seed at the bottom most level to the right, climb back up a level and head through the corridor to the right under where you came in.
(Image credit: EA)
Star Wars Jedi Fallen Order walkthrough — wall run ability
Drop down into the new area and head to the end where you’ll reach a narrow blocked corridor and trigger a Flashback that will teach you the Wall Run ability, which you can then use to get out of this area and back to the Subterranean Refuge
Once you have the Wall Run, Force Pull and Jedi Leap you can Wall Run and Jedi Leap between the narrow walls to the top and Force Pull the rope to reach the top of the muddy slope and a Force Essence (you can just about do this with Force Pull and Wall Run alone, but it’s easier with Jedi Leap). Then you can Wall Run to the rope again and swing out into the main room to another rope you can Force Pull to swing and then Jedi Leap to reach a Wall Run to a ledge where you can grab a Life Essence.
Back in the Subterranean Refuge you can use the Wall Run to reach the previously inaccessible platform with the glowing spot on it by wall running around the back of the area with a Climbable Wall, jumping between several walls to reach a Force Echo. There’s another Force Echo at the top, on the right as you came in, that you can reach by wall running several times from the meditation point.
(Image credit: EA)
Once you have the Force Echo drop down to the area above the vines and get back to the Meditation Spot. Head out over the beam and turn right to Wall Run over along the metal plate, then again over the wall towards the elevator tower.
(Image credit: EA)
Before you drop down to the base of the elevator tower check left for a Crate with a Lightsaber Switch Valour and Wisdom 2 inside, then use the lift at the base of the metal tower (which is the bottom the rusty metal platform you saw earlier). At the top you’ll see a Zipline but ignore it and look behind you for a grassy path.
(Image credit: EA)
Take the left path go down, killing any monsters along the way and look for an old fire on the left for Force Echo. You can go back the way you came to get to the other path or use the Climbable Wall as a shortcut.
(Image credit: EA)
Head up and look for a way into the central part of the area. You’ll know when you’ve found it as a bog rat will ambush you. You’ll find a Climbable Wall inside the alcove you can use to climb up to find some monsters, a good view of the giant Binog, a Crate with a LIghtsaber Sleeve Valour and Wisdom 2 and a Scomp Crate you can’t open without a Scomp Link with the Lightsaber material Corundum inside.
(Image credit: EA)
Once you’ve collected everything zipline down and you can now take the left path that involves multiple Wall Runs. This will take you to the vault. Interact with the door to open it and head inside to scan the plate in the middle and activate a recording from Eno Cordov. He’ll tell you to search Zeffo for ancient tombs.
Head out slide down to where you’ll fight an Oggdo you can kill and scan it (or just run around) Take the long path from the temple to the right with the fossil at the end.
(Image credit: EA)
Drop down to the space on the left. There’s a door that opens from the other side you can’t do anything yet so Wall Run over to the painting and scan it to unlock the planet Dathomir as a destination. Open the door to make a shortcut to the starting area Meditation Spot.
(Image credit: EA)
Now you have the Wall Run you can use to to reach the Climbable Wall on the left. That will get you on top of a new area where you can drop down on the big Oggdo for a surprise attack (although it’s still worth waiting until you’re a higher level).
If you look to the side of the zip lines here when you have Jedi Leap you’ll see a crate containing the Lightsaber Material Neauranum and a tiny purple flower — the Terrarium Seed Featherfern — that you can now reach if you double jump from the rusted walk way stubs at the edge. If you have the Force Pull there’s a bridge you can bring down and cross. In the area that leads to you’ll find a three Oggdo to kill, guarding a Scomp crate containing the Lightsaber Material Lamina Steel, a rope you can Force Pull to swing between areas a small structure where you can climb up to the scaffolding supporting the rope a Scomp Crate with Poncho Material offshore (look for the ribs of the fossil you saw earlier sticking up). You can also use the rope to swing into the fan room from the outside, using Force Slow on the fan to get through. That will get you to the Crate you couldn’t reach before that contains the Mantis Paint Job Republic.
If you decide to take on the Oggdo by dropping down for the sneak attack, and defeat him, you’ll find a Life Essence and a Scomp Link Crate with the Poncho Material Sumi.
You then need to get back to the area above where if you dropped down where a zipline will take you back to the ship area. However, don’t go back to the ship straight away, instead turn right immediately after the zipline wall run combo and follow the path, past the Meditation Point and up the Climbable Wall. Keep around to the left until you reach the Amphitheater like area where can now access a new area with your Wall Run ability (there’s also a Force Echo in the trench under the walls you can run along).
(Image credit: EA)
Star Wars Jedi Fallen Order walkthrough — Stim location, Bogano
Drop down the hole in the middle of this near area to the upper level of the Subterranean Refuge and unlock a Health Stim Upgrade from a Yellow crate. If you have Force Push you can knock the block down to make a Shortcut back up. If you can get back up (or don’t drop down) you can go up the slope at the back, and drop into an area with a binog mural and a Crate with the Outfit material Pathfinder. From the create look for a tiny ledge below that will let you drop down back to the Subterranean Refuge entrance.
Whatever you end up doing, now’s the time to head back to the ship and prepare to move on.
Star Wars Jedi Fallen Order walkthrough — should you go to Zeffo or Dathomir first ?
At this point you’ll have two options to travel to: the planets Dathomir and Zeffo. The latter is technically where you’re meant to be going first. Dathomir on the other hand is tough at a low level and you can’t get past a certain point until you’ve upgraded a lot. However, you can unlock a double bladed Lightsaber here early and grab a few other useful, if nonessential things, so it’s worth taking a little detour. If you’re not bothered about upgrading your lightsaber early, it’ll happen later anyway so skip to Zeffo and comeback to Dathomir later.
Star Wars Jedi Fallen Order walkthrough — Dathomir
(Image credit: EA)
When you land on Dathomir you’ll want to take the right path down to the Climbable Wall and go right until you can climb up. You’ll see a monster peak over as you go but he won’t attack. Climb up and keep right, taking care with the toxic spiders that spit poison and splash caustic gunk when they die, as you scale the ledges and look for an alcove you can Wall Run in to reach a higher level.
(Image credit: EA)
Get up there and you’ll see a Climbable Wall on the right to take. At the top you can head right for another Wall Run to a Crate with the BD-1 skin Yavin Prime inside. Turn back and look for a 90 degree Wall Run that leads to a wooden platform.
(Image credit: EA)
Get up there and go into find a Force Echo then leave. When you come out look right for a branch you can use to reach a Wooden crane in the distance. Slash it with your lightsaber to release a Shortcut down to the original area you climbed up to.
(Image credit: EA)
Go around the corner and you should see a tall doorway ahead.
(As you head up check right for a hidden Scomp Crate containing the Lightsaber Emitter Magus you’ll be able to get once you have the Scomp Link. On the left you should see a path down to a locked door and an opening blocked by a wooden crate you can move if you have Force Push. If you have it then push the crate to get in and then keep pushing it through and out, so that it falls into the corridor below. Then you can push it towards the vine you can’t reach without the box and climb over to get a Life Essence.
(Image credit: EA)
Head through the big door to trigger a cutscene where you’ll meet the Night Sister and have to fight two Night Warriors. Defeat them and head out of the room where you’ll see two ropes you can swing across to find a Meditation Point. Stop on the first rope though and turn around you’ll see a Force Echo hidden in the wall above you can swing too.
(Image credit: EA)
Swing over to the Meditation Point and use it before heading up the stairs where you’ll be attacked by a Night Warrior and two archers. Once they’re all dead you’ll discover the door is locked so head around to the right where the archer was and go in that door. Be ready for an ambush as you go through. Deal with that and head up the stairs where another Night Brother will jump out, kill him and deal with the archer then check to the right where you’ll find a Crate with Mantis Paint Job Racer (if you com via this route later there’ll be another Night Brother ambush here).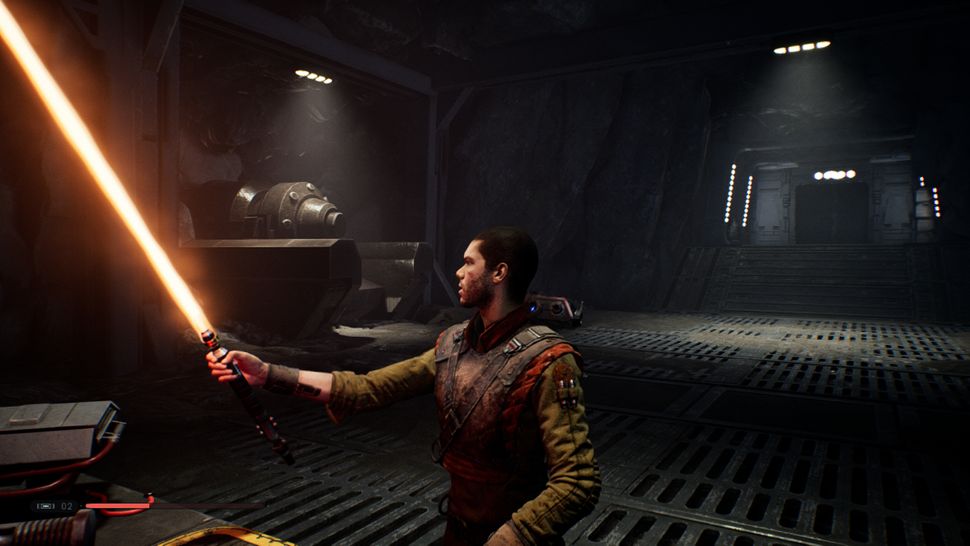
(Image credit: EA)
Head through the door on the left where you’ll find two archers on a ledge to deal with and a Wall Run you can use to reach a branch up there once you’ve dealt with them. Follow the path around and you’ll go past the locked door from earlier, below you on the right. Follow the path around and when it goes back inside you should be above a Night Brother and spider you can drop down on and attack.
When they’re dead look for a Crate which will contain the Lightsaber Switch Magus, then follow the passage out which will bring you to the otherside of the locked door you can now unlock for a shortcut. Head to the ledge which should look out over a bridge with a cloaked figure.
(Image credit: EA)
Star Wars Jedi Fallen Order walkthrough — Dathomir early double bladed lightsaber unlock
You can talk to the cloaked figure although you won’t get much out of him now (he’s a later thing) so drop down and head left to find a lightsaber Bench to gain a Double Bladed lightsaber and a new Lightsaber Sleeve magus then keep going through the tunnels killing the monsters and climb up at the end to find a Life Essence.
This is pretty much all you can do here for now so drop down to the Meditation Point and fight your way back to the ship so you can head to Zeffo.
- 1
Current page:
Star Wars Jedi Fallen Order walkthrough: Bracca and Bogano
Next Page Star Wars Jedi Fallen Order walkthrough: Zeffo pt1
Get the best gaming deals, reviews, product advice, competitions, unmissable gaming news and more!
Contact me with news and offers from other Future brandsReceive email from us on behalf of our trusted partners or sponsors
I’m GamesRadar’s Senior Guides Co-ordinator, which means I run GamesRadar’s guides and tips content. I also write reviews, previews and features, largely about horror, action adventure, FPS and open world games. I previously worked on Kotaku, and the Official PlayStation Magazine and website.
Walkthrough Star Wars Jedi: Fallen Order — Guide to the location of all the boxes and secrets on the planet Zeffo
In this guide we will show the location of all the boxes and secrets on the map of the planet Zeffo .
You won’t be able to get into every zone, find every chest and every secret during your first visits to the planets in the game. Exploration, leveling up, and backtracking with new skills are all part of the game’s design.
These guides are organized based on the order of obtaining the necessary skills necessary to gain access to certain locations of the planets. nine0005
The guide was updated on 12/15/2019: «Second visit to Zeffo» and «Final visit to Zeffo» were added.
First visit to Zeffo, part 1
Abandoned Village location map
There are three boxes in Abandoned Village . At this stage, two of them are available to you.
Drawer #1 — Guardian suit.
When you first arrive at this location, push forward until you are on the rooftops. The first chest is next to the door in the rock. Open it and get suit Guardian .
Crate #2 — Lightsaber Handle Duty and Resolve.
Go a little further along the rooftops in this location until you see two stormtroopers standing next to a short pipe. The box is on the right. Open it and you’ll find the Duty and Resolve Lightsaber Handle.
A map of the location of boxes and secrets in the Auger Pulverizers location. nine0004
There are three chests and one secret in this location. You can find all this right now.
Crate #1 — Lightsaber Switch Duty and Resolve.
The first crate is hard to miss. As soon as you enter Auger Pulverizers , look around the corner of the passage and see a crate. Inside is a lightsaber switch Duty and Resolve .
Crate #2 — Durasteel lightsaber material. nine0004
When passing through the rooms of location Auger Pulverizers , stop near the first of the moving blocks. Slow him down and quickly run through his shaft. A little further you will see a niche in which there is a box. Inside you will find lightsaber material Durasteel .
Crate #3 — Starfighter Mantis skin.
At the end of the location, where on the map you will be right above the Jedi temple, look up and see a box in which you will find a coloring for Mantis Starfighter .
Secret number 1 — life essence.
You can get to this secret now, but it’s still recommended to wait until the double jump becomes available to you. When you exit the moving block tunnel, look to your left and see some poles sticking out of the ground. Come closer and you will see another moving block. Slow down and jump on it, then slow down the next one. Run up and press jump at the very last moment to reach the surface. Then do the same again. It is recommended to use a double jump, since the distance between the blocks barely allows you to jump over with a normal jump. If you manage to get to the end, then you will get the life essence. nine0005
Map of chests and secrets in Derelict Hangar.
There are three crates and one secret in Derelict Hangar . All you need to get to everyone is the ability to run on the wall.
Case #1 — BD-1 Blue Leader coloring page.
Once you get off Praying Mantis onto Zeffo , go forward to a small abandoned hangar. There is a box there. Inside skin for BD-1 Blue Leader .
Crate #2 — Duty and Resolve lightsaber emitter.
In the hangar, go right and end up on the roof. Walk forward until you have to jump down and open the door. Keep walking forward through the door. Turn around and climb up the small overhang to find a crate and lightsaber emitter Duty and Resolve .
Drawer #3 — material for Bravo poncho. nine0004
Inside the hangar, next to Praying Mantis you will see a crate against the wall. Inside you will find material for poncho Bravo .
Secret No. 1 — Steam Pack.
From Mantis turn right. Follow the passage until you reach two skuzzz fighting next to a stormtrooper’s corpse. Then turn left. You will come across a few more tales. Look for a cave that leads to a ledge. Light up the darkness with your lightsaber, climb up the platforms to the left to find a yellow crate. There you will find an increase in the number of wearable steam packs. nine0005
Gusty Bluffs secret location map.
There is one secret in the location and you can get it as soon as you land on Zeffo .
The secret is the essence of life.
While jumping on the huge spinning fans, instead of eventually jumping down, take the available path to the right. Get past the next set of fans and you’ll enter a secret tunnel where the life essence is located. nine0005
Map showing the location of crates in the Turbine Facility location.
This location has one crate available to you from the start.
Crate #1 — lightsaber material Copper.
Turbine Facility is a small, dark location just outside of location Abandoned Village . Go left and onto the central platform. There is a box there. Inside is lightsaber material Copper .
Weathered Monument location map.
There are four drawers here, while only one is available to you.
Crate #1 — Lightsaber Handle Elemental Nature 2
When you encounter a stormtrooper with a rapid fire cannon, continue up the slope. There will be a large rock to your right and a pipe running under the canisters to your left. Go around the rock on the right and find a crate. Inside lightsaber hilt Elemental Nature 2 .
Map of the location of the boxes in the Windswept Ruins location.
There are two chests in this location, you can get to one of them.
Crate #1 — Duty and Resolve 2 lightsaber hilt.
Before you enter the tomb, look to the right and find a small cave. Inside is a box containing a lightsaber hilt Duty and Resolve 2 .
First visit to Zeffo, part 2 You will need a push to get upgrade BD-1 at Weathered Monument .
Map of the location of the boxes in the Abandoned Village location.
There are three boxes in the location. Now you can get to the last one. nine0005
Crate #3 — Durite lightsaber material.
Stay on the ground at this location and get to a large group of stormtroopers. Kill them and use a Force push to create a bridge leading to the chest. Hack it with BD-1 . Inside lightsaber material Durite .
Map of the location of the boxes in the Ancient Catacombs location.
There is one box here. You will be able to get to it after passing tomb Zeffo .
Box #1 — Charisma Mantis skin.
In Ancient Catacombs you will find one wind tunnel that throws straight up. Jump into the air and you’ll be taken straight to the crate where you’ll find the Charisma Praying Mantis coloring page.
Crash Site location map.
There are eight chests and one secret in this location. So far, you can only get to two crates. nine0005
Drawer #1 — Hyper Shell poncho material.
Swim to the island on the left. Climb onto the platforms and run along the wall — there will be a crate containing material for poncho Hyper Shell .
Drawer #2 — coloring for BD-1 Swoop.
Go under the rubble in the center of the location on the big island. There is a locked box next to the ledge. Hack it and get coloring for BD-1 Swoop .
Ice Caves location map.
There are four chests and one secret in this location. So far you can find four crates.
Crates #1 and #2 — Cerakote lightsaber material and BD-1 Bestine coloring.
The first two boxes are waiting for you at the end of the location. Follow the available path to unlock all the elevators and you’ll be next to a door with a meditation circle. There are two boxes here. Inside lightsaber material Cerakote and coloring for BD-1 Bestine .
Drawer #3 — Wayfarer poncho material.
In front of a large chasm, just below the meditation circle, you will find a small cave and a chest containing poncho material Wayfarer .
Drawer #4 — Arcetron lightsaber material.
Find two large rotating gear platforms and get over them. You will come across several stormtroopers guarding the elevator. Kill them and look to the right. At the edge of the ledge, you will see a locked box. Hack it and get lightsaber material Arcetron .
Map of the location of boxes and secrets in the Tomb of Eilram location.
There are three chests and one secret in this location. You have access to two boxes and both secrets.
Crate #1 — Silvian Iron lightsaber material.
Once you get a push of the Force at Tomb of Eilram push the blocks down the corridor, push the last of them in such a way as to climb up it into a small opening. There, open the chest to get lightsaber material Silvian Iron .
Drawer #2 — Outlander poncho material.
In the main area with raised platforms, slide down the ramp and jump onto the rope. Instead of jumping forward properly for further passage, turn left and jump over to another rope, further onto the platform. There you will see a box. Inside it is material for poncho Outlander .
Crate #3 — BD-1 Balmgrass skin.
When you try to get out of the tomb and solve the puzzle with the ball and air jet, you will see a platform next to Guardian , behind the lower (third) bowl for the ball. You need to be on this platform when it starts to rise.
First push the ball into the bowl. Then push the ball once, it will pop out of the bowl, and the platform will lower, but the ball will eventually return to its place. Use this time to climb onto the platform and when the ball is back in the bowl, the platform will take you up to a crate where you will find a coloring book for BD-1 Balmgrass .
Secret No. 1 — the essence of the Force.
During the passage of the tomb, you will find yourself in a square room with a ball and several air currents. With the help of the latter, force the ball to end up in a bowl in the center of the room. This will lower the floor and you will find Essence Power .
Secret No. 2 — the essence of the Force.
After you get a push of the Force, return to the long corridor where you will find Essence of Force inside a small cave that can be accessed by pushing a bomb into a weak spot in the wall.
Venator Wreckage secret location map.
There are four chests and three secrets in this location. You can get to one secret.
Secret #1 — life essence.
You can get to this location from location Crash Site . Follow the path on the left through the giant pipe. You won’t be able to go any further, but you will find a life essence. nine0005
The second visit to ZEFFO
after you get an upgrade for BD-1 , which allows you to enforce the terminals of the force in the tomb of Miktrulla and the ability to slide along stretched cables not only down, but also up, you will open up many new areas for research. Return to Zeffo for new crates and secrets.
Map of the location of secrets in the Broken wing location. nine0004
This location has one crate and one secret. Now you can get to the secret.
Secret #1 — Power Essence
Get to location Crash site , to the leftmost island on the map. Get into the room. There, use BD-1 to disable the barrier and squeeze through the gap.
Follow this path by turning the power on and off and cutting the cables to cut off the power. When you reach the end of location Broken wing , go up the elevator and find Force Essence .
Map of the location of secrets in the Crash site location.
There are eight boxes and one secret. Now you can find the secret.
Secret #1 — life essence.
At Crash site , find the crashed fighter jet to the right of the lake you enter when you enter the location. Further up the rope and with the help of BD-1 activate the moving blocks. Use the Force slow to climb up for Force Essence .
Map of the location of secrets in the Ice caves location.
There are four chests and one secret, which you can now obtain.
Secret No. 1 — steam pack.
You will need a double jump and a Force pull to get to this secret. If you can slide up the zipline, you can get to this secret in another way, which will be much easier. nine0005
From Imperial dig site.
At Imperial dig site , look for the meditation circle closest to Ice caves. Keep to the left and you will see a zipline leading to Ice Caves , but you can’t just jump on it. Instead, find a rope that can be pulled with the Force from the left side of the canyon.
Swing on a rope and jump into an updraft that will take you right up to the zip line. At the top, follow the path up and there will be a crate on your left with an extra stimpack. nine0005
Map of the location of the boxes in the Imperial Headquarters location.
There are two chests in this location. Both can be picked up now.
Drawer no. 1 — Serape poncho material.
Reach the giant landing pad. Turn left. Follow this path, opening all locked doors with BD-1 and using the force pull to cross the large chasm on the vine. When you reach a small island of land with a large building in the middle, go around it and find a crate containing poncho material Serape .
Crate #2 — Aurodium lightsaber material.
Turn left from the giant landing pad. When you reach the place where you need to jump up and slow down the spinning fan, stop. Instead of turning right towards the stormtroopers, turn left and pull up the raised bridge. Jump up and take the lightsaber material Aurodium from the box.
Map of chests and secrets in the Tomb of Miktrull location.
There are four chests and two secrets in this location. You can find everything.
Crate #1 lightsaber material Haysian smelt.
In the main room of the tomb — where the glass ball is hanging in the middle of the room, jump to the wall with many lamps. Go left and follow this path to a small alcove where you will find a crate and lightsaber material Haysian smelt .
Crate #2 — Mantis Zodiac drifter skin.
In front of the large ice slope, look across the chasm and see vines hanging from the ceiling. Pull them with the Force and fly to a small cave.
Defeat your enemies. Go back and pull the lamp with the Force. Aim higher — where there is a cutout in the form of a mouth in the wall. Throw the lamp into the mouth to clear your way. Go forward and you will see a box. Inside coloring book for Mantis Zodiac drifter .
Box #3 — coloring for Greezy money Mantis.
Closer to the starting point of the location is a long bridge with a broken door at the end and a Guardian nearby. Cross the bridge, kill the guard, use BD-1 to hack the crate and get the Mantis Greezy money skin.
Box #4 — coloring for BD-1 Sumi.
This is one of the trickiest crates in the game. Jump to the second floor of the main chamber of the tomb. Pull the lamp and hold it. Approach the ice slope. Hold the lamp and slide down the slope. Look up and to the left, you will see vegetation. Throw a lamp at her. Return to the main room, to where the vegetation previously blocked access to the crate. Hack it open and inside is the coloring for BD-1 Sumi .
Secret #1 — life essence.
On your way to the tomb, you will come to an area with movable stone blocks. Walk through this location as required by the game until you reach an exploding plant. Opposite him behind bars you will see a secret. Force push the plant towards the grate to access Life Essence .
Secret No. 2 — the essence of the Force. nine0004
On the lower floor of the main room of the tomb, to the right of the wall with lamps, there is a door. Take the lamp and go inside. Next, throw the lamp into the hole above the grate. Pull the rope by force and attach it to the column. Go further and take the lamp again. Throw it into the vegetation and climb up to the crate.
Final visit to Zeffo
0003 Zeffo .
Map of the location of the boxes in the Broken Wing location.
There is one secret and one box in the location. You can find the remaining crate.
Crate #1 — Orichalc lightsaber material.
Get to the place where you need to jump and grab the pipe. From the pipe, jump into the water and dive. Under water box and lightsaber material Orichalc .
Crash site. nine0004
There are eight boxes here, and six of them you can now find. All of them are underwater.
A map of secret locations in the Imperial Dig Site.
There is a secret here and now you can find it.
Secret No. 1 — steam pack.
Reach the long bridge with the elevator leading to the Imperial headquarters. Find a zipline. Jump on it and jump off about 2/3 of the way. With proper skill and luck, you will land on a platform with a pipe leading to a wall that can be broken with a push of the Force. Behind it is a box that increases your stock of stimpacks. nine0005
Map of the location of chests and secrets in the Venator Wreckage location.
There are four boxes and one secret. Everything you can find now.
Drawer #1 — Starfighter poncho material.
In the last room of the location Venator Wreckage , before going outside, in one of the corners you will see a locked box. Inside material for poncho Starfighter .
Crate #2 — Chromium lightsaber material.
In the last room of the location, in the back left corner is a locked box. Inside lightsaber material Chromium .
Box #3 — BD-1 Cantonica skin.
In the last room of the location, one of the corners is a locked box. Inside coloring for BD-1 Cantonica .
Drawer #4 — Elemental Nature 2 lightsaber switch.
Before climbing the ship, swim around the wreckage. Look for a small opening in the wall. There you will find a crate and lightsaber switch Elemental Nature 2 .
Secret No. 1 — the essence of the Force.
On your way up through the rubble, you will reach a platform with a long vine hanging from the ceiling that you can use to fly across the abyss. Instead, on the vine, turn left, jump into a small opening and there you will find essence of the Force .
Secret #2 — steam pack.
As soon as you go outside of the last room of the location, on the left you will see a box, inside which is an upgrade stock of stimpacks.
Walkthrough Star Wars Jedi: Fallen Order — Guide to the location of all the boxes and secrets on the planet Bogano
In this guide we will show the location of all the boxes and secrets on the map of the planet Bogano. nine0005
You won’t be able to get into every zone, find every chest, and find every secret during your first visits to planets in the game. Exploration, leveling up, and backtracking with new skills are all part of the game’s design.
These guides are organized based on the order of obtaining the necessary skills necessary to gain access to certain locations of the planets.
First visit to Bogano.
The following are the collectibles that can be accessed with Cal’s basic abilities, as well as wall run, which is the first ability you get when visiting Bogano .
Map of the location of the boxes in the Binog Mesa location.
Binog Mesa contains one box. You will be able to find it during the first visit.
Drawer #1 Pathfinder Suit.
Wall run to the left of Praying Mantis .
When you get to Binog Mesa wall run through the narrow passage. You will find yourself in the middle of a large amphitheater. There is a big hole in the middle of it, don’t jump there yet. nine0005
Go down to the left of the platform instead. Deal with opponents and open the box. Inside you will find the Pathfinder suit.
Location map of secrets in the Bogdo sinkholes location.
There are two secrets in the location Bogdo sinkholes . You will be able to find both on your first visit to Bogano .
Secret #1 — Life Essence.
When you get to location Bogdo Sinkholes , go right and go through the pipe. Instead of slowing down and jumping over the fan, head right until you reach a cave. There you will find a secret that is guarded by Oggdo Bogdo .
Oggdo Bogdo is pretty hard to beat in the early game. You can always come back later.
If you have fought these giant toads before, you will understand that Oggdo Bogdo is not much different from them, just more tenacious. Dodge his attacks in time and strike from the side. After the victory, pick up the life essence nearby. nine0005
Secret #2 — Essence of Power.
At Bogdo sinkholes turn right and jump onto the pipe. Walk forward, slow down the fan and jump over it. Downstairs, also slow down the rotating fans and climb over them to get to the essence of the Force.
Map showing the location of the boxes in the Great divide location.
There are five chests in Great divide , three of which you can find during your first visit to Bogano .
Drawer #1 — Bogano dawn poncho material.
When you first go down the rope in Great divide , look for a small area where the enemy is waiting for you. Jump down and at the end of a small alley you will see a box in which you will find material for poncho Bogano Dawn .
Crate #2 — Valor and wisdom 2 lightsaber handle.
V Great Divide you will find a large spire and a large elevator shaft nearby. Climb up the cliff through the vegetation. At the top you will find two chests. You will not be able to open one of them until BD1 has the necessary upgrade for this. Therefore, open the available one and get a lightsaber hilt Valor and wisdom 2 .
Drawer #3 — Valor and wisdom 2 lightsaber switch.
Take the elevator down to location Geat divide . To the right of the elevator is a crate. Open it and inside you will find a lightsaber switch Valor and wisdom 2 .
Map of the location of the boxes in the Hermit’s abode location.
There are two chests in Hermit’s abode , one of which you can find during your first visit to Bogano .
Crate #1 — Eno Cordova lightsaber emitter.
When you first get to location Hermit’s abode , look up and to the right to see a ledge with a crate on it. Follow this path until you reach a rope opening a shortcut. Instead of going up the ramp, jump to the left. There you will find a box and lightsaber emitter Eno Cordova .
Map of secret locations in the Subterranean refuge location.
There are two secrets in the location Subterranean refuge , one of which is available to you during the first visit to Bogano .
Secret #1 — Steam Pack.
Use the wall run to get to Binog mesa and go left to the amphitheater. Get down into the hole in the middle of the amphitheater. You will find yourself in front of a yellow box — this is a box inside which is an upgrade in the number of stimpacks.
Visit after passing the location «Tomb of Eilram» on the planet «Zeffo».
After you pass location Tomb of Eilram on planet Zeffo you will gain the ability to use Force push and get an upgrade for BD-1 that allows you to break doors and boxes. With these new abilities, you will gain access to many collectibles on Bogano that were previously unavailable.
Map of secrets in the location «Abandoned workshop».
Location Abandoned workshop has one secret and four chests. You will be able to get to one secret. nine0005
Secret No. 1 — the essence of the Force.
Using the push of the Force, you can get to location Abandoned workshop from location Great divide . There you will find a large room with a secret inside — this is the essence of the Force.
Map of the location of boxes in the location «Bogdo sinkholes».
There are two boxes and two secrets in the location Bogdo sikholes . Now you can get to the first crate. nine0005
Drawer no. 1 — Sumi poncho material.
There is a locked chest in the lair of Oggdo bogdo . Use BD-1 to open it. Inside you will find material for poncho Sumi .
Map of the location of the boxes in the Great Divide location.
There are five boxes in Great Divide , now you can get to the last two.
Crate #4 — lightsaber material «Corundum». nine0004
Head to the top of the cliff at Great divide where you found two chests earlier. Now you will be able to open the one that was locked. Inside lightsaber material Corundum .
Case #5 — BD-1 «Z’gag wave» skin.
Go to Great Divide and take the elevator down there. Look for a rift that you can’t jump over and a bridge that’s pulled up. Use the push of the Force to lower it. Cross the resulting bridge and find a locked box. Use BD-1 to open it. Inside you will find a coloring book for BD-1 Z’gag wave .
Landing pad location map.
Location Landing pad has a secret. Now you can get to it.
Secret #1 — Steam Pack.
Exit Praying Mantis and go down the stairs. Inside you will see a sphere that can roll with the wind (similar to those that you met in the tomb at Zeffo ). However, the sphere is behind bars, there is also a box with an upgrade in the number of stimpacks. With the help of a push of the Force, ensure that the sphere fits into the slot intended for it, and the grate will open. Open the box and get an upgrade in the number of stimpacks.
Visit after passing the «Tomb of Miktrull» location.
BD-1 now has upgrades that allow it to charge electrical outlets, take you up ziplines, and Cal can use Force pull. This way you can get access to the next portion of secrets and boxes for Bogano .
Map of the location of boxes in the location «Bogdo sinkholes».
Bogdo Sinkholes has two drawers and two secrets. Now you can find the last crate.
Crate #2 — Republic Praying Mantis coloring.
Jump off the roof of room Abandoned workshop . Slow down the fan and jump inside. On the right you will find a crate containing the Mantis Republic coloring page.
Map of the location of the boxes in the Hermit’s abode location.
Hermit’s abode has two drawers. Now you can find the last one.
Drawer #2 — Eno Cordova lightsaber switch.
At Hermit’s abode , use the rope to climb up and go through the door. Drop down into the circular room and use BD-1 to open the hidden alcove in the floor. Inside box and lightsaber switch Eno Cordova .
Last visit to Bogano.
After you visit the planet Kashyyyk for the second and last time, you can collect the remaining collectibles on Bogano using the underwater breathing apparatus and double jump.
Map of crates in the Abandoned workshop location.
There are four chests in this location.
Drawer #1 — Valor and wisdom lightsaber switch. nine0004
At Abandoned workshop , where you pushed the bridge down, jump into the water. Under water, on the far side, you will find a crate. Inside is a lightsaber switch Valor and wisdom .
Crate #2 — Valor and wisdom lightsaber emitter.
In Abandoned workshop , swim around the spire underwater to find a chest containing a lightsaber emitter Valor and wisdom .
Drawer #3 — Offshore poncho material.
Get to the roof of Abandoned workshop using the bridge that you can pull in Bogano sinkholes . Fly on a vine. To your left there will be some bones and a chest that needs to be hacked. Open it to get Poncho Material Offshore .
Crate #4 — lightsaber material «Lamina steel». nine0004
On the roof of Abandoned Workshop , run all the way to the end and you will see a crate containing lightsaber material Lamina steel .
Map showing the location of crates in the Fractured plain location.
There are two chests in this location.
Crate #1 — lightsaber material «Neuranium».
Double jump from location Bogdo Sinkholes to location Fractured Plains. Run across the plain until you see a small island that you can climb through the thickets. At the top, open the drawer, inside which you will find the lightsaber material Neuranium .
Drawer #2 — Peace and Justice 2 Lightsaber Handle.
To the left and back on top of location Fractured plain is a chest. Open it and find inside the hilt of the lightsaber Peace and justice 2.
Map of secret locations in the Subterranan refuge location.
There are two secrets in this location.
