So formatieren Sie eine SSD (Solid State Drive) | Crucial
Zurück zu den Ergebnissen
Das Formatieren (präziser: Neuformatieren) einer SSD (Solid State Drive) ist ein simpler und praktischer Vorgang, um das Laufwerk in einen sauberen Zustand zurückzusetzen, vergleichbar mit dem Ursprungszustand einer neu erworbenen SSD. Auch wenn Sie eine SSD verkaufen oder verschenken möchten, sollten Sie das zuvor genutzte Laufwerk neu formatieren und sämtliche Dateien und Datenreste gründlich löschen. Entdecken Sie die Vorteile einer SSD gegenüber einer mechanischen Festplatte (HDD).
Überlegungen vor dem Formatieren einer SSD
Die Neuformatierung einer SSD löscht die gespeicherten Daten auf eine ebenso schnelle wie praktische Art und Weise. Zuvor sollten Sie sich jedoch unbedingt vergewissern, dass Sie sämtliche wichtigen und noch benötigten Dokumente, Dateien etc. auf einem anderen Speichermedium, wie etwa einer anderen SSD, gesichert haben. Grundsätzlich ist es zwar nicht unmöglich, die Daten einer gelöschten bzw. formatierten SSD wieder herzustellen, dieser Prozess kann sich allerdings als kompliziert, riskant und kostspielig erweisen. Daher sollten Sie von allen bedeutenden Dateien mindestens eine Kopie an einem anderen Speicherort erstellen oder zusätzlich in einer Cloud speichern.
Wenn das Betriebssystem Ihres Computers TRIM-Unterstützung bietet und diese aktiviert ist, stellt der Computer automatisch sicher, dass die in der SSD gespeicherten Daten korrekt angeordnet und verwaltet werden.
Neuformatierung und TRIM können mit der bekannten Defragmentierung einer klassischen mechanischen Festplatte (HDD) verglichen werden, obwohl sich die zugrundeliegenden Technologien stark unterscheiden. Beachten Sie jedoch, dass eine SSD keine Defragmentierung benötigt und der TRIM-Befehl in seiner Auswirkung der Defragmentierung nur ähnelt.
Wenn Sie eine SSD neu formatieren, füllt der Vorgang die Zellen dieser mit Einsen (1) und Nullen (0) und ersetzt die ursprünglichen Daten. Der separate TRIM-Befehl informiert den Laufwerk-Controller nun darüber, dass die neuen Daten nicht echt bzw. keine wirklichen Daten sind. Mithilfe dieser „Dummy-Daten“ kann der maximale bzw. freie Speicherplatz der SSD bestimmt und angezeigt werden.
So formatieren Sie Ihre SSD Schritt für Schritt
Um Ihre Solid State Drive unter Verwendung von Microsoft® Windows® zu formatieren oder neu zu formatieren, folgen Sie diesen Anweisungen:
1. Klicken Sie auf Start oder die Windows-Schaltfläche, wählen Sie Systemsteuerung und dann System und Sicherheit
2. Wählen Sie Verwaltung, dann Computerverwaltung und Datenträgerverwaltung (alternativ können Sie in der Suchfunktion/Suchzeile von Windows® direkt nach Festplattenpartitionen erstellen und formatieren oder Datenträgerverwaltung suchen)
3. Klicken Sie mit der rechten Maustaste auf das zu formatierende Laufwerk und wählen Sie Formatieren
4. Wählen Sie im angezeigten Dialog das Dateisystem (normalerweise NTFS) aus, geben Sie die Größe der Zuordnungseinheit (üblicherweise 4096) ein und aktivieren Sie Schnellformatierung durchführen
5. Bestätigen Sie mit OK
Auf dem neu formatierten Laufwerk können Sie nun nach Belieben ein Betriebssystem und weitere Programme installieren.
©2017 Micron Technology, Inc. Alle Rechte vorbehalten. Informationen, Produkte und Spezifikationen können ohne Vorankündigung geändert werden. Weder Crucial noch Micron Technology, Inc. sind für Auslassungen oder Fehler in Texten oder Bildern verantwortlich. Micron, das Micron Logo, Crucial und das Crucial Logo sind Markenzeichen oder eingetragene Markenzeichen von Micron Technology, Inc. Microsoft und Windows sind eingetragene Markenzeichen oder Markenzeichen der Microsoft Corporation in den USA und/oder anderen Ländern. Alle anderen Markenzeichen und Dienstleistungsmarken sind Eigentum ihrer jeweiligen Inhaber.
SSD Formatieren mit installierten Windows | Die Hardware-Community für PC-Spieler
MadLedune
Schraubenverwechsler(in)
-
-
-
#1
Hallo zusammen.
Ich habe mir einen neuen Rechner gebaut und möchte nun die SSD aus meinen alten Rechner als Speichermedium weiter verwenden. Im alten Rechner war dies die Boot SSD mit Win10 drauf. Wie kann ich diese nun komplett formatieren so das auch alle Win10 Dateien verschwinden? Mit den normalen formatieren funktioniert das irgendwie nicht.
Grüße Mad
Camari
Freizeitschrauber(in)
-
-
-
-
#2
Mit Diskpart zum Beispiel. Windows Installation mit USB Stick Booten dann Shift + F10 drücken und dann die Schritte befolgen wie sie im Video gezeigt werden und dabei dann die Festplatte auswählen die formatiert werden soll.
Hier ein Tutorial:
YouTube
taks
PCGH-Community-Veteran(in)
-
-
-
-
#3
Was ist das «normale» Formatieren?
Unter «Datenträgerverwaltung» kannst du einen Rechtsklick auf die richtige Festplatte/Partition machen und dann Formatieren wählen.
the.hai
Lötkolbengott/-göttin
-
-
-
-
#4
Du darst einfach nicht von der SSD booten, ansonmsten klappt alles wie normal. ch würde es einfach über die Windows10 Installation machen, dann hat man das Problem nicht.
IICARUS
Trockeneisprofi (m/w)
-
-
-
-
#5
Er meint wahrscheinlich das löschen der Win Partitionen.
Unter Datenträgerverwaltung geht dies nicht, Windows lässt es nicht zu.
Mit Diskpart könnte es klappen, es könnte aber dennoch sein das der zugriff verweigert wird.
Sollte dies sein dann starte dein System mittels Windows Setup und folge dem Setup bis zur Auswahl der Laufwerke.
Dort kannst du die Partitionen löschen und auch Formatieren.
Nachdem alles erledigt ist Setup beenden und nicht weiter ausführen.
EDIT:
the.hai schrieb:
Du darst einfach nicht von der SSD booten, ansonmsten klappt alles wie normal.
Zum Vergrößern anklicken….
Habe letztens auch mein neue 960 EVO eingebaut und hatte dann über die neue M.2 SSD gebootet, Windows hat es dennoch nicht zugelassen auf meiner alten SSD die Partitionen(Windows eigene) zu löschen.
drstoecker
Lötkolbengott/-göttin
-
-
-
-
#6
taks schrieb:
Was ist das «normale» Formatieren?
Unter «Datenträgerverwaltung» kannst du einen Rechtsklick auf die richtige Festplatte/Partition machen und dann Formatieren wählen.
Zum Vergrößern anklicken….
Der bootmanager bzw. Die Windows Dateien lassen sich nicht komplett löschen.
ich starte dafür immer das win10 Setup, dann die zu löschende Festplatte inkl. Der Partitionen auswählen und dann löschen. Danach in Windows nachher das Volumen neu zuweisen und fertig.
markus1612
Kokü-Junkie (m/w)
-
-
-
#7
Man kann die Platte auch über das Windowssetup formatieren.
How to format an SSD — Kingston Technology
Search Kingston.com
To get started, click accept below to open your cookie control panel. Then click the Personalize button to enable the chat feature and then Save.
Your web browser version is out of date. Please update your browser to improve your experience on this website. https://browser-update.org/update-browser.html
May 2022
-
Personal Vault
-
Mobile lifestyle
-
PC of own assembly
-
SSD
Blog Home
Have you recently upgraded to a new SSD drive? Or do you want to sell or upgrade an old laptop? In any case, you may find it useful to know how to format an SSD. This article provides a step-by-step guide to formatting an SSD and explains why it’s important to do so.
When should I format my SSD?
- If you have recently purchased an SSD, you may need to format it so that it can be used with your operating system. When installing the operating system, you can select a new drive and format it.
- If you plan to reuse an existing SSD drive, be sure to format it before reinstalling the operating system. Please note that clearing partitions on the drive will delete data, so be sure to back up your content before proceeding.
- If you want to sell or donate an SSD, consider securely erasing the data on it using the Kingston SSD Manager app or third-party utilities that support secure erase or format via NVMe. Please note that this will permanently delete all data from the drive.
File system options
It is important to choose a file format that is compatible with your operating system. Most commonly used file systems:
- FAT32: popular choice due to compatibility with Mac®, Windows® and Linux® operating systems, as well as game consoles and other USB devices. However, its main disadvantage is that it does not provide security and limits files to 4 GB.
- exFAT: is a popular choice that eliminates the 4 GB file size limit and is compatible with most Windows and Mac operating systems. However, older operating systems may need to be upgraded to properly read and write data to an exFAT drive.
- NTFS: is the default format used when installing Microsoft Windows. Supports a much larger maximum file size, but is read-only on macOS® X (unless you install a third-party NTFS reader/writer).
- APFS: Native solution for Mac users starting with macOS 10.13. Use this option only if the drive will only be used on macOS. Windows will not be able to detect this file system without a third party utility.

- Ext4 (Fourth Extended File System): Linux’s default journaling file system, designed as a successor to ext3.
Preparing the SSD for formatting
- First of all, back up your data! Make sure all important data is backed up, whether on an external drive or in the cloud, before formatting the drive. Once a drive is reformatted, it is almost impossible to recover any data.
- Make sure TRIM is enabled on a supporting operating system to maintain SSD performance.
- To completely erase all previous content from the drive, perform a secure erase or format via NVMe on the device.
How to format in Windows
In Windows, formatting is usually done using the Disk Management tool or File Explorer. Both options can be accessed by right-clicking the Windows Start button. Right-click on the partition you want to format and select Format. Select a file system and cluster size. Select «Quick Format».
How to format on a Mac
The easiest way to format an SSD drive on a Mac is to use Disk Utility, which can be found in the Finder. Select your SSD from the list on the left and click Erase. Enter a «Name» for the drive and select «Format» (file system). Select Erase. If you are formatting a drive for Time Machine backup, you must select macOS Extended or APFS as the file system. Learn more about Time Machine disk formats.
Is my data really gone?
Although formatting the drive will delete your data, there is no guarantee that all your data will be permanently erased. If you have stored very personal and sensitive information on the SSD, we recommend that you encrypt the data before deleting it. Alternatively, you can perform a secure erase using the BIOS or SSD management software such as Kingston SSD Manager.
Conclusion
Formatting an SSD is a quick and easy procedure that everyone should be able to do. If you have any problems formatting your SSD, feel free to contact Kingston support.
#KingstonIsWithYou
Installing an M.2 Solid State Drive on a Desktop Computer
Step-by-step process for installing an M.2 SSD on a desktop computer.
Installing an M.2 SSD on a laptop
Step-by-step process for installing an M.2 SSD on a laptop.
Installing a 2.5-inch SSD on a desktop computer
Step-by-step process for installing a 2.5-inch SSD on a desktop computer.
Installing a 2.5″ SSD on a
laptop
Step-by-step process for installing a 2.5-inch SSD on a laptop.
XS2000 Portable Solid State Drive High performance external drive
The Kingston XS2000 is a high performance external solid state drive that uses USB 3.2 Gen 2×2 speeds to upload and edit high-resolution images, 8K video files and large documents in the blink of an eye.
4:46
Formatting a disk to completely delete data!
We will show you the step by step procedure to format and clean your SSD or HDD.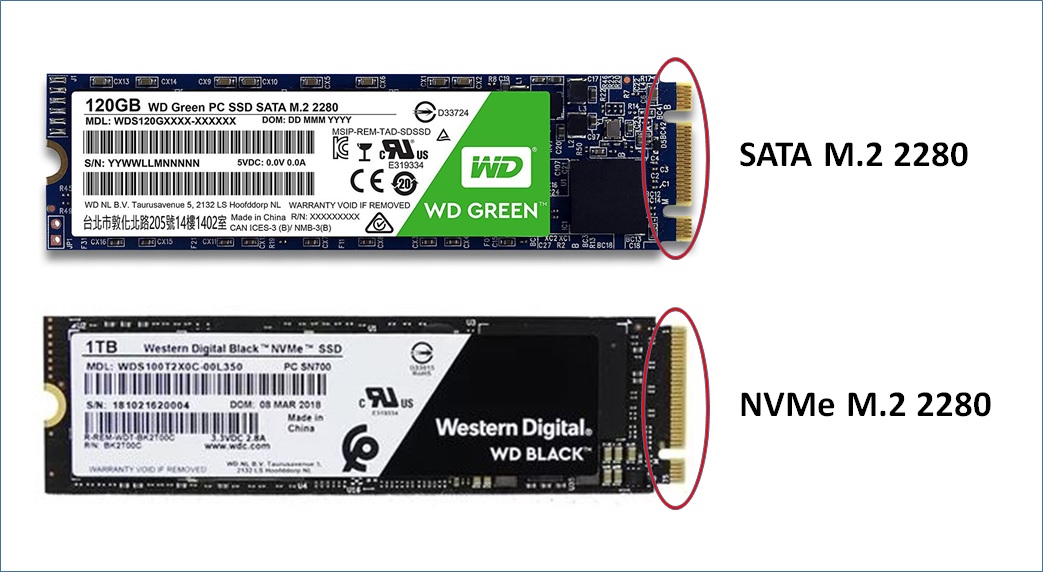
Installing an M.2 SSD in an External Chassis
Installing an M.2 SSD in an external enclosure is cheaper than purchasing an external USB SSD.
Building a steampunk SATA SSD enclosure
An interesting way to give an external SSD case a «vintage» look.
Assembling the LEGO
steampunk case for the SSD
A fun way to build an external SSD case with LEGO bricks.
Build a Concrete SATA SSD Enclosure
An interesting way to cast a solid state drive case out of concrete.
Build an SNES Style SATA SSD Enclosure
An interesting way to create an external SSD case from a Super Nintendo cartridge.
Sort by
Title — A to Z
Load more
No products were found matching your selection
7 Ways to Fix SSD Not Detected in Windows 10
If you just got an SSD for your Windows 10 system and unfortunately it doesn’t work, don’t worry, it’s not the fault of the SSD. Sometimes I found myself in the same position and there could be many reasons why your Windows 10 system cannot detect the SSD. It could be wrong file format, bad storage drivers, etc. So, with that said, let’s fix the problem step by step and see how to fix SSD not detected error in Windows 10.0003
1. Disk Management Menu
The thing with the brand new SSD is that it won’t automatically show up in File Explorer. You need to format it first. Similarly, if you use an SSD with different operating systems, chances are that the SSD was formatted with the wrong file format. It could be ext4 or exFAT which Windows 10 cannot understand.
To make your SSD visible in File Explorer and in turn compatible with Windows 10, we will have to format the SSD. To do this, disconnect all flash drives or SD cards connected to your Windows system to avoid confusion and accidental data loss.
Windows programs, mobile applications, games — EVERYTHING is FREE, in our closed telegram channel — Subscribe 🙂
Then press the Win + R keys to bring up the Run menu, type diskmgmt. msc and press Enter.
At the bottom of the Disk Management menu, you should see the storage devices connected to your laptop. The first device will be your system’s internal hard drive or storage. The next device should most likely be your SSD. The name will be Disk 1 and it must be unallocated.
Once you have identified the drive, right-click Unallocated Part and select New Simple Volume.
In the New Simple Volume Wizard, click Next to start creating the new volume.
You then have the option to select the amount of storage available. We’ll leave it at the default, which is the maximum storage option, and click Next.
You will have the option to select a drive letter. Just click Next.
This is the most important step in which you must select the file system type. The default file system is NTFS. If you will only use the SSD with a Windows system, leave NTFS. If you are going to use it with other OS such as macOS, select the file system as exFAT from the drop down list.
Leave all other options as default and click Next.
Finally, we have a summary page. You can go through the settings once and then click Finish to start formatting the SSD.
After formatting the SSD, you will find it in File Explorer. Now it is usable and you can copy your files.
2. Force scan to find new SSD.
If the SSD doesn’t even show up in Disk Management, the problem is with old or bad drivers. So, in the following case, we need to check the device manager of our system.
To do this, go to the Start menu, type Device Manager and press Enter.
The Device Manager page has many sections. All internal and external SSDs are displayed under Disk Drives. Click the arrow next to expand the Drives section.
In my case, I have a Toshiba hard drive and a Samsung SSD. As you can see in the screenshot below, they both show up under Disk Drives.
If you see your SSD in Device Manager, then there is no problem with the SSD itself. It’s just a file format or driver issue. Just unplug the SSD and plug it back in to have it reinstall the drivers. Also, it will appear in Disk Management. Alternatively, you can also try it on another system and format it for use.
If you still don’t see your SSD under Disk Drives, click Storage Controllers to expand it. Here you should see your internal memory controller. Right-click it and select Scan for hardware changes.
Now check the Disk Drives section again. You should find your SSD under it.
3. Update the drivers
Even after forced scan, if the SSD is not detected in Windows 10, we need to update the storage controller driver. Right-click the storage controller and select Update Driver.
On the next page, click Search automatically for updated driver software.
Windows will now search the Internet for drivers and notify you after the update.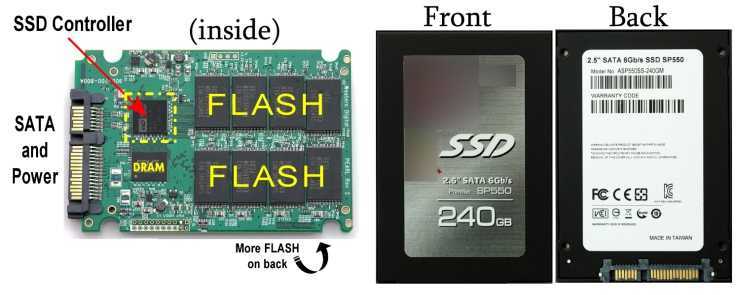
Then follow the same steps for IDE ATA/ATAPI controllers and reboot Windows 10 system. Post this, check if you can now find the SSD in Disk Management or Device Manager.
If you cannot, go to the next step.
4. Windows BIOS
If you can’t find the SSD in the operating system, we can check it in the BIOS. This is the last place you should find your SSD.
To enter the BIOS, click the Start menu and click the Power icon in the bottom left corner. Then, while holding down the Shift key, click Restart.
In the advanced restart menu, click Troubleshoot.
Then click UEFI Firmware Settings to boot into the BIOS.
Now, depending on the laptop you are using, the BIOS screen may be slightly different. For example, I’m using an Acer laptop and found the hard drive information in the Info tab. If you are using a Lenovo or Asus machine, the storage information may be on a different tab.
If you found an SSD, congratulations, it works. Now we know that at least the drive is getting power and being detected in your Windows 10 system. Also, we just need to format the SSD so it can be used. To do this, proceed to the next step.
5. Windows installation method
The last method is to try to format the SSD during Windows installation. Don’t worry, we won’t be installing Windows 10 anymore. We’re just checking to see if the SSD is detected during the installation process and then formatting it.
To install Windows 10, we need a Windows 10 bootable USB drive. You can do this using Microsoft’s Media Creation Tool or third-party USB bootable software.
Once we have a bootable Windows USB drive, restart the computer to boot via USB. On the Windows Setup page, click the Install button.
You can quickly go to the next steps and stop at the Windows setup screen. Of the two options, click Custom: Install Windows only (advanced).
On the next screen, you will see the drives connected to your Windows 10 system. Drive 0 is the drive where Windows 10 is installed. Anything that starts with Drive 1 should be your SSD. Please note that Windows 10 will not show external SSDs or flash drives at this point.
Once you have zeroed your SSD, click the «Format» button to format the drive in NTFS file format.
6. Try another system
If none of the above methods work, you can try connecting the SSD to another system. If it works on another system, it means your laptop has a bad USB port or SATA/M.2 slot.
If this is not the case, try another operating system such as Linux or macOS to ensure that the SSD file system is not corrupted. If it’s an external SSD, you can also try switching the USB cable.
7. Return the SSD.
Unfortunately, if none of the above methods work, the SSD is defective. If it’s still under warranty, you should consider returning it to the seller.
If it is out of warranty, you can try to have it repaired at your nearest shop.
