Ryzen 5 overclocking the 1600. — Evil’s Personal Palace — HisEvilness
-
Tech, OC’ing, SEO and more
-
Hits: 131820
-
Rating:
( 39 Ratings )
User Rating: 5 / 5
Please Rate
Vote 1Vote 2Vote 3Vote 4Vote 5
Article Index
-
Ryzen 5 overclocking the 1600.
-
My Hardware
-
Getting Started
-
BIOS Settings
-
DIGI+ and VRM Settings
-
AMD CBS
-
CPU Vcore
-
Stability Testing
-
All Pages
This guide will be an overclocking guide for AMD Ryzen 5 1600 with the setup listed below. Using a B350 chipset motherboard, I have another manual listed below for an X370 motherboard. Explaining the basics and will only list volts and numbers with basic settings setting up the VRM. I am assuming you have done this before I am writing this to supplement AMD Reddit and other AMD overclocking sources.
My Ryzen 5 1600X guide is located in the links below as well as a guide for the 8086k/8700k, Z390 and X370 motherboards and some upgrades included as well.
Ryzen 5 OC’ing the 1600X.
Intel i7 OC’íng the 8086K on Z390.
Streaming and/or recording using OBS NDI Tutorial.
My Rig.
- Case: Phanteks Enthoo Luxe.
- Motherboard: ASUS Prime B350-Plus.
- CPU: Ryzen 5 1600 Retail.
- RAM: Corsair DDR4 LPX White 16 GB 3000.
- GPU: MSI GTX 960 4GB.
- PSU: Sharkoon 600 Watt semi-modular.
- OZC Agility 3 256GB C Drive, WD Green/Blue 1TB storage drives.
- Cooling: CoolerMaster 212 EVO and AMD Wraith Spire.
- Case fans: 2 x 120mm and 1 x 140mm push fans, 1x 120mm and 3 x 140mm pull fans.
A medium-range setup, nothing fancy for a workstation but it works like a charm. This rig will run programs like Photoshop, some recording with Nvidia shadowplay, gaming, some web page editing, music, browsing etc. daily. While I could get away with not overclocking Ryzen shines when you push it and get the best results performance-wise.
Getting Started with the AMD Ryzen 5 1600.
Skipping the part of installing all the hardware in your case since that should be covered in the manuals. To ensure that you apply the RIGHT amount of thermal paste so that your CPU cooler will work as it supposes to. When booting up the first time make sure to go right into your BIOS and update the BIOS to the latest version, this will enhance stability from the get-go. Also, memory and other hardware support will be in the latest BIOS version if feeling brave use a Beta release BIOS but that might not be wise. The updating BIOS in the ASUS motherboards can be done inside the BIOS, in the worse case you need to use a flash drive. Boot up your system one time to see if you installed the components correctly and make a baseline performance test with Passmark or Cinebench. Restart and boot back into your BIOS, ensure that you have the latest drivers and updates for stability and support purposes!
You also want to download the following programs for stress testing your overclock. These are a vital tool for stress testing and monitoring if you already have tools you can use those but these programs I highly recommend and were used while writing this overclocking guide.
- HWiNFO64: https://www.hwinfo.com/download/
- Prime 95: https://www.mersenne.org/download/
BIOS Settings.
Make sure your RAM profile is set to 2133mhz, not DOCP/XMP/A-XMP max 3000/3200mhz and up, just the basic 2133mhz all DDR4 runs on. Set the optimal RAM clocks speed after achieving a stable CPU overclock since Ryzen still has some compatibility issues. What RAM MHz you can pick also has to do with the die quality of the components, Samsung allows for the best results anything else will be lower. You can check your die quality with THAIPHOON BURNER and see for yourself, manufacturers have a list, but this tool is far easier and quicker. 1st Gen Ryzen is notorious for being very picky with RAM selection ensure yours is at least QVL from the motherboard vendor. Samsung B-die is known for always working with 1st Gen Ryzen CPU’s. Finding Samsung B-die kits follow the rule of thumb 3200mhz with C14 timings, or 3600mhz should always be Samsung B-die kit.
Now it is time to set the Ryzen 5 clock, in ASUS it is called CPU Core Ratio, MSI calls it CPU Frequency. Each chip Intel or AMD Ryzen will behave differently, the OC community phrase would be «silicone lottery», and it is winning or losing.
That said any Ryzen should be able to reach 3800mhz or I would recommend a refund and replacement with a better chip. They can go as high as 4000mhz or even higher, but that is winning the silicon lottery or being blessed with an engineering sample.
DIGI+ VRM Settings Ryzen 1600.
These settings help with achieving greater overclocks and stability of the overclocks, setting this in the BIOS over AI Suite is better since it might reset. Putting them to Extreme will only affect power consumption do make sure to select the VDDCR CPU Switching Frequency to 350 MHz and not higher. You can tinker with these settings once you have achieved a stable overclock, see if you can reduce power consumption, this is a starting point, not the end.
- VDDCR CPU Load Line Calibration: Set to Extreme or LLC 3 or equivalent.
- VDDCR SOC Load Line Calibration: Set to Extreme or LLC 3 or equivalent
- VDDCR CPU Power Phase Control: Extreme.
- VDDCR CPU Switching Frequency: Set to 350.
Some other BIOS options might be available to you as I have with my other guide using an X370 motherboard. VDDCR Current Capability should be set the highest possible option in your BIOS both for CPU and SOC.
Here you can find some critical settings, for now, leave everything on Auto but Disable Core Performance Boost and Global C-state Control, this will hamper stable overclocking if left on. Core Performance Boost to put it is the boost function of your CPU within set guidelines from AMD to increase core clocks and VDDCR CPU voltage. Global C-state Control does the opposite and will lower core clocks and VDDCR CPU voltage when the CPU idles. This could be left on, but with higher a overclock, I found this resulted in instabilities.
- Core Performance Boost: Disable.
- Global C-state Control: Disable.
AMD Ryzen 1600 CPU Core Volts.
There are several volt ranges you need to consider, for those who are new to overclocking Voltage and CPU core ratio/frequency will attribute to your overclock. The ratio of your clock should be seen as x multiplied by 100, mostly 99.9 and 99.8 what then translates into overclock speed; higher ratios need more volts. The Voltage will result in more or less heat being produced there for you need cooling, the Voltage can be different per chip due to the silicone lottery. Lower volts is always better but is not always possible, and will set a limit on how far you can overclock combined with the CPU core ratio/frequency.
- AMD Recommended Voltage: 1.350 and 1.375 volts.
- Community Recommended Voltage: 1.400 and 1,450 volts.
- Absolute max and not recommended: 1.500 and 1550 volts.
Here we start with an overclock speed of 3800 MHz, set CPU Core Ratio to 38.00, disable EPU Power Saving mode and OC Tuner. Now it is time to adjust the CPU voltage, VDDCR CPU Voltage in this BIOS also to note this offers an offset and not a manual mode. Set the CPU Voltage to Offset Mode, Offset Mode Sign to + and Offset Voltage to 0.13750. Exit the BIOS and save these settings, you can also opt to save as a profile under the Tool section of this BIOS and reboot. If you want to use Manual mode, you can directly dial in the VDDCR CPU Voltage. Ensure the Voltage does NOT exceed 1. 400 VDDCR CPU Voltage. Going higher than 1.400 CPU voltage will require a better cooling solution like a Noctua Dual 120mm or 140mm tower cooler or a 240 or 360 AIO. Now save these settings and exit the BIOS and run a quick stress test with Prime95 with small FFT’s. If this remains stable boot back into the BIOS and dial in 38.50 or 39.00 and keep the VDDCR CPU Voltage and repeat the process. If this fails to pass the stress test, then increase the CPU voltage. For Offset Mode 0.2000 and Manual Mode dial in 1.400 save these settings and run another stress test in Prime95 with Small FFT’s. Pass or fail you can move the CPU clock speed 500mhz up or down and adjust the Voltage where needed. Most 1600 none X or 1600X will cap out around 3.9Ghz with the best CPU’s able to reach 4.0Ghz. This with a voltage of 1.400 or higher but keep an eye on temperatures and stability.
- 3.9Ghz with 1.375 CPU Voltage.
- 4.0Ghz with 1.400 or more CPU Voltage.
Stability and Tweaks.

Unless the silicone lottery hates you, it should reboot, and now you use Cinebench and Prime to run a quick stability test. If your settings are stable and they should be you can try to lower the CPU Offset Voltage to lower your temperatures.
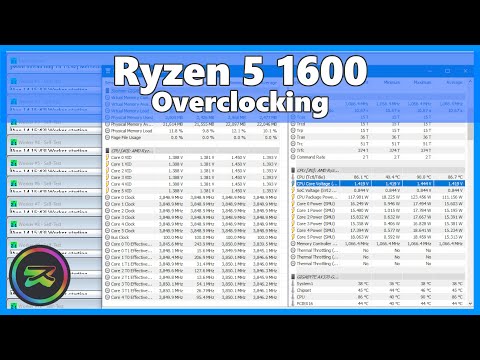
As shown in the picture, the increments are 0.00625 volts use that to lower the CPU Voltage while remaining stable in Prime95/Cinebench. Make sure to keep an eye on those temperatures for that I would recommend HWMonitor, no individual core temperature programs are updated yet. You can also set your XMP/A-XMP/DOCP profile above the basic 2133 MHz; I was not blessed with a Samsung B-die so mine, for now, is set at 2666 MHz.
Here is my CPU-Z validation link for my 38.25: https://valid.x86.fr/z9ia69
My Absolute Max, 3900 MHz.
I spend days reading up on Ryzen and the overclocking potential I have not touched my DDR4 RAM yet, waiting for some BIOS update. Temperatures even with the stock cooler are acceptable, but the core voltage is above the AMD recommended value. Therefore I opted to go back to my 38.25 clocks what yielded me to best results, with BIOS updates I hope this will become more viable.
The new AMD Ryzen CPU chip is impressive especially considering the price, with a good overclock you can take on CPU’s double in price. Happy I took the plunge and invested in a Ryzen 5 chip with my upgrade, Intel better steps up its game because this is stiff competition. With that, I conclude my small guide; I hope this has helped the readers and saved them some time.
— Paul Ripmeester
Ryzen 7 overclocking the 3700X
AMD Ryzen 7 3700X overclocking guide.
This is an easy to use and comprehensive overclocking guide for the AMD Ryzen 7 3700X with a wide
Intel i5 overclocking the 10600K.

Intel i5 overclocking the 10600K on a Z490 Motherboard.
This is easy and illustrated overclocking guide for the i5 10600K using a mid-range MSI Z490
Ryzen 5 overclocking the 2600.
AMD Ryzen 5 2600 overclocking guide.
This is a comprehensive and easy to use guide with illustrations to overclock the Ryzen 5 2600 CPU from
How to stabilize DDR4 with Infinity Fabric
This is a short How-To fix AMD Ryzen with RAM issues on X370 that results in memory errors that will either prevent a PC from booting,
DDR RAM Overclocking Terminology FAQ
DDR RAM Overclocking Terminology FAQ
This Terminology FAQ covers overclocking for DDR RAM for both Intel and AMD platform and adds a reference material for various
How to Overclock Ryzen 5 1600 to 4GHZ in 2021
Do you know How to Overclock Ryzen 5 1600? Let’s discuss this in a simple guide.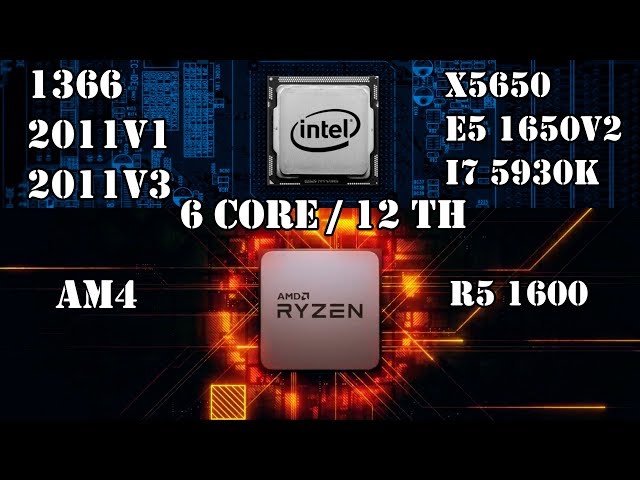 AMD has finally relaunched the market this year with its new line of Ryzen CPUs, which immediately attracted interest in every segment of the market for the best value for money. To achieve ultimate level performance, AMD’s version is to increase the number of courses in its CPU, quad cores in the entry-level range, Hexa courses in the main range, and Octa cores in the high range of the mainstream sector.
The performance of the Ryzen line has proved to be more than easy to force Intel to run for the cover, but you know that performance is never enough for the most demanding customers.
For those who want to squeeze their system out and get even more performance, Ryzen invites overclocking margins, which can be achieved relatively easily. so begin the process of How to Overclock Ryzen 5 1600.
Meanwhile, what does overclocking mean? This means that in this case, the CPU has to move beyond the component that the manufacturer certifies. Keep in mind that this is a risky exercise and you should be well aware before you start.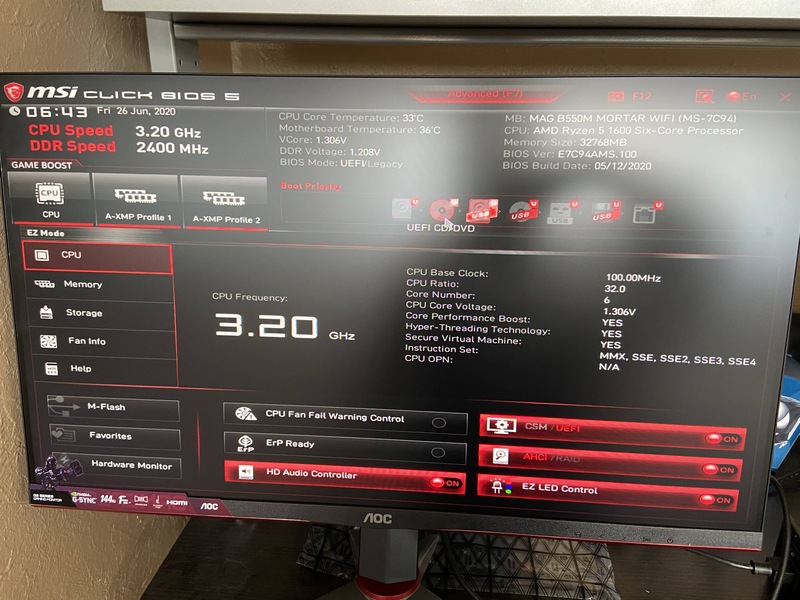 Overclocking your system will work better, but it can also shorten the life of your computer components. I am not responsible for any damage to your computer using this guide, follow it at your own risk.
Also Read: 6 Best Motherboard for Ryzen 5 3600
Table of Content
- 1 What do we need
- 2 The goal is to increase efficiency.
- 3 Test to use.
- 4 Down With overclocking!
- 5 Ryzen 5 1600 overclock CPU to 4GHz
- 6 Ryzen 5 1600 overclock Supply Voltage
- 7 With Ryzen 5 processors, AMD takes the lead.
- 8 Safe Side: How to Overclock Ryzen 5 1600
- 9 Ideal for overclocking.
- 10 Ryzen 5 1600x and 1600x.
- 11 Ryzen 5 1500X and 1400.
- 12 Energy saving processors.
- 13 Conclusion
What do we need
Let’s first see what we need to be able to start this fun and profitable operation.
- CPU: It must be an X series. Just as Intel only allows overclocking on a series of its CPUs, so MD has created the X series to identify which of its CPUs can be overclocked.
 In this guide, we take a look at the Ryzen 1600X which I think is the best value for money in the whole series.
 - Mainboard: Not all chipsets allow you to overclock the CPU, we have to choose the mainboard with B350 or X370 chipset. The biggest difference between the two chipsets is that the X370 has SLI and crossfire support, which means it can hold multiple video cards.
- Heat sink: Overclocking the CPU raises its temperature considerably, so it is important to remove everything properly to keep it at an acceptable temperature so that it does not cause problems for the system. You can choose liquid or tower heat sinks, but not necessarily of high quality.
- Ram: Ram is essential for the stability of the system. Choose high-quality modules with certified features for your system. If you have instability in the system you should make sure that it is for overclocking that you are about to perform, we cannot risk other low-quality components that introduce problems otherwise It will be really difficult to get out.
The goal is to increase efficiency.
AMD believes that the differences in gaming performance initially noted between Ryzen and Intel are due to inactive game engines, which do not use the new Zen architecture effectively.
Three developers have already released corrective patches that offer significant improvements in performance and prove that the true potential of the new Ryzen 5 CPU is just beginning to emerge!
Also Read: 6 Best Motherboard for Ryzen 5 3600
Test to use.
It will be important to test the computer several times throughout the procedure to ensure that you have maximum system stability. It’s good to have more power, but we don’t need to block or restart when we play or work, otherwise, it will be useless.
As a test we can use the following:
To run all these tests, run Prime 95 and OCCT for at least one hour and PC Mark at least 2 or 3 cycles. If all the tests pass without any problem then we will pass the test =)
Down With overclocking!
First, let’s get started by updating the mainboard bio. Having the latest BIOS is important because it often improves compatibility, for example with different RAM models, improves system stability (which is fundamental to us), and enhances functionality.
What happens is that we configure the BIOS correctly and run a full test of the PC in the absence of overclocking.
Use the tests I mentioned earlier.
It has been established that in the absence of overclocking, the PC is very stable, let’s overclock it.
Ryzen 5 1600 overclock CPU to 4GHz
If we want to bring the CPU to 4GHz, we have to set 40. More advanced mainboards allow you to increase the speed of the bus and then you go without any change, or even reduce the multiplication. This type of overclocking is more difficult because not only does the CPU speed up, but the entire system moves beyond the threshold. Clearly, the final results are better in terms of performance.
This is why we have to find the power supply voltage of CPU, CPU core voltage. This is a must have, for any Affiliate, promoting any program. I can’t give you a standard price, as it varies depending on CPU and mainboard usage. The way to do this is to slowly increase it in small steps until the PC is stable. I’ll start below 1.35V, no sense in trying.
Save voltage, restart, and test. If the PC does not start, the BIOS is reset and a higher voltage is set. As you can see from the picture with the system I used I had to set 1.435 for a stable situation. I’m not lucky at all, on average we don’t go beyond 4 1,425 on Ryzen, however, either it is or I don’t have a very stable system. In general, however, the mainboard will be written in red if you set a dangerous parameter, it is better not to go so high.
Also Read: 6 Best Motherboard for Ryzen 5 3600
Ryzen 5 1600 overclock Supply Voltage
Again, look for the supply voltage CPU load line calibration item. This item causes the CPU to receive more voltage than reported in high load moments. I got good results with profile 1.
As far as RAM memory settings are concerned, if they have modules, let’s try activating the XMP profile.
Once the parameters are configured, first check that the PC starts shutting down regularly and restarting Windows. Once we have verified this, start with the test cycle we described earlier. Each time a test fails, touch the parameters again and run the entire cycle again.
Also, control the temperature during the test, but use your mainboard program to do so, keeping in mind that many software resins are about 20 degrees higher.
Once you reach full stability, save your parameters in the BIOS, there is usually a special section to save the configuration.
With Ryzen 5 processors, AMD takes the lead.
AMD Ryzen introduces a new series of 5 processors: several six and four core models that challenge Intel’s most popular proposals.
Like the Ryzen 7 solution, the Ryzen 5 is also ideal for gamers and does not waste resources on an integrated GPU, but is designed for it with a dedicated graphics card.
The 5 Series is aimed at fans and the gaming world, where overclocking is common.
What makes them so interesting with the same performance (or almost)? Definitely, the low price makes them processors with the best quality/price ratio in the market.
Also Read: 6 Best Motherboard for Ryzen 5 3600
Safe Side: How to Overclock Ryzen 5 1600
Now I will explain to you a very safe overclock for CPU which I have inspected, you can try to go ahead if you want but in the absence of very lucky CPU, you can hardly Will be able to get more.
Our goal is to operate all 6 cores on 4GHz. The Ryzen 1600X actually runs at 3.6GHz and the Precision Boost at 4GHz, but only if the load is low and at a maximum of 2 cores. Having an overclock that takes all the cores to work simultaneously at 4GHz is about 12% higher than the basic performance of the CPU.
Let me show you some scenarios of the main board that I used, MSI B450 Gaming Plus, but keep in mind that the main boards of different brands have more or less the same layout, maybe Different menus are grouped but the soup is always the same.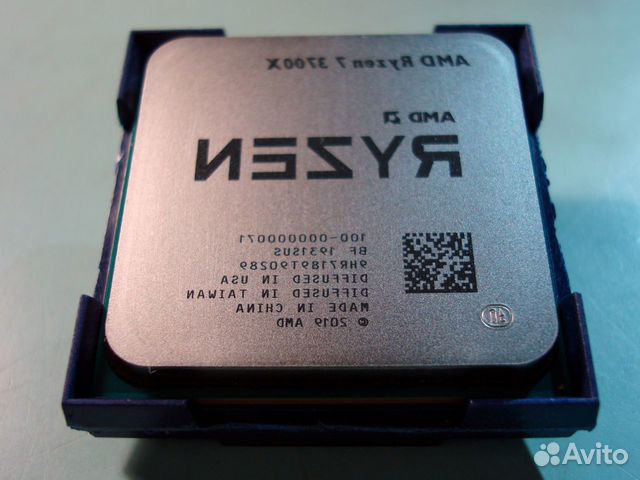
First, let’s enter the BIOS, usually, you have to press the CANC or F2 key as soon as you turn on the PC.
Once logged in, go to the Overclocking section of your main board’s BIOS. Here you need to find the entry CPU RATIO or CPU MULTIPLIER. The CPU speed is given at the speed of BUS, which is currently 100MHz, multiplied by the price in the item we just found. The base value for the Ryzen 1600X is 36.
Ideal for overclocking.
All Ryzen 5 processors have features already seen on Ryzen 7, including compatibility with unlocking multipliers, Sensei technology suite, dual-channel memory controllers, and AM4 socket motherboards.
To the delight of true gamers, it is possible on how to overclock Ryzen 5 1600? Overclock any Ryzen processor on motherboards with X370 and B350 chipsets.
Ryzen 5 1600x and 1600x.
AMD has positioned the Rison 5 1600X over the Core i5-7600K: it has six physical cores with SMT (simultaneous multi-threading) for a total of 12 threads.
Its cheaper brother, the Ryzen 5 1600, still has six cores and has a TDP of 65 watts, operating at a frequency of 3.4 / 3.8 GHz (base/boost).
All the other features, including the 100 MHz increase due to XFR on all cores and dual cores, remain the same as the more expensive models.
Ryzen 5 1500X and 1400.
As far as the quad-core is concerned, we have the Ryzen 5 1500X (with which AMD wants to fight the Core i5-7500) and the Ryzen 5 1400.
These are two models with a 65-watt TDP that operates at 3.5 / 3.7 GHz and 3.2 / 3.4 GHz respectively. The 1500X model has an XFR margin of 200 MHz and 16MB of cash. L3, while 1400 only 50 MHz and 8 L3 caches MB.
Energy saving processors.
AMD does not ignore the theme of energy-saving and heat dissipation: the Ryzen 5 is built with their heat sinks, the Ryzone 5 1400 with Wraith Stealth, and the 1600 and 1500 X models with Vritha Spire.
On the other hand, the choice not to supply a heat sink with the 1600X is linked to the fact that the experts who will choose this processor are happy to design a cooling system with other brands of products or liquid cooling.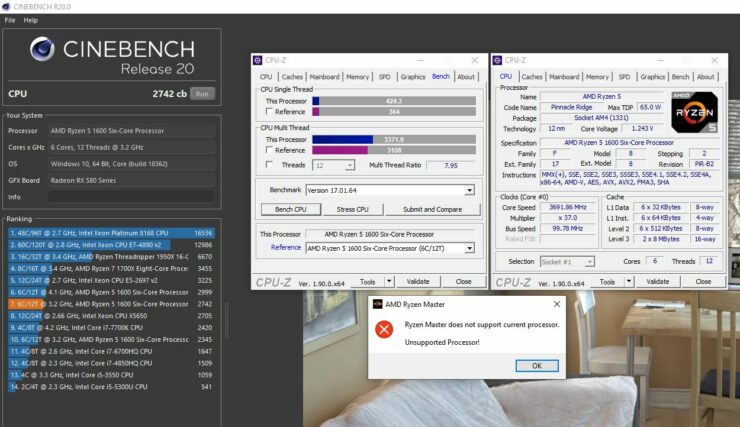 System
Conclusion
I hope this article on how to overclock Ryzen 5 1600 will make the process easier for everybody. Please let me know in the comments section below about your views.
Ryzen 5 overclocked to 1600. — Evil’s Personal Palace — HisEvilness
This guide will be an overclocking guide for an AMD Ryzen 5 1600 with the setting shown below. Using a B350 chipset motherboard, I have another manual for an X370 motherboard. Explaining the basics and listing only volts and numbers with basic VRM setup settings. I’m assuming you did this before I write this to complement AMD Reddit and other AMD overclocking sources. nine0004
The manual for the Ryzen 5 1600X is in the links below, as well as the manual for the 8086k/8700k, Z390 and X370 motherboards and some updates included.
My Horn.
Case: Phanteks Enthoo Luxe.
Motherboard: ASUS Prime B350-Plus.
Processor: Ryzen 5 1600 Retail.
RAM: Corsair DDR4 LPX White 16GB 3000.
GPU: MSI GTX 960 4GB.
Power supply: Sharkoon 600 W semi-modular.
OZC Agility 3 256GB Drive C, 1TB WD Green/Blue drives. nine0003 Cooling: CoolerMaster 212 EVO and AMD Wraith Spire.
Chassis fans: 2 x 120mm and 1 x 140mm push fans, 1 x 120mm and 3 x 140mm exhaust fans.
Mid range setting, nothing fancy for a workstation but it works like a charm. My Antec 650 Gold PSU went bust and I replaced it with a Sharkoon I had on hand, either going back to Antec or Corsair PSU ASAP. This setup will run programs like Photoshop, some Nvidia shadowplay recordings, gaming, web editing, music, browsing, etc on a daily basis. While I can’t get away with overclocking, Ryzen shines when you push it and gets better results in terms of performance. nine0004
Getting Started with AMD Ryzen 5 1600.
Skipping the whole hardware installation part in your case as it should be covered in the manuals. Make sure you apply the RIGHT amount of thermal paste for your CPU cooler to work properly. When you first boot, don’t forget to go directly to the BIOS and update the BIOS to the latest drivers, this will improve the stability from the very beginning. Also, support for memory and other hardware will be in the latest BIOS if you feel daring to use the beta BIOS, but this may not be practical. Updating the BIOS on ASUS motherboards can be done inside the BIOS, in the worst case you will need a flash drive. Boot your system once to see if you installed the components correctly and perform a basic benchmark test with Passmark or Cinebench. Restart your computer and boot back into BIOS, make sure you have the latest drivers and updates for stability and support! nine0004
You also want to download the following programs to stress test your overclock. It’s a vital tool for stress testing and monitoring if you already have the tools you can use, but these programs I highly recommend and were used in writing this overclocking guide.
- HWiNFO64: https://www.hwinfo.com/download/
- Prime 95: https://www.
 mersenne.org/download/
BIOS settings. nine0008
Make sure your RAM profile is set to 2133MHz, not DOCP/XMP/A-XMP max 3000/3200MHz and above, but only the 2133MHz base clock that all DDR4 runs at. Set the optimal RAM clock speed after reaching a stable CPU overclock as Ryzen still has some compatibility issues. Which RAM you can choose also depends on the quality of the components, Samsung provides the best results and everything else will be lower. You can check the quality of your stamps with THAIPHOON BURNER and make sure the manufacturers have a list, but this tool is much easier and faster. nine0004
Now it’s time to set the Ryzen 5 clock speed, ASUS calls it CPU Core Ratio and MSI calls it CPU Frequency. Each Intel or AMD Ryzen chip will behave differently, the OC community’s phrase will be «silicone lottery» and it wins or loses.
However, any Ryzen should be able to hit 3800MHz or I would recommend a return and a replacement with a better chip. They can reach 4000 MHz or even higher, but that wins the silicon lottery or is blessed with an engineering sample. nine0004
DIGI + VRM settings.
These settings help in achieving more overclocking and stable overclocking, setting this in BIOS over AI Suite is better as it can be reset. Their extreme value will only affect power consumption. Be sure to set the VDDCR CPU switching frequency to 350 MHz or less. You can fiddle around with these settings once you get a stable overclock, see if you can lower the power consumption, this is a starting point, not an end. nine0004
AMD CBS.
Here you can find some important settings, for now leave everything on Auto but disable Core Performance Boost and Global C-state Control, this will prevent stable overclocking if left enabled. Simply put, Core Performance Boost is a feature to boost your CPU performance in accordance with AMD’s established guidelines for increasing core clock speeds and CPU VDDCR voltage. Global C-state Control does the opposite and lowers the core clock and CPU VDDCR voltage when the CPU is idle. nine0004
Processor core Volt.
There are several volt ranges you should consider, for those who are new to overclocking voltages and the ratio/frequency of the CPU core to your overclock. Your clock ratio should look like x times 100, basically 99.9 and 99.8 which then translates into overclocking speed, higher ratios require more volts. The voltage will cause more or less heat to be produced there, since you need cooling, the voltage may be different per chip due to silicone lottery. Lower voltage is always better, but not always possible, and will set a limit on how far you can overclock in combination with the core/CPU frequency ratio. nine0004
- AMD recommended voltage: 1.350 and 1.375 volts.
- Community recommended voltage: 1.400 and 1450 volts.
- Absolute maximum and not recommended: 1.500 and 1550 volts.
Here we start with 3800MHz overclock, set CPU Core Ratio to 38. 00, disable EPU power saving mode and OC Tuner. Now it’s time to adjust the voltage on the processor, VDDCR CPU Voltage in this BIOS, to note that this is an offset and not manual mode. Set CPU voltage to offset mode, offset mode sign to +, and offset voltage to 0.13750. Exit the BIOS and save these settings. You can also save the profile in the «Tools» section of this BIOS and reboot. nine0004
Stability and tweaks.
If silicone lottery doesn’t hate you, it should reboot and you are now using Cinebench and Prime for a quick stability test. If your settings are stable and they should be, you can try lowering the CPU offset voltage to lower the temperature.
As shown in the figure, increments of 0.00625V are used to lower the voltage across the processor while remaining stable in Prime95 / Cinebench. Be sure to keep an eye on these temperatures, for this I would recommend HWMonitor until the individual core temperature programs are updated. You can also set your XMP/A-XMP/DOCP profile above the base 2133MHz, I was not blessed with a Samsung B-die so mine is set to 2666MHz for now. nine0004
My Absolute Max, 3900 MHz.
I’ve been spending a few days reading about Ryzen and the overclocking options I haven’t touched yet on DDR4 RAM while waiting for a BIOS update. Temperatures are acceptable even with the stock cooler, but the core voltage is above AMD’s recommended value. So I decided to go back to my 38.25 hours which gave me better results, with BIOS updates I hope this becomes more viable.
AMD’s new Ryzen processor chip is amazing, especially considering the price, with good overclocking you can charge twice as much. Glad I took the plunge and invested in a Ryzen 5 chip with my upgrade, Intel better step up their game because it’s tough competition. This concludes my little guide and I hope it helped the readers and saved them time. nine0004
— Paul Ripmeester
How to overclock AMD Ryzen 3/5/7 — three ways
Recent materials subtly hint to the attentive reader that someone is placing a strong emphasis on some processors from a company whose name rhymes with . .. Um- mmm… Let it be BMW. In general, the review of the A8-9600 and Ryzen 3 1200 is already in reality and in the flesh. And before my move to the Ryzen 5 1600, I decided to show you three easy as a spoon ways to overclock any Ryzen processors. They are suitable even for those who have never dealt with overclocking at all — and I will explain why. nine0004
1. Preparing for overclocking Ryzen
2. Overclocking with Ryzen Master
3. Overclocking with MSI Command Center
4. Overclocking with BIOS
Preparing for overclocking Ryzen
First, let’s prepare the necessary hardware. We need:
- random AMD Ryzen processor (no, Athlon and APU won’t work)
- motherboard based on B350 or X370 chipset for fast multiplier overclocking (I have MSI B350M Pro-VDH)
- installed Ryzen Master applications and a proprietary overclocking program from your motherboard manufacturer (in my case, this is MSI Command Center)
Technically, there are a lot of programs for overclocking in Windows — there are both EVGA Precision and MSI Afterburner, but I give an example of programs that with a 99% probability will end up on your video card driver disk.
And if you are a fan of downloading drivers from the Internet, then one of these programs will definitely appear on the manufacturer’s website. A megabyte does not pull a pocket, right? As for Ryzen Master, I attribute this program to the required drivers, but not the motherboard, but the processor. nine0004
Read also: everything you need to know about overclocking RAM
Now — about why this scheme is suitable even for beginners. It’s simple — we will overclock the processor by only 100 MHz above its Boost frequency! Through space and time, the indignant cries of masters and professional overclockers are already flying to me, they say, “What’s the point of overclocking then?” Gentlemen indignant, do not forget that we all started somewhere, and +100 MHz is ideal for the first step.
Why? The overclocker will immediately be able to see the result of his work by going to the task manager and switching to the «Performance» tab. Here are those little numbers that are different from the standard ones that will insanely warm the soul of beginners. With such a scale, you don’t need to be afraid of either the voltage, or the power supply, or the cooling — even a standard boxed cooler can easily withstand a miniature plus to the load on the processor.
Yes, such overclocking is more psychological than actual and effective. And this is good — the more people stop being afraid to overclock processors, the more mainstream the direction will become. You look, and the azure ones will come to their senses and stop making pebbles with an open multiplier 50% more expensive than standard ones …
Despite all of the above, always has a chance of breaking . Perhaps your motherboard is defective, but barely holds up under standard CPU loads. Or the processor itself is bad. Therefore, Root Nation editors are not responsible for your actions, everything you do, you do at your own peril and risk!
The good thing is that in the case of the processor, the warranty is not reset if you overclock Ryzen within reasonable limits, and +100 MHz is nowhere more reasonable. For example, I will take a Ryzen 3 1200 with a Boost frequency of 3400 MHz. Let’s get started! nine0004
Overclocking via Ryzen Master
Yes, unlike many of my colleagues in the overclocking shop, I can’t stand BIOS overclocking in the first place. And all because for a beginner it is much more scary to climb into the jungle of the boot screen, to an interface unknown to him, where there are a bunch of scary switches, and if you do something wrong, you can break your computer. No, we will start with overclocking right when Windows is running.
If you haven’t downloaded Ryzen Master yet, download it from here. Install where you need, run, see the following screen:
Choose an arbitrary profile (1, 2, whatever, except for the standard one). We need to change only one indicator — «Speed (MHz)». You can either set 3500 in numbers, or click on the up arrow to the desired number. You need to set the indicator in just one window — to the left of everything. The remaining boxes on the right will be set to the appropriate parameters automatically.
Save the profile and click on «Apply» on the top right.
We enjoy the result! Of course, you would like to see a frequency of 3500 MHz all the time, but Windows works a little differently. In addition, even this frequency is higher than Boost. nine0004
Overclocking via MSI Command Center
The principle is the same. If you have not downloaded the program, download it on the official page of your motherboard manufacturer in the «Drivers» section. If you have an MSI B350M Pro-VDH, it’s located here in the «Utility» section. Install, run.
Under the sliders depicting the CPU frequency, we find the inscription Ratio, to the right of which the multiplier is indicated. By default, in the case of the Ryzen 3 1200, it is set to 31.
It can be increased either by entering the desired number immediately (in our case, 35), or by poking the plus sign and increasing the multiplier in 0.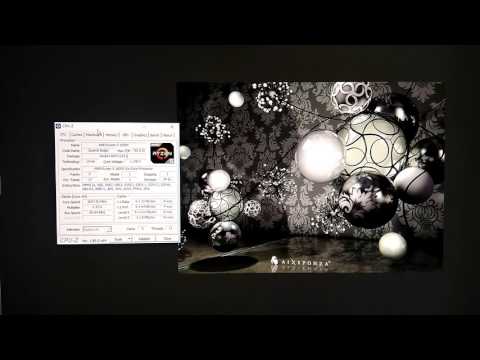 25 increments.
As soon as the desired multiplier is set, click on Save on the top right, and then on Apply. We enjoy the result!
Overclocking via BIOS
The most difficult way, if only because we have to turn off the computer. Therefore, if you read this article on a PC, I advise you to switch to a smartphone. So, turn off the computer, turn it on again and poke the Delete key until the BIOS loads. If your motherboard supports «hot login» by, say, holding down the power key for 5 seconds, use this, but remember to check this possibility in the motherboard manual. nine0004
In the BIOS, do not touch anything, find the Overclocking Settings / OC menu, open it. We are interested in the items Adjusted CPU Frequency with the number 3100 according to the standard and CPU Ratio with the number 31 according to the standard. These are respectively the frequency and the multiplier.
If you do not have such a motherboard, you can find these indicators by values.