Zelda: Breath of the Wild DLC 1 — Inhalt der Legendären Prüfungen, Truhen-Fundorte
Zelda: Breath of the Wild DLC 1: Die Legendären Prüfungen ist das erste der zwei Erweiterungspakete für das riesige Switch- und Wii-U-Abenteuer.
Es beinhaltet neue Spielmodi und Funktionen, die eine Erweiterung der bestehenden Welt von Hyrule darstellen: den knackigen Master-Modus bzw. Hard-Modus, die Prüfung des Schwertes, den Pfad des Helden, neue Ausrüstung und das Teleport-Medaillon, mit dem ihr schneller und effektiver durch die offene Welt reisen könnt. Außerdem könnt ihr fortan über acht neue Schatztruhen stolpern, in denen ihr spezielle Outfits für Link findet, die von früheren Zelda-Spielen inspiriert wurden.
In diesem Zelda: Breath of the Wild DLC 1 Guide erklären wir euch, wie ihr an die entsprechenden Inhalte gelangt und welchen Nutzen sie haben. Übrigens: Auf der Switch benötigt die erste Erweiterung schmale 456 MB, während ihr auf der Wii U hingegen stattliche 3,7 GB an Speicherplatz freischaufeln müsst.
Springe zu:
- Welche Inhalte hält Zelda: Breath of the Wild DLC 1: Die Legendären Prüfungen bereit und wie erhält man sie?
- Neue Features und Inhalte im Zelda-DLC: Die Legendären Prüfungen
- Fundorte der Rüstungen in Zelda: Breath of the Wild DLC 1: Die Legendären Prüfungen
- Fundorte der neuen Truhen im Zelda-DLC
- Was wir über das zweite DLC-Zusatzpaket für Zelda: Breath of the Wild wissen
Seid ihr hingegen auf der Suche nach Hilfestellungen zum eigentlichen Hauptspiel, werft einen Blick auf unsere Zelda: Breath of the Wild Komplettlösung.
Welche Inhalte hält Zelda: Breath of the Wild DLC 1: Die Legendären Prüfungen bereit und wie erhält man sie?
Habt ihr den Erweiterungspass im eShop der jeweiligen Konsole gekauft, müsst ihr ggf. noch das aktuellste Update des Spiels herunterladen (auf der Switch müsst ihr dafür lediglich das Zelda-Symbol auswählen, die Plus-Taste drücken und auf den Update-Reiter klicken).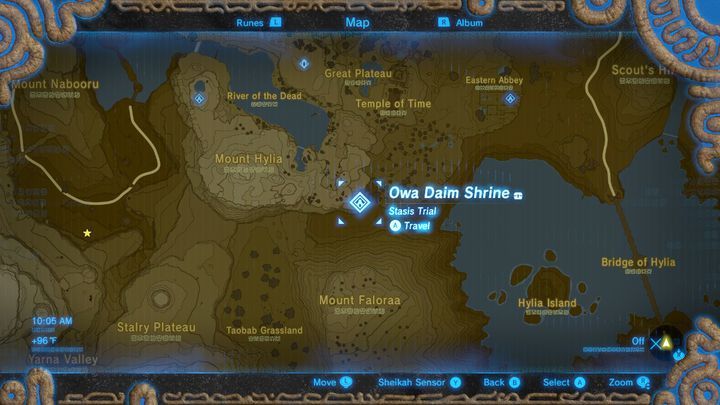 Hier noch mal eine kurze Übersicht, was sich anschließend auf eurer Konsole befindet:
- Master-Modus (Hard-Modus)
- Zugang zur Prüfung des Schwertes (Arena mit mehreren Gegner-Wellen)
- Pfad des Helden (Karten-Funktion)
- Quests für das Teleport-Medaillon, die Krog-Maske sowie die Tingle-, Majora’s-Mask-, Phantom- und Midna-Rüstung
Startet das Spiel und ladet euren Spielstand. Anschließend werden alle DLC-Quests automatisch aktiviert. Denkt daran, dass ihr diese erst absolvieren müsst, bevor ihr Zugriff auf die jeweiligen Inhalte erhaltet. Lediglich der Pfad des Helden sowie der Master-Modus sind von Anfang an verfügbar; letzteren wählt ihr direkt im Hauptmenü aus.
Neue Features und Inhalte im Zelda-DLC: Die Legendären Prüfungen
Der erste Zusatzinhalt bringt euch insgesamt drei essentielle Gameplay-Erweiterungen: den anspruchsvollen Master-Modus, die Prüfung des Schwertes sowie die praktische Pfad-des-Helden-Funktion.
Master-Modus
Der Master-Modus zieht den ohnehin nicht zu verachtenden Schwierigkeitsgrad des Hauptspiels an allen Ecken und Enden an. Dafür legt das Spiel einen separaten Spielstand an — ihr müsst euren bestehenden also dankbarerweise nicht überschreiben.
In Kürze nehmen wir die Eigenheiten des Master-Modus in einem weiteren Guide auseinander. Fürs Erste findet ihr nachfolgend aber eine grobe Liste der wichtigsten Änderungen.
- Der «Rang» aller Einheiten erhöht sich um eine Stufe. Gewöhnliche rote Bokoblins werden folglich etwa zu blauen Bokoblins befördert usw.
- Bereits in frühen Arealen bekommt ihr es mit knackigen Gegnern zu tun. Anders als im normalen Modus stoßt ihr beispielsweise bereits auf dem Vergessenen Plateau auf die knackigen Leunen.
- Vor der Veröffentlichung der Erweiterung hielt sich Nintendo noch etwas bedeckt, versprach aber «hochrangigere Feinde, auf die ihr im normalen Spielverlauf nicht stoßen würdet». Die nächsten Tage werden zeigen, worauf die Japaner hiermit anspielten.
- Gegner regenerieren während des Kampfes ihre Gesundheit und entdecken Link früher als gewöhnlich.

- Ihr könnt in Hyrule auf fliegende, an Ballons befestigte Floße stoßen, auf denen gleichermaßen Feinde wie Schatztruhen warten.
- Es gibt lediglich einen manuellen Speicherplatz sowie einen automatischen Speicherplatz.
Es erklärt sich von selbst, dass euch dieser Modus speziell in Kämpfen einiges abverlangt. Ihr solltet nicht blindlings auf jeden Gegner zustürzen und stattdessen lieber zweimal abwägen, ob und welche eurer verbleibenden Gegenstände ihr einsetzt. Bevor ihr euch an dieser Herausforderung versucht, ist es also keine schlechte Idee, zumindest eine Handvoll Stunden in den normalen Schwierigkeitsgrad zu investieren.
Prüfung des Schwertes
Die Prüfung des Schwertes wurde ursprünglich als sogenannte «Cave of Trials» angekündigt: ein Feature, das in einer ähnlichen Form bereits in früheren Zelda-Spielen vertreten war, etwa als Drillhöhle in Twilight Princess.
Innerhalb dieses Gebiets muss Link ohne jedwede Gegenstände auskommen — das schließt Waffen sowie Rüstungen mit ein — und gegen mehrere Wellen von Gegnern bestehen. Nach 45 (!) Räumen erwartet euch für diese Mühen aber eine angemessene Entschädigung in Form einer Erweiterung des Master-Schwerts.
Habt ihr die Prüfung des Schwertes erfolgreich abgeschlossen, «erwacht» euer Master-Schwert: Es wird permanent auf Stufe 60 aufgewertet und auch seine Haltbarkeit steigt enorm. Damit wird es endgültig zur besten Waffe im ganzen Spiel.
Wollt ihr die Herausforderung annehmen, werft einen Blick auf die Seite Zelda: Breath of the Wild — Prüfung des Schwertes bestehen.
- Bevor ihr euch dieser Herausforderung stellt, müsst ihr das Master-Schwert gefunden haben. Befindet es sich in eurem Besitz, steckt es einfach zurück in das Podest und die Prüfung beginnt.
- Zwar müsst ihr die Prüfung ohne eure Waffen, Rüstungen und Gegenstände bestreiten. Dafür bleibt Links Gesundheit- und Ausdauer jedoch unangetastet. Es wäre also keine schlechte Idee, vorab ein paar weitere Schreine zu besuchen, um diese Werte zu verbessern.
- Während der 45 Räume gibt es zwei Checkpoints, je nach dem ersten und dem zweiten Drittel.
 Sterbt ihr, könnt ihr an diesen Stellen erneut beginnen, ohne wieder beim ersten Raum anfangen zu müssen. Aber: Tut ihr dies, wird euer Inventar wieder auf Null zurückgesetzt.
Pfad des Helden
Der Pfad des Helden wird augenblicklich nach dem Installieren des DLCs aktiviert und bietet eine praktische Wegfindungs-Funktion. Im Wesentlichen zeichnet es den von euch zurückgelegten Weg auf, den ihr auf eurer Karte jederzeit vor- und zurückspulen könnt, um euch einen Überblick darüber zu verschaffen, wo ihr schon überall wart. Falls ihr euch nicht mehr sicher seid, wo um Himmels willen noch mal dieses eine verfluchte Rätsel war, könnt ihr nun also jederzeit nachschauen.
Das Feature zeichnet maximal 200 Spielstunden auf. Die Chancen stehen also nicht schlecht, dass euer gesamter Spieldurchgang vom Pfad des Helden festgehalten wird. Da eure Bewegungen zudem auch rückwirkend aufgezeichnet werden, funktioniert das Feature sogar rückwirkend mit jedem eurer bislang angelegten Spielstände (selbst wenn diese vor der Installation des DLCs begonnen wurden).
Fundorte der Rüstungen in Zelda: Breath of the Wild DLC 1: Die Legendären Prüfungen
Zu guter Letzt hält das erste Erweiterungspaket noch eine Handvoll neuer Ausrüstung und Gegenstände bereit. Sobald ihr das Spiel mit installiertem DLC startet, erhaltet ihr einige Nebenquests. Die entsprechenden Fundorte und damit verbundenen Aufgaben findet ihr nachfolgend.
- Fundort Teleport-Medaillon (ermöglicht euch das Erschaffen eines Schnellreisepunktes)
- Fundort Krog-Maske (macht die Suche nach Krog-Samen erheblich leichter)
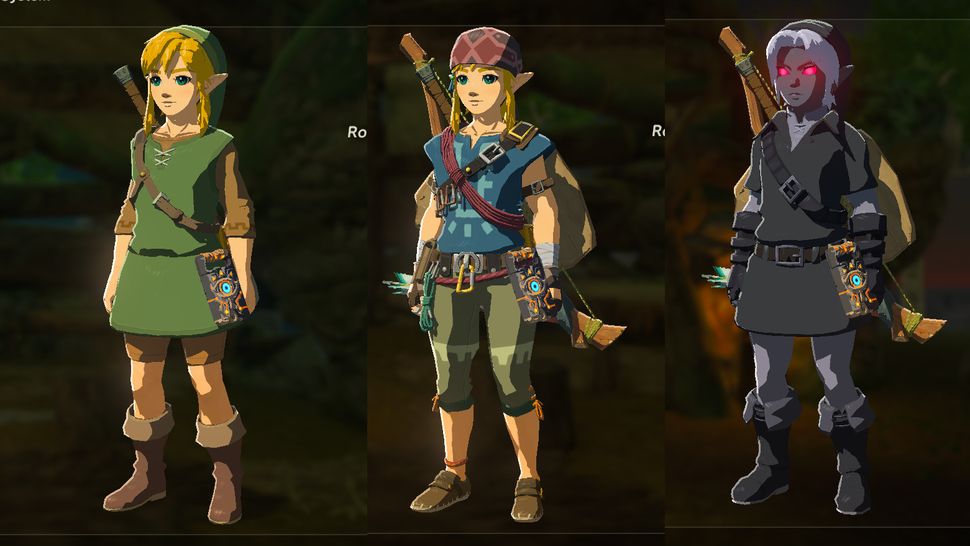
- Fundort Tingle-, Majora’s-Mask-, Phantom- und Midna-Outfit
Ein kleiner Hinweis: Einige der oben genannten Gegenstände können nicht aufgewertet werden, wie es bei anderen Rüstungsteilen des Hauptspiels der Fall ist. Zwar haben auch die neuen Outfits einige Boni — das Tingle-Kostüm lässt Link etwa bei Nacht schneller rennen -, an die Defensivwerte verbesserter Endgame-Rüstungen kommen sie allerdings nicht heran.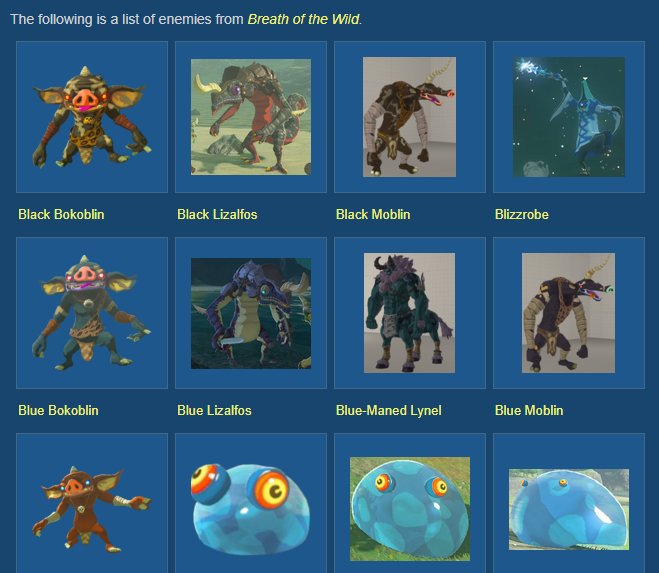
Natürlich lohnt es sich trotzdem, Jagd auf die wortwörtlich einzigartigen Outfits zu machen. Und weil sie tatsächlich nur ein einziges Mal im gesamten Spiel vorkommen, solltet ihr tunlichst darauf achten, sie nicht versehentlich aus eurem Inventar zu entfernen!
Fundorte der neuen Truhen im Zelda-DLC
Zusätzlich zu den bereits genannten Inhalten gewährt euch das Erweiterungspaket Zugang zu drei Schatztruhen, die ihr auf dem Vergessenen Plateaus finden könnt. Selbst wenn ihr bereits weit über dieses Areal hinaus seid, könnt ihr jederzeit zurückkehren, um die neuen Schätze in euren Besitz zu bringen.
Rubine: Diese Truhe befindet sich unmittelbar neben dem Oman-au-Schrein.
Bombenpfeil x5: Lauft hinter den Kah-Namut-Schrein und schaut nach Süden. Ihr könnt die Truhe etwas weiter unten an direkt an der Wand sehen. Springt einfach runter oder gleitet nach unten, um sie zu öffnen.
Nintendo-Switch-Shirt: Begebt euch zum Ja-Bashif-Schrein und klettert an der gegenüberliegenden Wand hinauf.
Was wir über das zweite DLC-Zusatzpaket für Zelda: Breath of the Wild wissen
Den zweiten Teil der Erweiterung erhaltet ihr ausschließlich über den Season-Pass von The Legend of Zelda: Breath of the Wild. Um das klarzustellen: Der Kauf dieses Doppelpacks ist die einzige Möglichkeit, an eines bzw. beide der DLC-Pakete zu gelangen — ihr könnt diese nicht einzeln kaufen. Für den Erweiterungspass knöpft euch Nintendo 19,99 EUR ab. Womöglich wird die zweiteilige Erweiterung zu einem späteren Zeitpunkt im Rahmen eines Sales für einen geringeren Preis angeboten. Darauf wetten solltet ihr aber nicht.
Das erste DLC-Paket — Die Legendären Prüfungen — könnt ihr ab sofort herunterladen. Der zweite Teil — Die Ballade der Recken — folgt im Winter 2017.
Der zweite DLC rückt Zelda sowie die vier Champions in den Fokus, die vor 100 Jahren kämpften und starben — ein Jahrhundert vor den Ereignissen des Hauptspiels.
Das zweite Zusatzpaket erscheint gemeinsam mit vier neuen Amiibo-Figuren — den vier Champions. Welchen Nutzen sie im Spiel haben, ist bislang jedoch nicht bekannt.
Walkthrough — The Legend of Zelda: Breath of the Wild Wiki Guide
The Legend of Zelda: Breath of the Wild Wiki Guide
By Brendan Graeber, pameluh, Max Roberts, +17.5k more
updated
Welcome to IGN’s The Legend of Zelda: Breath of the Wild Walkthrough. This guide will seek to assist you through the main story adventure in Breath of the Wild, from Link’s strange awakening to the final boss fight.
Loading
advertisement
With an open world unlike any other Zelda game, Breath of the Wild’s main story quest can be tracked in Link’s Adventure Log — and can be undertaken at any point — or avoided in favor of exploring Shrines and taking on numerous Side Quests. Use this Legend of Zelda: Breath of the Wild guide to help you get back on track if you happen to lose your place in the quests.
Note that the sections are divided up below in terms of the Main Quests that you get while playing. However, many of these quests — like the order you complete dungeons — can be done in any order. Almost all of the Main Quests are technically optional in one way or another, and some will provide more benefits than others on the road to defeating Ganon.
See the sections below for an optimal route through the main quests and their locations.
| Quest Name | Location |
| Follow the Sheikah Slate | Great Plateau |
| The Isolated Plateau | Great Plateau |
| Seek Out Impa | Great Plateau |
| Locked Mementos | Kakariko Village |
| Find the Fairy Fountain | Kakariko Village |
| Free the Divine Beasts | Multiple |
| Reach Zora’s Domain | Lanayru Tower |
| Divine Beast Vah Ruta | Zora’s Domain |
| Divine Beast Vah Rudania | Goron City |
| Divine Beast Vah Medoh | Rito Village |
| Forbidden City Entry | Gerudo Town |
| Divine Beast Vah Naboris | Gerudo Town |
| The Hero’s Sword | Great Hyrule Forest |
| Captured Memories | Kakariko Village |
| Destroy Ganon | Hyrule Castle |
- See Also: Our Full List of Side Quests and DLC Side Quests in Breath of the Wild
- Full List of Shrines and Shrine Quest Walkthroughs in Breath of the Wild
- How to Find and Unlock All Armor
Below is a list of guides and tips for taking on each level of the Trial of the Sword, an optional quest available as part of The Master Trials DLC pack for Breath of the Wild:
Here you will find a list of guides and walkthroughs for each of the quests you can undertake in The Champions’ Ballad DLC pack, which boast all new shrines and items to uncover:
| Quest Name | Location |
|---|---|
| EX The Champions’ Ballad | The Great Plateau |
| EX Champion Mipha’s Song | Lanayru Region |
| EX Champion Daruk’s Song | Eldin Region |
| EX Champion Revali’s Song | Hebra Region |
| EX Champion Urbosa’s Song | Wasteland Region |
| The Divine Trial | The Great Plateau |
Up Next: The Shrine of Resurrection
Previous
How to Whistle Sprint
Next
The Shrine of Resurrection
Was this guide helpful?
In This Wiki Guide
The Legend of Zelda: Breath of the Wild
Nintendo
Rating
ESRB: Everyone 10+
Platforms
Wii UNintendo Switch
Avatar: The Way of Water Holds Off an Impressive $30. 2 Million Debut by M3GAN
M3GAN Review
Loading
How to Build a Decoder in Minecraft (Ft. WildEngineering)
Renfield — Official Red Band Trailer
Check out the trailer for Renfield, the upcoming vampire movie starring Nicholas Hoult and Nicolas Cage. The film co-stars Awkwafina, Ben Schwartz, and Adrian Martinez. In this modern tale focusing on Dracula’s loyal servant, Renfield (Hoult) is the tortured aide to history’s most narcissistic boss, Dracula (Cage). He’s forced to procure his master’s prey and do his bidding, no matter how debased. But now, after centuries of servitude, Renfield is finally ready to see if there’s a life away from The Prince of Darkness. If only he can figure out how to leave him. Renfield, directed by Chris McKay, arrives in theaters on April 14, 2023.
Breath Of The Wild • OneAngryGamer
Nintendo has finally managed to get the long awaited The Legend of Zelda: Breath Of The Wild more and more for both Nintendo Switch and Wii U. The game is much bigger and much more skillful in mechanics, than some people think. Luckily, there are several walkthroughs that will help with some of the problems in the game.
The Legend of Zelda: Breath of the Wild starts with Link exiting the pod. Players will be able to move around and get familiar with the basic controls. The link will move towards the pedestal in the room in order to purchase
Sheikah Slate, Mysterious Luminous Pill,
You will be able to leave the room and grab an old shirt and worn trousers from nearby chests. Use the Sheik Slate on the pedestal to exit the temple.
You can use B to jump and climb things and X to run. After you close the title of the game, the logo will appear and you will see an old man walking down the hillside near the Great Plateau region. Follow him as indicated in the video below MKIceandFire. nine0005
Talk to the old man and he will direct you to the old church.
You will find an old woodcutter’s ax next to a goblin roaming near the thicket. Kill the goblin, take the sticks and go to the ruins of the church. The woman will direct the link to the head up to the point marked on the Sheik’s shiak. The quest marker will glow on the mini-map in the lower right corner.
Near the temple there is a small cleft in the rock with another sheikh’s pedestal. Place the tablet inside to activate a scene where giant towers emerge from the ground. nine0005
You will then gain access to the Great Plateau Towers.
Each tower will open regional maps for Link to explore. You will need to scale to the top of the tower to access the map pedestals, unlike the eagle’s nests in Assassin’s Creed .
Link will need a paraglider to get out of the wall where Link and the old man are. You can only get a paraglider by trading the treasure with the old man; the treasure can be found in the Omani manor. nine0005
Activate the door with Sheikah on the pedestal in the temple.
Once inside, use the physics-based magnetic forces to knock the wall block against using one of the square blocks. You can also use blocks to crush the enemy.
There is a chest on one of the ledges on the side of the structure. You can tap the chest and access it to unlock the Traveler’s Admirer. Open the doors using the magnets and go inside to activate the temple altar. Link will gain access to his first Spirit Orb. nine0005
Talk to the old man again and he will teach you how to mark items on your map using Sheika’s scale. He will guide you to the next shrine, where you will learn how to use remote bombs and even unlock access to the Traveler’s Claymore. Make sure your inventory is free enough to take it.
To get to the spirit temple, place a bomb on a rock block that expands and retracts. Block will blow the ball towards some blocks and crack them open, paving the way for Link. nine0005
After you complete the most basic puzzle inside the temple, you’ll unlock another spirit for Link, along with a remote bomb that you can use to break open cracked walls, rock formations, and kill enemies.
Once you get outside, use the bomb to blow open the rocks blocking the archway. You can either fight the ancient guardian or climb over the wall and leave.
You can fight some goblins by using the camp and knock the beehive off the tree — kill the goblins and kill the bees and then take the beehive. nine0005
You can also learn a little cooking recipe to stay warm and recharge your health by visiting the old man’s cabin.
If you have an ax you can also cut trees.
To get across one of the chasms, cut down a tree to create a makeshift bridge.
Zoom in on the mountains to get to the next shrine; it’s marked on your map if you used the Sheika tablet to find it out. Once you reach the top and activate the pedestal, you will have access to the Ova Daim Temple. nine0005
Run up elevated platforms and dodge dripping cliffs. Take the hammer and use it on one ball blocking the path. Keep hitting him until he flies out of the way and then grab the spirit orb.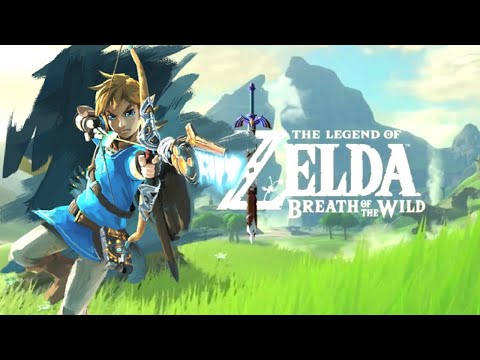
When you reach high places or catch a cold, don’t forget to dress or bring plenty of food, otherwise you will slowly lose life in the cold. Alternatively, you can use a torch to keep warm. Climb to the top of the mountain to meet the old man and he will give you doublet in order to stay warm while in frosty areas.
Go to Keh Namut Shrine to purchase the next spirit orb.
Cryonis Trial will require you to use cryo’s ability to freeze water and create platforms. The stand is where you need to raise the platform and have the cryo ability to lift Link into the air. You can also use this to raise gates or open doors.
After you finish Trial Cryonis and head outside, the old man will give Link a paraglider if you can get to his location. nine0005
The place where the old man is located is marked below on the map.
If you want to improve Link’s health or stamina, collect four Spirit Orbs and go to the Temple of Time and pray in front of the statue. After that, you will have the opportunity to upgrade your abilities. You will also find the Old Man in the temple there.
Use the Ladder to climb to the top of the temple where the bell tower should be. King Rhoam will be shown to be an old man, and he will reveal that 100 years ago — while Link was dozing — he was killed and Hyrule was destroyed. Link will need to get good, power, head to the castle, except for Zelda and defeat Ganon. nine0005
Roam will give you a paraglider and a chest with an inner bow.
The first main task is to go to Kakariko village to find Impa. Use the Sheikha Shiite to mark the location of the Impa on the mini-map and paraglider.
Actual travel time may vary, but it will most likely take you half an hour to travel the map without transport.
To see more of the map and unlock the scope of the map, head to Dueling Peaks Tower. Get up top and activate the pedestal. Cross the valley to the Peaks duel. You can also find shrines using the updated Sheikah Slate, which will indicate when a shrine is nearby.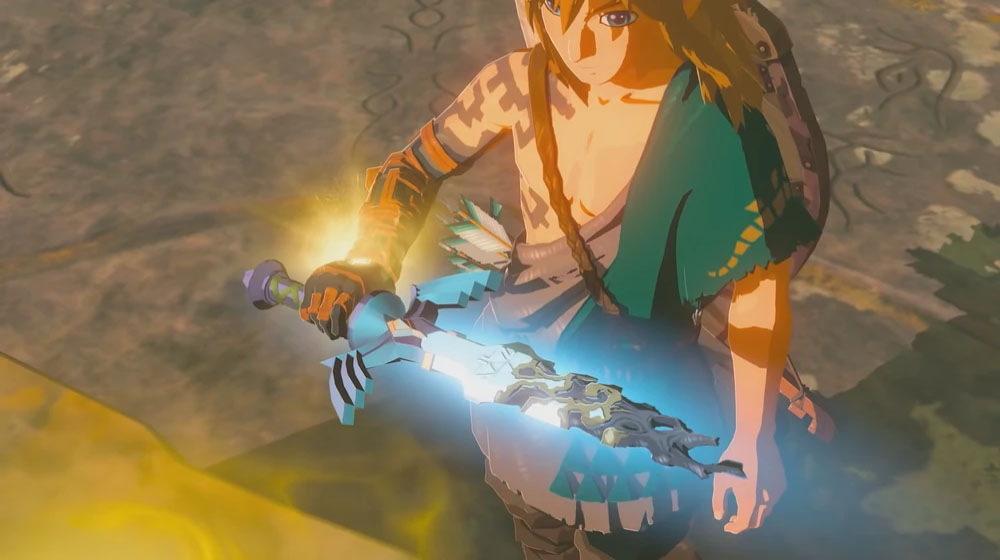 nine0005
Above the Duel Spades is the Temple of Ha-Dahamar, in some muddy swamps.
Once inside, use the cryo powers on the water to create a platform to jump over.
Go down to the bowl next to the gate room. Create a platform for waterfalls to climb up.
Use the stop time power on the rolling ball and then give it a good hammer blow towards the direction of the circular recess in the floor. Once the ball is in place it will open the door to the temple and grant access to a link to the next Spirit Orb. nine0005
Go to stable Duel Peaks.
Shibo and Darton will teach you how to catch wild horses, which can make traveling around the Great Damn Plateau much easier.
You can register your wild horses with Tasseren, but first you have to catch them. You will find Tasseren in a tent in the Dueling Peaks Stable.
Right outside the stable heading towards the next shrine, you can find a horse in the wild. You can install a horse by sneaking up behind it and pressing «A». You will either have to calm (left trigger) the horse when it goes wild, use the left stick to tell it «Whoa» or press «A» for it to «Yah». nine0005
After registering a horse, you can name it if you wish.
As you venture east towards a nearby village, you may come across Hetsu, a giant-looking piece of broccoli that can talk. If you want to complete a few side quests, Hetsu will have some for you.
If you have completed the tasks and give Hestu A seeds korok , you can expand your inventory by one slot. You can upgrade your shield, bow, or weapon slot. The more slots you add, the more korok seeds it will take to increase your inventory. You will find Hestu in the next location. nine0005
If you continue northeast along the path and across the valley to the Great Fairy Fountain, you will find yourself in the presence of a great fairy if you find yourself a little. Cotera is in the forest and can upgrade Link’s items and show him how to get extra bonuses with his equipment using set bonuses.
Head west of the Great Fairy Fountain and you’ll run into Ta’loh Naeg Shring near Kakariko Village where Impa is located.
If you need help completing the tutorial, there is a video below that demonstrates how you can overcome this problem.
The Teaching will instruct you to use the left trigger to attack the enemy with side attacks. If you dodge the exact moment of the enemy strike, you will get the perfect trick with a slow motion effect. You can then make attacks with «Y» which will initiate a flurry.
Once you learn how to make perfect blocks and tricks, you can access the next room where you can collect another Spirit Orb so that Link can become strong enough to eventually face Ganon. nine0005
Outside the Kakariko village temple is literally just down below.
There is a shrine statue that you can pray that will let you upgrade your health or stamina if you have enough orbs.
You can buy, trade and sell goods in the village if you need to upgrade your equipment.
The Guard House is where you need to talk to Impa, who will give you a link to a summary of the story of Link and Zelda’s battles against Ganon. She also explains that Hyrule’s advanced technology from 10,000 years ago was built to neutralize Ganon using four Divine Beasts and Guardians. nine0005
Impa will give Link a new main mission: he must free the Divine Beasts and seek help from his four pilots scattered around the four corners of Hyrule. Their locations are marked on the map:
Before Link can repair the Divine Beasts he must first repair his Sheikah Slate and Impa gives him another quest to meet with the researcher in Hateno Village to repair the slate.
Hateno Village is located across Hateno Fort, which is located east of Kakariko. You will need a horse if you want to get there quickly. nine0005
Link may also have his first encounter with the Igi Clan while moving through the valley, so be careful who you talk to because some may present themselves as villagers when in fact they are assassins. They are very dangerous and battles can take a while to defeat just one of them. The AI is very cunning and you will have to fight smart and tactical to take down the killer.
On your way to Hateno village, you will most likely want to open the map by visiting one of the towers. Directly east of western Nekluda — southeast of Kakariko village — and past the main river, you’ll find Hateno’s tower, which will open up the rest of the map to this area. You will find the Hateno Tower location shown in the image below. nine0005
Tower scaling will be difficult considering it requires a lot of stamina so bring a lot of energy elixirs or you won’t be able to reach the top. Alternatively, if you’ve completed enough shrines and increased your stamina, then you should be able to handle it without too much hassle.
Also, try to avoid traveling at night or when the blood moon is out, otherwise you might get thwarted by super powerful monsters. nine0005
Go to Hateno and there will be a lot of bizarre NPCs you can encounter. Getting there is not that hard if you just skydive down from the Hateno Tower.
There are a few more side quests to pick up while Link is also in town to restore his Sheikah Slate.
Now, if you’re looking for help when it comes to fighting a specific boss, YouTuber Fight Boss Database has a guide covering all the major bosses in the game. You can check it out below. nine0005
The Legend of Zelda: Breath of the Wild is available right now exclusively for the Wii U Switch and Nintendo.
In an alternate passage from Shirrako, He meets Tona while venturing through the river areas. Tona will direct you to the prince of Sidon near the mountains on the Inogo Bridge. However, the real meat of the next video is that it walks you through the puzzle to complete the SOH Kofi Shrine, as mentioned below.
The task is quite simple, focusing on mortal combat and not moving boxes around or taking part in any physics challenges. nine0005
Further on at 49:32 sign, there is a walkthrough for Shah Rata Shrine. You will have to use all your skills and abilities to overcome this problem. The main goal is to drain the water and force one of the lasers to focus on the crystal.
If you need help completing the Bosh Kala Shrine, you will find a walkthrough that starts at the 1:31:59 sign.
You will need to paraglider through the winds of the wind to get around the shrine. Literally the only task is to tactfully glide and use the appropriate wind lanes to acquire crates and reach the shrine. If you follow the paths correctly, you will easily reach the Spirit Horde. nine0005
The next shrine up is the Wahgo Katta Shrine. The walkthrough for completing this particular shrine starts at the 2:01:51 mark.
The test task is called «Metal connections». It is centered around climbing the map.
You can use the magnetic skill to move boxes around to reach different platforms. Basically you just have to move over the metal crates from one platform to another so that you can climb them to reach the Spirit Orb shrine. For the last platform, simply stack all three boxes and then use the metal bridge to create a ramp from the boxes to the platform where the shrine is located. nine0005
For the Hila Rao Temple located in Floret Sandbar, you will find a walkthrough for this particular task card at 2:15:50 sign.
The task requires the use of water to get through the room. Basically, use the cryo skill to create platforms and jump until you reach the shrine at the end. Take the Spirit Orb and you’re good to go.
Breath of the Wild available now
944 views
62 shares
3 minutes read
Bruno Martinez
February 12, 2019
Grab your Nintendo Switch and enjoy the first Legend of Zelda: Breath of the Wild «The Master Trials» expansion.
Serenity in the eyes of those who enjoy Zelda DLC
The wait is over, at least the first part of DLC The Legend of Zelda: Breath of the Wild . The game, which was released with the Nintendo Switch on March 3, 2017 and reached an absurd level of sales for a Japanese company, is now available. nine0005
Supplement 1, «Main Trials» became available at 1:30 Brazil time this Friday (XNUMX) . This DLC brings some exciting new features to the game, and the «original story» won’t be released until the end of the year.
In Master Trials you can now live an even more challenging experience with hard mode. Find 900 korok seeds this will also become easier thanks to the new item. The player will also have access to the new clothes and the new search to reveal the true power of the Master Sword. Check out all the details
What you need to know about the first part of Zelda: Breath of the Wild DLC
- Trial of the sword enemy after another. Link starts searching for without any armor or sword and need to defeat all 45 enemies of . When the hero completes all tasks, true strength Master sword will wake up and she will always shine in all her strength;
- Hard Mode: The Legend of Zelda: Breath of the Wild is already considered one of the most addictive games in the Zelda franchise.
 Fans are waiting for new challenges in the new hard mode. In this hard mode or , the enemy’s rating is increased by at least one level , i.e. the red Bokoblin will turn blue. In addition, it will be easier for players to find mega strong enemies, and it will also be harder to attack them by surprise. nine0245
- Hero’s Journey Mode : Exploring Hyrule is amazing, but sometimes even after 100 hours of play, the player still hasn’t accessed all of the game’s locations. To make people remember where they’ve been, the Hero’s Journey mode will let you see every corner you’ve walked through up to 200 hours of in-game. It will be possible to track «in real time» what you have done to know if you need to return to the area or not, in addition to discovering other places you have not been yet. This feature will help those who do not know where else to look for new shrines. nine0245
- Medallion of Travel: A new in-game chest will be added to the game with Medallion of Travel , the object will allow Link to create a new temporary portal that does not contain a sanctuary.
 That is, you can create an access point on some bridge to catch some Hyrule dragons or wherever you want.
 - Korok Mask : By finding Korok Mask , it will be easier for Link to know where Korok is when he explores the game. If the player doesn’t know, they are 900 seed korok , so this item should arrive on time. As Link approaches Korok, the mask shakes as if there is a temple nearby.
- New Equipment: Eight new pieces of equipment inspired by previous characters in the game and will be added to the series in Breath of the Wild with the first DLC. Once players have discovered them, they can be equipped on Link with clothing resembling Midna, Tingle, Phantom, and Majora’s Mask. nine0245
It is worth remembering that in hard mode you can only play from scratch, in another save. To find out where to find all the new items, stay tuned to showrooms.
