Intel Unlock Overclock – Intel Core i7 Overclocking Guide
Intel Unlock Overclock – Intel Core i7 Overclocking Guide
Intel Unlock Overclock Phase 3 – Overclocking the Intel Core i7 PC …
Who did not already read the beginning of the guide, find here the first page of the Intel Unlock Overclock article.
Well, then we power on the PC and look if everything is working. This Gigabyte full screen boot logo looks very nice, but we should deactivate it in the BIOS.
BIOS Update …
Before we change any settings in the BIOS, we make a BIOS update to the most current version. Because we do not like to work with old bugs, which were already solved. On the Gigabyte P55A-UD6 motherboard the version F6 was installed, which we replace now with the version F9. Download the BIOS, unpack it to an USB stick, start Q-Flash with “End” key during boot-up and update the BIOS:
Check the original values and setup the basic BIOS settings …
Then the first boot screen of the new system, whereby the CPU and the memory are somewhat underclocked. Everything else already looks not bad at all.
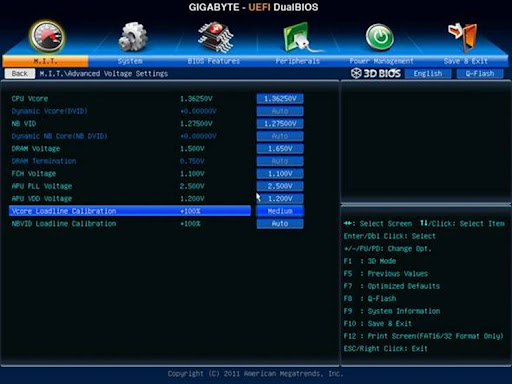
The MB Intelligent Tweaker (M.I.T.) menu of the Gigabyte P55A-UD6 motherboard contains all important frequency settings.
The status menu (under M.I.T. Current status) shows the current settings of the four CPU cores, whereby the screen hangs unfortunately very often with the Gigabyte P55A-UD6 motherboard BIOS version F9 and can only left by Reset.
Operating system installation …
Before we start overclocking and unlocking Intel CPU, we start the PC first times without any overclocking and install a fresh Microsoft Windows 7 Ultimate 64bit operating system. A 32bit installation would be no good choice here, since Windows7 in the 32-Bit version unfortunately doesn’t support the full 8GB completely. In approximately 9 minutes and 30 seconds the installation from an USB stick is finished, that’s really nice.
Then a first view into the task manager and we see – 8 CPU cores.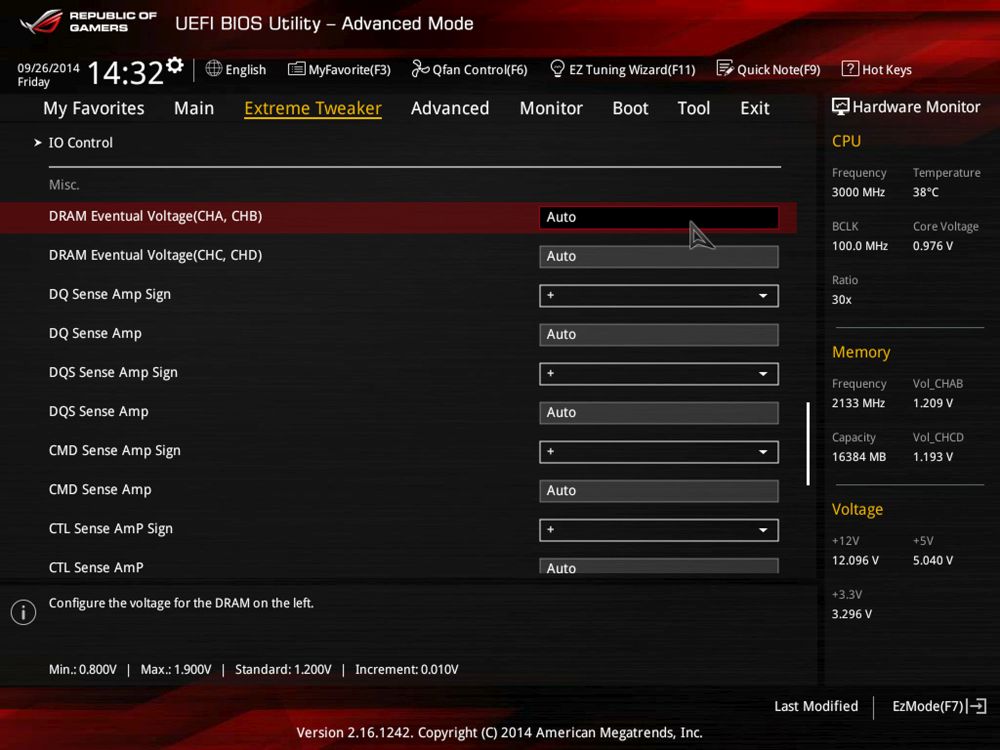 8 CPU cores? Sure , because as explained in Intel Unlock Phase 1 of 3, this Intel Core i7-875K processor has four cores, whereby each core can process two tasks at the same time thanks to the Hyper-Threading technology.
Check the CPU benchmark results without overclocking …
Well, now we want to see the first time, what the CPU offers with Turbo Boost, but without overclocking. The system reached in Windows7 a performance index of 6.8 and the processor offers 7.3 points. Who would have thought that the fast OCZ 128GB SSD with good 6.8 points would be the slowest device in the PC …
Let us look at the CPU values again in detail. The CPU-Z software shows an Intel Core i7-875K LGA 1156 Lynnfield CPU with 32KB L1 cache, 256KB L2 cache per core and a total of 8MB L3 cache. The processor frequency is indicated in the field core speed as 1230 MHz (136.7 MHz x 9x multiplier) and the core voltage is only 0.896 V. In the BIOS basic adjustment, the CPU frequency and Vcore is very low, because the CPU lowers the multiplier and voltage automatically depending upon load. Intel e.g. offers EIST (Enhanced Intel SpeedStep Technology) and the C1/C3/C6/C7 State in the Sytem Halt State for an automatic Vcore and CPU clock adjustment.
And to know how fast this Gigabyte P55A-UD6 platform is with an Intel Core i7-875K CPU, Sapphire HD4870 video card and Patriot Viper II DDR3-2400 8GB memory without overclocking, we start the first benchmark programs without overclocking. With 3DMark Vantage the system reached in the entry test a Score of E26998 with 37641 GPU points and 14607 CPU points.
In 3DMark06, the Intel Core i7 system reached 14675 3DMarks.
With SiSoftware Sandra 2010c the CPU reached with Arithmetic 56.3 GOPS and 110.11 MPixel/s in the Multimedia benchmark.
Power consumption without overclocking …
In idle, the Intel Core i7 system has a low power consumption of 128 Watts without overclocking. The maximum power consumption peak of the system after various benchmarks was 215 Watts without overclocking.
Intel Core i7 Unlocked CPU multiplier overclocking …
For the first overclocking attempts we should deactivate the automatic settings in the Advanced CPU Core Feature BIOS, because one could otherwise have the risk to produce unfavorable voltage and frequency combinations which could not work stable. Then we come finally to that, which we’re waiting for such a long time – the overclocking of the Intel Core i7 875K CPU with unlocked multi. The multiplier can be increased in the Advanced Frequency Settings menu from 9x to 62x. We begin in small steps and look, up to which frequency this CPU runs stable.
Wow, even with 29x 133MHz = 3.86 GHz starts the PC without problems, so let’s try more.
In dozens steps we came now up to incredible 32x 133MHz = 4375 MHz. Right, 32x 133MHz should actually result in 4256 MHz, but the Gigabyte board increases the Base Clock frequency (BCLK) about more than 3 MHz and with the high multiplier we get a frequency difference of approx. 100MHz. Here one should better switch on BCLK control and adjust it to fix 133 MHz. Anyway, we would like to test 4375 MHz now, but the benchmark program unfortunately doesn’t like to run stable after some sequences. Thus we must reduce the frequency (or with the Vcore to help) so far, until all is running 100% stable.
Maximum stable overclocking result over the CPU multiplier without Prime errors was 3964 MHz (29x 136,7MHz). In the BIOS of the motherboard it was necessary to enter a multiplier of 27x instead of 29x, because the F9 BIOS is unfortunately incorrect concerning the multiplier changes and supplies thus wrong results.
CPU benchmark results with unlocked multiplier overclocking …
Well then let us look which benchmark results we can reach now. With 3DMark Vantage the system reached in the Entry test a Score of E34342 (instead of E26998 without OC) with 40130 GPU points (instead of 37641) and 23970 CPU points (instead of 14607).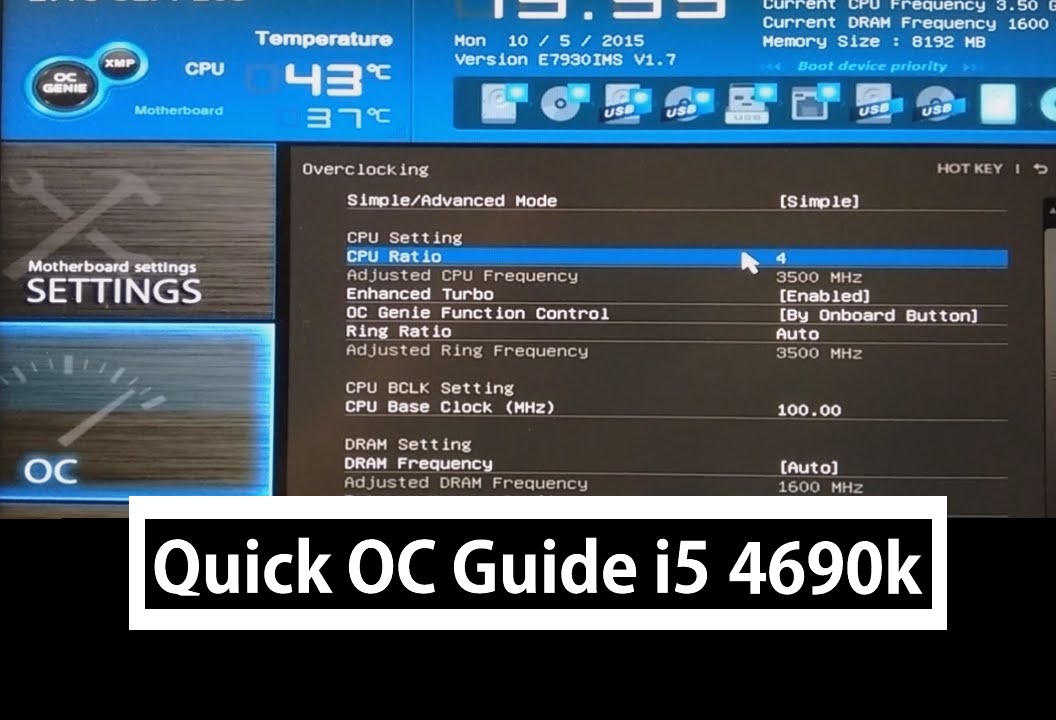 Very good result and we reached that result just by increasing the multiplier of the unlocked Intel CPU!
In 3DMark06 the overclocked Intel Core i7 system reached now 18515 3DMarks (instead of 14675 OC).
With SiSoftware Sandra 2010c the CPU now reached in Arithmetic 96.14 GOPS (instead of 56,3 GOPS without OC) and in the Multimedia benchmark 187.84 MPixel/s (instead of 110,11 MPixel/s without OC).
Power consumption with CPU multiplier overclocking …
In idle, the overclocked Intel Core i7 system has now a power consumption of 150 Watts (instead of 128 Watts). The maximum power consumption peak of the system after various benchmarks was 227W (instead of 215W).
Intel Core i7 CPU Base Clock overclocking …
Now we try the same again by increasing the Base Clock (BCLK). So multi down and Base Clock up. The maximum system bus frequency was a little bit over 200MHz. If we like to achieve our maximum CPU OC result with 200MHz BCLK, we need a 20x multiplier. OK, 20x 200MHz = approx. 4 GHz!
Now we check the values again with CPU-Z:
CPU benchmark results with Base Clock overclocking …
Well then let us look which benchmark results we can reach with high BCLK. With 3DMark Vantage the system reached in the Entry test a Score of E34762 (instead of E34342 with multi) with 40383 GPU points (instead of 40130) and 24522 CPU points (instead of 23970). So the result is only a little bit higher than the result with the high multiplier!
In 3DMark06 reached the BCLK overclocked Intel Core i7 system now 18648 3DMarks (instead of 18515 with multi).
Power consumption with Base Clock overclocking …
In idle, the Intel Core i7 system has a power consumption of 180 Watts (instead of 150W with multi). The maximum power consumption peak of the system after various benchmarks was 315W (instead of 227W). Here we can see a significant difference, because the power consumption increased enormously!
Adjust the memory frequency and memory timings …
Nevertheless we set the memory to a higher value, because it runs also with 200MHz by SPD not yet as DDR3-2400 memory, but only with 800 MHz as DDR3-1600 memory.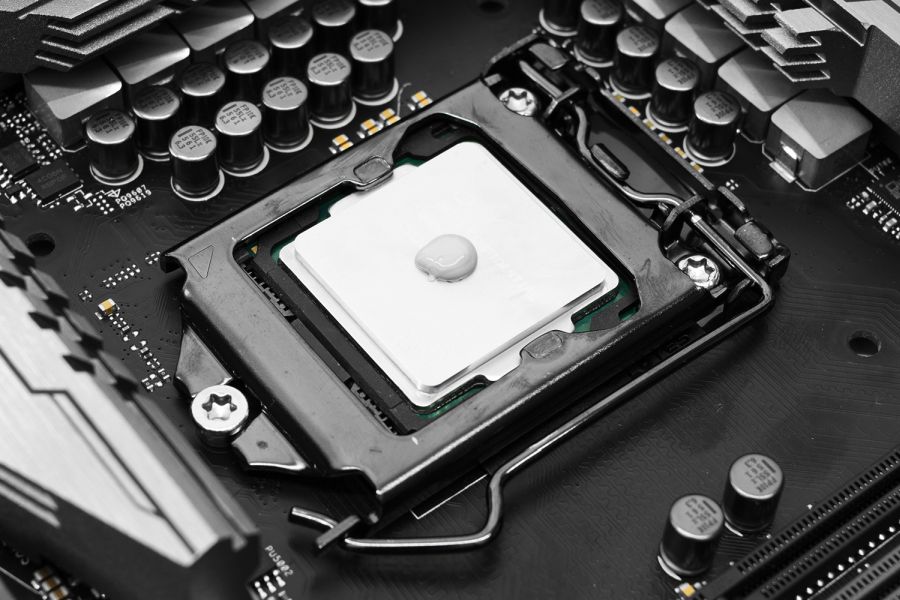 It was not possible to run the memory stable on DDR3-2400 with 1.660 V and slower timings on this board, but DDR3-2000 (1000 MHz) works perfectly with 9-11-9-27 timings.
Well then let us look which benchmark results we can reach with faster memory. With 3DMark Vantage the system reached in the Entry test a Score of E34882 (instead of E34762 without RAM OC) with 40533 GPU points (instead of 40383) and 24595 CPU points (instead of 24522). So it’s just a small increase of these benchmark values.
In 3DMark06 the overclocked Intel Core i7 system reached now 18673 3DMarks (instead of 18515 without RAM OC).
With SiSoftware Sandra 2010c the CPU reached in Arithmetic 97 GOPS and in the Multimedia benchmark 189.6 MPixel/s.
Result and general impression …
The Intel Unlock Overclock mission impressively shows that by increasing the multiplier, most overclockers can get nearly the maximum out of the Intel Core i7-875 processor. Furthermore, the power consumption of the system with an exclusive multiplier overclocking is very low in spite of the enormously high performance gain. In our case the increasement of the Base Clock frequency would have been sufficient, in order to reach the highest CPU frequency, however things would look different with a watercooling, a compressor cooling or with LN2 cooling. An energy-conscious Overclocker get with this Intel Core i7 875K processor finally the possibility to build an inexpensive, fast and energy-saving Intel Core i7 OC system. High-End Overclocker will also benefit from the unlocked multiplier, because they’re able to overclock this CPU to the limit, independently from the rest of the system. Only for reaching the high memory frequencies and an error free support of the multiplicator settings by the motherboard manufacturers should be optimized.
Alles in allem war diese Intel Unlock Overclock Mission sehr spannend und auf jeden Fall erfolgreich!
All in all this Intel Unlock Overclock mission was very interesting and in any case successfull!
Like already mentioned at the end of the second phase, there’s another big surprise for the visitors, because Intel draws the suitcase at ocinside. de with contents to one happy winner. Who would like to participate in the contest, will find here all further details in German.
Win this Intel Unlock Overclock Case (German)
Discuss in our forum and share experiences …
The Workshop with more guides …
Back to the Intel Unlock Overclock Page 1 …
Overclocking Intel i7-5820k guide 4700MHz v1.285
Last year we have upgraded our computers in our workstation offices in North London – Palmers Green.
We have gone for following components:
- CPU: Intel Core i7-5820K, 3300 MHz (4700 MHz OC)
- CPU Cooler: Kraken X61
- Memory: G Skill F4-3000C15-4GRR 16GB
- Motherboard: Asus X99-S (1 PCI-E x4, 5 PCI-E x16, 8 DDR4 DIMM, 1 M.2, Gigabit LAN, Audio)
- PSU: 850W EVGA SuperNOVA G2
- Graphic Card: NVIDIA Ge Force GTX970
- Sound Card: Creative Recon 3D
- Primary HDD: SAMSUNG SM951 MZHPV256HDGL-00000 (256 GB, PCI-E 3.
 0 x4)
0 x4) - Secondary HDD: 3 x WD Green WD30EZRX (3 TB, SATA-III)
- Monitors: Dual HP Z30i IPS Display
- PC Case: Define R5
Since we don’t play any games, we thought this setup should be sufficient for our daily tasks. We run Windows 10 PRO, dual boot with Hardened Gentoo x64 and few Virtual machines (all with Debian).
Ok, so you are now know our configuration, let’s get going with overclocking, we wanted to achieve at least 30% but end up with even more – 42%
Step 1:
Remove all Asus OC software as we are going to do manual overclock in BIOS. Please make sure you have the latest BIOS.
Also make sure your CPU cooler is sufficient enough to handle this beast.
Let’s enter the BIOS and go to:
Set OC Tuner to XMP and CPU Strap to 100MHz.
Set BCLK Frequency to 100 – increasing this will also increase memory frequency (Memory speed= BCLK * Memory multiplier). We have tried playing with this setup increasing BCLK, but we could not get stable overclock at 4500MHz+
Leave anything else in this section on Auto as Asus motherboard will take care of anything else.
Step 2:
Scroll down in this section and make sure all voltage below are set to AUTO, there is no need to adjust them as our motherboard will set them up automatically and won’t go over the limits.
Step 3:
One of the most important step in CPU overclocking, here we adjust CPU Multiplier (CPU Speed= BCLK * CPU Multiplier)
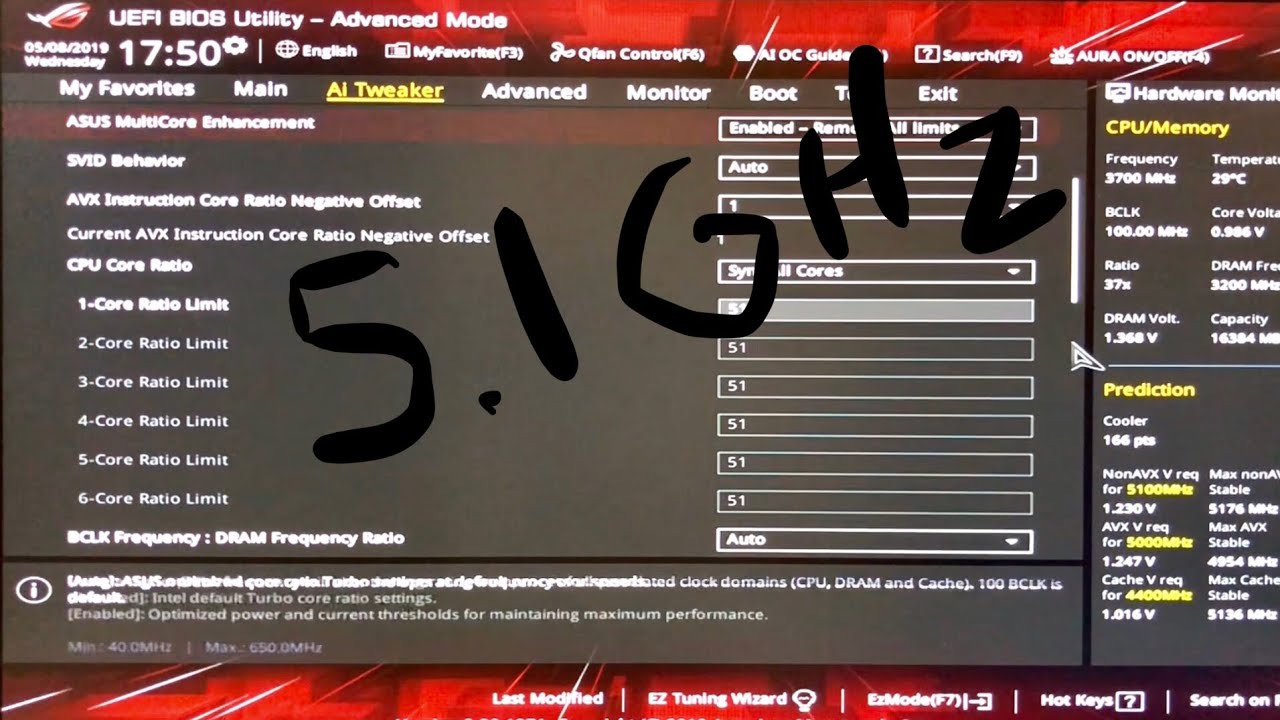
Select Sync all cores from CPU Core ratio option.
On Intel i7 5820k you can easily set this up at 40 at the beginning and start increasing it once you test stability of your OC.
Step 4:
Most important step, setting Core Voltage of our CPU.
Set CPU Core Voltage to Adaptive Mode
Offset Mode Sign to +
CPU Core Voltage Offset to Auto
Leave all other settings on AUTO as they will be set up automatically.
If you see CPU Input Voltage going above 1.950, then set it up manually at this value, or leave AUTO if it stays below.
Now under Additional Turbo Mode CPU Core Voltage set at 1.290 at the beginning. Keep this value under 1.300 for 24/7 OC profile.
Step 5:
Here we start to play and try to find the right balance between CPU multiplier, Vcore and CPU temps.
Install Intel Extreme Tuning Utility for a quick benchmark.
Set Vcore on value in step 4 and start increasing multiplier.
Set CPU multiplier to 41, boot to Windows, run stability test with Intell XTU. This software will usually detect invalid settings right away, resulting in BSOD or restart.
If you passed OC Test, boot back to BIOS, increase CPU multiplier and repeat the process.
When you get Blue Screen, decrease CPU multiplier to last good settings.
Once you found your “magic” CPU multiplier number, go back to Step 4 and start decreasing Additional Turbo Mode CPU Core Voltage by 0. 005
005
Repeat the test with Intel XTU and keep decreasing Vcore until you find your “magic” value.
Step 6:
Once you find your “magic” numbers it’s time to do full stress test.
Run Intel XTU and setup stress test for at least 5 hours. Use RealTemp to monitor your Core temperature. Keep Core temperature under 85C.
Every chip is different, overclocking results may vary, but if your chip is capable of 4500MHz under 1.300v Vcore then you are lucky.
We have been extremely lucky with ours achieving 4700Mhz at v1.285
Below are few screenshots from CPU-Z and RealTemp (idle and stress).
i7 5820k overclocked to 4700MHz with Vcore 1.285
i7 5820k 4700MHz CPU temperature idle
i7 5820k 4700MHz CPU temperature full load
Good luck with your overclocking, let us know your results in comments below.
PCMarc Team
Overclocking Guide for Intel Haswell-E Processors (Core i7-5960X, Core i7-5930K and Core i7-5820K)
Overclocking the Haswell-E family of processors is not an easy task.![]() Yes, these CPUs have an unlocked multiplier, but firstly, these CPUs are quite hot, and secondly, there are tuning nuances that are important to consider in the overclocking process (they are most directly reflected in the result). At one time we were not able to squeeze out of stones Core i7-5930K and Core i7-5820K are more than 4200 MHz on air , and the top-end Core i7-5960X only wound up stably at 4000 MHz.
Yes, these CPUs have an unlocked multiplier, but firstly, these CPUs are quite hot, and secondly, there are tuning nuances that are important to consider in the overclocking process (they are most directly reflected in the result). At one time we were not able to squeeze out of stones Core i7-5930K and Core i7-5820K are more than 4200 MHz on air , and the top-end Core i7-5960X only wound up stably at 4000 MHz.
Overclocking a Haswell-E family CPU is an additional load on the board’s power subsystem.
Experienced enthusiasts claim that the average for the Core i7-5960X is 4500 MHz (1.3 V). An excellent result is 4600 MHz at the same voltage.
If you are serious about overclocking your Intel Core i7-59 CPU60X, Core i7-5930K or Core i7-5820K, you can’t do without a water cooling system. A voltage of 1.25 V will require a two-section CBO, and for 1.35 V you will need a three-section radiator.
BP also plays an important role. The EPS12V connector must withstand at least 30A. Overclocked to 4.6 GHz, the Core i7-5960X sucks the at about 25A from the EPS12V connector. If your system also has a top-end video card in addition to the stone Haswell-E, consider purchasing a 1000 W power supply.
Think that’s it? No matter how. Overclocking a Haswell-E family CPU is an additional load on the board’s power subsystem. Enthusiasts strongly recommend actively cooling the VRM area, i.e. with a fan.
Overclockers do not recommend testing an overclocked Core i7-5960X, Core i7-5930K or Core i7-5820K with Prime95 (Small FFT), prolonged attempts can lead to degradation of internal CPU components.
Pro RAM
When the Haswell-E processor family first hit the market, it was hard to find a stable yet fast set of RAM for the Intel X99 platform.
The most balanced were the bars with Hynix chips (who would have thought, but the options with Samsung chips were in second place), which functioned normally at a frequency of 3000 MHz (15-15-15-34-2T).
Now the situation on the DDR4 memory market is different. Buy worthy high-frequency modules, which without tweaks work stably with an overclocked Core i7-5960X, Core i7-5930K or Core i7-5820K, quite simply.
About the VCCSA parameter
Do not forget about the VCCSA parameter in the UEFI BIOS, which stabilizes the memory controller in extreme situations.
Usually this option is left in Auto mode, but sometimes manual adjustment is required. The maximum should not exceed 1.15 V, although some CPUs are naughty and at 1.05 V.
There is no linear relationship between the stable operation of the CPU at an increased frequency and the VCCSA voltage. You will have to look for the golden mean on your own. In some ranges, the system behaves more stably, in others — less.
About Cache Overclocking (Uncore)
CPU Cache Overclocking (Uncore) does not significantly affect the overall performance of the PC, although certain benchmarks respond positively to additional megahertz.
Successful CPU instances operate stably at 4.6 GHz (Uncore frequency) together with cores overclocked to 4600 MHz, but in this case it is desirable to increase the cache voltage to 1.35-1.45 V (Cache Voltage).
Keywords: Intel
detailed guide, performance and efficiency — ABC IMPORT
Content of the article:
- Processor parameters
- Microprocessor bundle
- Overclocking kit
- Method.3 PC bundle
- Implementation procedure
- Additional stability check
- Results
- Feasibility
- Conclusion
This review will describe how to overclock the i7-920. Also, its technical specifications will be considered and recommendations will be given for increasing the speed of a personal computer based on such a microprocessor. The information presented in the future will allow the owners of such computing systems to significantly increase the speed of work by means of minimal material investments.
Processor parameters
You may be interested in: What are the most reliable SSD drives
Before overclocking Core i7-920, it is necessary to consider its technical specifications. This chip was officially introduced in 2008 and was intended to be installed in the LGA1366 socket. The composition of this microprocessor included four computing cores. With HT technology, this CPU could process up to 8 code streams simultaneously.
The microprocessor consisted of a single semiconductor chip, which was produced according to the technological standards of 45 nm. Its highest power consumption was 130 W, and the maximum temperature was 67.90C.
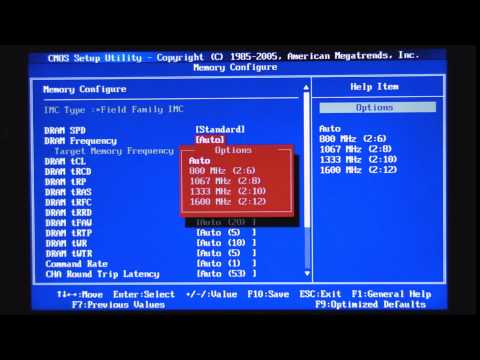
The system bus of the chip was running at 133 MHz. However, its value can be changed in the BIOS system. In nominal mode, the minimum clock frequency was 2.66 GHz, and the highest was 2.93 GHz. The value of the multiplier of this chip could vary from 20 to 22. It is impossible to somehow go beyond this range. Therefore, the only way to increase the speed of the microprocessor in this case is to increase the frequency of the system bus. All other methods are blocked by the manufacturer.
You may be interested in: Connecting an Xbox 360 joystick to a computer: instructions and tips
Microprocessor Package
The CPU delivery list includes the following items:
The complete set of the microprocessor is typical and sufficient. But for the nominal mode of operation of the CPU. If you plan to increase the clock frequency of the chip, then you need to use an improved cooling system. In all other respects, the above list is sufficient for the first launch of such a device and its further operation as part of a computer system.
PC bundle
Overclocking Intel i7-920 puts forward increased demands on the elements of the computer system. First of all, the computer motherboard must be full-size and based on reliable semiconductor elements. But since the LGA1366 platform was originally intended for the implementation of high-performance personal computers, all of its such components necessarily met this condition.
As noted earlier, the standard microprocessor cooling system is excellent for use in nominal mode. In the case of an increase in voltage and clock frequency, the power consumption of the CPU increases. Therefore, in this case, the microprocessor must work in combination with an improved cooling system. An example of such a cooler is the Noctua NH-U12P. It is also recommended that when installing such a cooling system, use an improved thermal paste, for example, Thermaltake TT-1225T.
The maximum power consumption of this model chip must not exceed 130W. But this value is valid for the nominal mode. In the case of overclocking, it can be exceeded. Therefore, the power supply must necessarily have a power reserve. The minimum value in this case should be 700 W. But it is recommended to use those devices that are capable of delivering 900-1000 watts.
The RAM controller built into the CPU is three-channel. Therefore, in combination with such a chip, it is recommended to use special sets of modules that include three bars with the same frequencies. In this case, their frequency should be 800 or 1066 MHz. If faster RAM modules are used, the personal computer may become unstable.
Increased requirements are also put forward to the computer case. The air environment must circulate perfectly inside it, additional fans must be installed in it for these purposes. Also, to get the maximum speed of the PC, it must be equipped with a solid state drive.
Overclocking technique.
 Implementation procedure
Overclocking of the i7-920 processor is performed as follows:
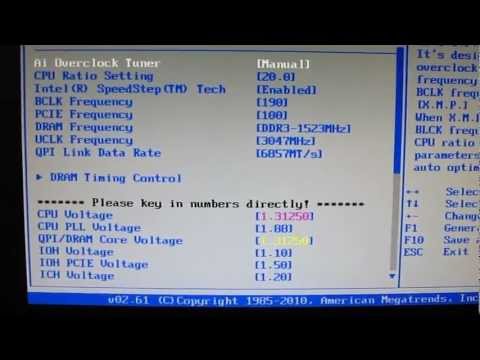 Then you need to select the item Vcore. We put it in Manual mode and force it to 1.424 V. This is the minimum limit at which any instance of such a processor will work stably. Save the changes again.
 If necessary, you can increase the CPU supply voltage and the system bus frequency. But not every chip of this model can work stably at their higher values.
Additional stability check
This completes the overclocking of the i7-920. But it is recommended to check the PC for stability. To do this, you need to run any resource-intensive software installed on your computer and work in it for about three hours. If there are no problems, then you can leave the parameters of the system unit unchanged.