Walkthrough — Far Cry 3 Wiki Guide
By Tanner Sundwall, Joe, sng-ign, +26.2k more
updated
Far Cry 3’s walkthrough consists chiefly of the single-player «story» quests and associated missions.
advertisement
It’s suggested that once you’ve liberated your first Outpost and have to travel to Dr. Earnhardt’s toward the western section of the north island (for the mission Mushrooms in the Deep) that you stop and segue into Side Missions and Hunting so you can equip Jason with better gear. Head over to the Crafted Items section of the wiki and check out the upgrades you can make to important items such as your weapon holster and your item rucksack.
One last suggestion is that you don’t purchase weapons and equipment from stores. You will obtain these for free by interacting with radio towers found throughout the islands.
Loading
- Make A Break For It
- Down In Amanaki Town
- Harvest The Jungle
- Secure The Outpost
- Mushrooms In The Deep
- The Medusa’s Call
- Playing The Spoiler
- Prison Break-In
- Island Port Hotel
- Keeping Busy
- Meet Citra
- Bad Side of Town
- Kick the Hornet’s Nest
- A Man Named Hoyt
- Saving Oliver
- Piece of the Past
- Down in the Docks
- The Motherlode
- Lin Cong I Presume
- Unhappy Reunion
- The Social Club
- This Knife’s For You
- Ambush
- Warrior Rescue Service
- New Rite of Passage
- Payback
- Citra’s Favor
- Fly South
- Three Blind Mice
- Doppelganger
- Triple Decker
- Defusing the Situation
- Deepthroat
- All In
- Paint It Black
- Black Gold
- Aced in the Hole
- Betting Against the House
- The Doctor Is Out
- Hard Choices
- Bled Dry
- Cargo Dump
- Connection to the Past
- Dirty Work
- Dog Soldier
- Eternal Love
- Faces of Death
- Father’s Burden
- Home Delivered
- Light at the End of the Jungle
- Once More with Dignity
- Pinned to Earth
- Tagging the Past
- Wherefore Art Thou Juliet
advertisement
- Bow Hunt: Golden Tiger
- Bow Hunt: Black Panther
- Bow Hunt: White Belly Tapir
- Sniper Rifle Hunt: Yellow Neck Cassowary
- Shotgun Hunt: One Horn Buffalo
- Bow Hunt: Maneater Shark
- Bow Hunt: Blood Komodo
- Shotgun Hunt: Undying Bear
Up Next: Main Missions
Previous
Far Cry 3 Wiki Guide
Next
Main Missions
Was this guide helpful?
In This Wiki Guide
Far Cry 3
Ubisoft Montreal
Rating
ESRB: Mature
Platforms
PlayStation 4Xbox OnePlayStation 3PCXbox 360
Resident Evil 4: Remake VS. Original Graphics Comparison
Resident Evil 4 set benchmarks back in 2005 on the Gamecube, but with the 2023 remake coming soon, we’ve pitted both of them head to head for a graphics comparison. From the opening village scene, to Dr. Salvador with his chainsaw, and a lot more! Here’s how the Resident Evil 4 Remake compares to the original RE4.
Indiana Jones and the Dial of Destiny — Official Trailer
Harrison Ford returns as the legendary hero archaeologist in the highly anticipated fifth installment of the iconic “Indiana Jones” franchise, which is directed by James Mangold (“Ford v Ferrari,” “Logan”). Starring along with Ford are Phoebe Waller-Bridge (“Fleabag”), Antonio Banderas (“Pain and Glory”), John Rhys-Davies (“Raiders of the Lost Ark”), Shaunette Renee Wilson (“Black Panther”), Thomas Kretschmann (“Das Boot”), Toby Jones (“Jurassic World: Fallen Kingdom”), Boyd Holbrook (“Logan”), Oliver Richters (“Black Widow”), Ethann Isidore (“Mortel”) and Mads Mikkelsen (“Fantastic Beasts: The Secrets of Dumbledore”).
Assassin’s Creed Codename Jade — Reveal Trailer
Ubisoft has announced Assassin’s Creed Codename Jade, a new game in the series set in Ancient China. It features “classic” Assassin’s Creed gameplay and takes place in an open world, but is a mobile game rather than a console release.
Guide for Far Cry 3
The singleplayer is broken up between free roaming, main missions, side missions and collecting items. All the free roam achievements can be done anytime while doing the storyline missions. This page mainly describes the main missions of the game and how to complete them in order to continue, but achievements that can be earned during story missions will be covered as well. Spoilers will be kept to a minimum in order for you to enjoy the story. There will be video guides for each story mission and all credit for recording, editing and uploading go to IGNGameplay.
With the latest update, nothing is missable anymore so feel free to play the game how you like. Also, the difficulty does not matter so pick whichever you prefer. For a «quick» runthrough, Easy might do; but for a bit of challenge, I recommend Hard or Master.
Hide ads
Mission 01 — Make A Break For It (Video Guide)
This missions acts as a basic tutorial and introduces the island’s dangers. Follow the instructions on-screen to get through this mission flawless.
When reaching the first village (Amanaki Town), you will unlock:
Mission 02 — Down In Amanaki Town
In this mission you will be introduced to Dennis and his people, the Rakyat. He also gives you some cash to buy your first weapon. Also, later in this mission you will have to activate a radio tower.
While free roaming, you will have a lot of radio towers to activate which allows you to see more of the maps and you will unlock weapons which you can get for free. There is only one achievement which involves the radio towers and it requires you to activate 9 of those.
Mission 03 — Harvest the Jungle (Video Guide)
Note: The video guide also contains Mission 02. If you need help at some point, the video will do great.
In this mission you will be introduced to crafting syringes. This is very helpful in the game and the remaining missions so make sure you harvest some herbs while free roaming.
More information about crafting can be found on the next page. We’ll focus on the story here so for more information, it may be better to open the next page in a new tab of your internet browser to make things easier for you as there will be some references on this page towards the next page.
Mission 04 — Secure the Outpost (Video Guide)
This mission acts like a tutorial for clearing outpost. For this one, stealth isn’t really needed, but remember that it is better to take out enemies in other Outposts.
More information about outposts can be found on the next page.
Mission 05 — Mushrooms In the Deep (Video Guide)
Nothing difficult just yet, speak with Dr. Earnhardt to get this mission. It could be strange at some parts, but you better get used to it. After speaking with the Doctor again your next story related achievement will pop.
Missions 06 — The Medusa’s Call (Video Guide)
In this mission, stealth is required. If you break it, you will instantly fail the mission and a previous checkpoint will be reloaded.
Mission 07 — Playing The Spoiler (Video Guide)
Again, nothing too difficult here. Just follow the mission objectives.
Mission 08 — Prison Break-In (Video Guide)
This is the mission where shooting really starts and where you will encounter Vaas a second time. After completing this mission, you’ll automatically get Mission 09 popping up.
Mission 09 — Island Port Hotel (Video Guide)
Whilst saving your girlfriend, you will have a 3 minute timer to escape the building. In the second part of the mission, you will have to protect your truck, but you get the GL-94 Grenade Launcher as a weapon (with unlimited ammo). If you manage to take out 4 enemies with one explosion, you will unlock the ‘Love The Boom‘-achievement. If you don’t, on the next page, you will find some additional information.
After reaching a safe beacon, you’ll unlock the following story related achievement:
Mission 10 — Keeping Busy
There is no video guide for this mission as it’s all straight forward and mostly cutscenes.
Side Mission 01 — The Social Club (Part 1)
There is no video guide for this mission as it’s all straight forward and mostly cutscenes.
After saving Liza, it is possible to reach the cave underneath Dr. Earnheardt’s house. On the rightside of the cave, there will be some pills with a sign ‘Eat Me’. After picking one of the pills up, a cutscene will start and some objective markers will eventually lead you through this side mission. Please note that this is not needed to proceed, but it is a nice background of your main character and his friends.
Mission 11 — Meet Citra (Video Guide)
Again, very easy and mostly cutscenes. After exiting the temple, the mission will end and the next story related achievement will pop.
Mission 12 — Bad Side of Town (Video Guide)
Very easy, just hope the man in white doesn’t notice you while you follow him.
Mission 13 — Kicking The Hornet’s Nest (Video Guide)
In my opinion, the most awesome mission in the whole game. Be sure to have fire resistance-shots as well as some health vials. They will come in very handy and you will be able to pick up some of those leaves to craft new syringes. This will be a nice boost towards the ‘Heartless Pyro‘-achievement. More information can be found on the next page.
Mission 14 — A Man Name Hoyt (Video Guide)
Pretty much just gunblazing. In the beginning of the mission, be sure to watch out for the mines. The rest should be pretty obvious, but you got to pick off the enemies pretty quick since you will die quickly (even while playing on Easy). I used an Assault Rifle with a scope and aimed for their heads everytime. It will save you some time and the threat will be reduced towards your companion.
Mission 15 — Saving Oliver (Video Guide)
Follow the mission markers until you get on a cliff where a sniper rifle is waiting for you. With this, you will have to take out the enemies attacking your friend, Oliver. First, pick up the enemies you see in front of you and afterwards, look at the left side. Enemies will start spawning there and the explosive containers (they are red) will help to take out a lof of enemies at the same time. The last part will be protecting Oliver until he gets on a boat so you can dive in the water. Once you’re on the boat, pick of the enemies with the mounted machine gun until you get to a safe beacon.
Afterwards, you will get the next story related achievement:
Side Mission 02 — The Social Club (Part 2)
There is no video guide for this mission as it’s all straight forward and mostly cutscenes.
After saving Oliver, it is possible to reach the cave underneath Dr. Earnheardt’s house. On the rightside of the cave, there will be some pills with a sign ‘Eat Me’. After picking one of the pills up, a cutscene will start and some objective markers will eventually lead you through this side mission. Please note that this is not needed to proceed, but it is a nice background of your main character and his friends. Additionally, if you missed the first part of this side mission; you will have the chance to do it here along with part 2.
Mission 16 — Piece of The Past (Video Guide)
This might be a pretty long mission and therefore it’s better to have 3 guns equipped to get through this mission without much problems. I recommend 3 ‘silent’ weapons and the ones I used were the crossbow, a pistol with a surpressor and an Assault Rifle also, ofcourse, with a surpressor. Also, it might be better to have your backpack upgraded so you can carry more ammunition (you will need it, I promise). Have some grenades or C4 ready to take out enemies quicker. As for the mission itself, it’s very straight forward and the last sequence is pretty awesome although you have to be fast.
Mission 17 — Down In The Docks (Video Guide)
Pretty straight forward with the same hints and tips as the last mission: carry a lot of ammunition. This isn’t a very hard or long mission and should pose no difficulty.
Mission 18 — The Motherlode (Video Guide)
In this mission, you will have some molotov guys as well as a heavy gunner so having a shotgun and C4 equipped is a must. The shotgun will take out those crazy running up to you bastards quickly; while the C4, which is very powerful, will take out the heavy gunner significantly faster. Also, when he is weakened, try to aim for his head for a large EXP-boost. The rest should be pretty standard by now.
Mission 19 — Lin Cong, I Presume? (Video Guide)
Before you start this mission, make sure you got both the takedown from above and takedown from below unlocked since those will help you a lot. In this mission, you also have a lot of ziplines so the ‘Never Saw It Coming‘-achievement might unlock in this mission. More information, again, will be found on the next page. Either way, this mission might be standard. Take cover wherever you need it, pick off the enemies and move on.
Mission 20 — Unhappy Reunion (Video Guide)
You have found the knife? Good! Let’s take it to Buck. Pretty straight forward again, with a button mini-game at the end. After you have saved Keith, you will unlock:
Side Mission 03 — The Social Club (Part 3)
There is no video guide for this mission as it’s all straight forward and mostly cutscenes.
After saving Keith, it is possible to reach the cave underneath Dr. Earnheardt’s house. On the rightside of the cave, there will be some pills with a sign ‘Eat Me’. After picking one of the pills up, a cutscene will start and some objective markers will eventually lead you through this side mission. Please note that this is not needed to proceed, but it is a nice background of your main character and his friends. Additionally, if you missed the first two parts of this side mission; you will have the chance to do it here along with part 3.
Mission 21 — This Knife’s For You
Cutscenes and story telling, you know the drill.
Mission 22 — Ambush (Video Guide)
Note: The video guide also contains Mission 21. If you need help at some point, the video will do great.
Although the mission objectives guide you well enough, it is good to know that you will have to snipe at one point in the mission. Near the mission marker, you will find a sniper rifle which does a lot of damage and it might be good to hold on to it for future missions.
Mission 23 — Warrior Rescue Service (Part I — Video Guide/Part II — Video Guide)
For this mission, stealth will be your best friend. Take your time to scan your environment and take a close look at where your enemies are looking at. Take them out one at a time and don’t forget to disable the alarms, since it will get difficult if reinforcements come to say hello. (Though not impossible if you have C4 or mines to plant)
Mission 24 — New Rite of Passage (Video Guide)
Ready for some more weird things? Then this mission shall suit you fine. After talking with the Rakyat leader, you will have to fight a big monster with a bow. You have unlimited ammo and it’s your goal to hurt him by firing at his mask. Be sure to dodge it’s attacks and keep firing until the monster is down. Also beware of the minions that spawn to the left and right among the smoke. On higher difficulties these guys can kill and you should also make sure you don’t blow yourself up while dealing with them.
Mission 25 — Payback (Video Guide)
Time for revenge! The first part of the mission is straight forward and once you are close to Vaas, some weird things will happen again. Don’t worry, from that point on you will have unlimited ammo, but be sure to kill his doppelgangers (minor spoiler).
- Taken for Granted
Kill Vaas.
Mission 26 — Citra’s Favor (Video Guide)
This is not difficult and straight forward. Between the conversations with Citra and your friends, it is recommended to liberate outposts and enable radio towers as you are close to leaving this island. Pick up the collectibles you missed and once you’re done, feel free to start the next mission.
Mission 27 — Fly South (Video Guide)
This mission requires you to fire a lot of bullets, so it is recommended you have at least 1 fully upgraded assault rifle, an SMG and/or a grenade launcher to take out the juggernauts fast. Please have your weapons ready before the timer starts ticking or you won’t make it to Willis in time. C4 and grenades will come in handy as well, since they have a pretty big explosion radius. As for the objectives itself, they are straight forward and shouldn’t pose a problem at all. If you are having problems during the gunfight, try to set yourself up near the plane so you have a good sight of what is happening around you.
Mission 28 — Three Blind Mice (Video Guide)
Note: If you don’t deploy the wingsuit and just land in the water, you will unlock the following achievement
Only one part of this mission requires you to actually do something, the other objectives are mostly cutscenes and talking. When you reach this island, it might be better to starting enabling those radio towers so you have a better sight on your map and mini-map.
Mission 29 — Doppelganger (Video Guide)
After you’ve met Sam (the crazy German dude), you will have to find a privateer uniform. Once you are wearing this, Privateers will never attack you unless you attack them or you when enter restricted areas (Outposts as an example). This disguise will only work on Privateers thus Vaas’ pirates will still attack you on sight. It’s worth mentioning that you won’t have this suit anymore after your last story mission.
During this mission, you will have to be as stealthy as possible and throwing rocks to distract guards might be your best shot. Also, you will have the chance to grind the 25 distractions. Please note that a full distraction is only complete if the guard you want to distract goes from his own spot to where the rock has landed and returns to where he originally was.
In the video at marker 8:48, you come across a metal tunnel which gives you a lookout over a lake. If you throw stones at the back of that tunnel and the guard investigates the noise, he will never come searching for you if you keep hiding at the left side of the tunnel. Also, remember to mark him with your camera so you can follow his movements.
Mission 30 — Triple Decker (Video Guide)
This mission requires you to kill and loot 3 VIP’s for information and leave the area without raising the alarm. Again, stealth is your best option and it might be better to have your takedown skills upgraded as well since you will come across some big guys while doing this mission. Weapons with a surpressor are great as well of course.
Mission 31 — Defusing The Situation (Video Guide)
Time to fight along with Sam! He calls you to ‘defuse a situation’ and you will have to protect him while he defuses 3 bombs. This isn’t really hard as long as you have some good weapons equipped with a big bag of ammunition.
Mission 32 — Deepthroat (Video Guide)
For the first part of this mission, you will have to move stealthily but after you’ve gathered some evidence it’s time to start gunblazing again. There aren’t a lot of enemies, but you will have to be aware that enemies are mostly across great distances so having a sniper rifle equipped won’t be such a bad idea. Also, some enemies might run up to you while progressing so a shotgun won’t do any harm either.
Mission 33 — All In (Video Guide)
This is mostly cutscenes and following some people. After you’ve informed Hoyt of the betrayal, you’ll get a nice suprise though.
Mission 34 — Paint It Black (Video Guide)
This is mostly gunblazing so stack up on ammo before you go talking with Sam. Have a grenade launcher and a good assault rifle ready, because things might get hairy. Follow the mission objectives to get through this mission fast.
Mission 35 — Black Gold (Video Guide)
The rampage isn’t done just yet. Stack up on ammunition and go talk to Sam once more. There are 4 fuel depots to destroy and I strongly recommend following the route the video shows you. Other then that, same old things: plant bomb, kill enemies, RUNNNNNNN!
Mission 36 — Aced In The Hole (Video Guide)
Before you start this mission, you will get a pop up on your screen which basically says that this is your last chance to use the suit to your advantage and get things done for a little while. After you have finished the game, you will have the chance to explore the island a little more but I do recommend that you have all the skills you can possibly have.
This is very easy and doesn’t involve more then following a cutscene with a ‘push the button quickly’-minigame.
- Poker Night
Kill Hoyt.
Mission 37 — Betting Against The House (Video Guide)
Hoyt is dead? Great! Time to get your brother out and finally get them safe home! This is gunblazing and you probably already know the drill. If you run out of ammo at any point, pick up a gun from the ground and run over the possible bodies. You will pick up ammunition automatically since they mostly have the same gun equipped.
Mission 38 — The Doctor Is Out
There is no video guide for this mission as it’s all straight forward and mostly cutscenes.
Mostly a cutscene, as noted above. Weird story twist as well.
Mission 39 — Hard Choices («Good» Ending — Video Guide/»Bad» Ending — Video Guide)
The final mission is basically following the marker and pick your choice. Both are great, but it’s up to you what you decide. Both endings are linked above so you can follow the video of the one you didn’t chose to see what you might have missed. You can also choose to replay this game.
Either way, choosing one of these endings should unlock the achievement listed below and you have completed the story as well!
4. Miscellaneous & Collectibles
2. General hints and tips
Find anything you think is wrong with this walkthrough? Help us fix it by posting in its Walkthrough Thread.
This walkthrough is the property of TrueAchievements.com. This walkthrough and any content included may not be reproduced without written permission. TrueAchievements.com and its users have no affiliation with any of this game’s creators or copyright holders and any trademarks used herein belong to their respective owners.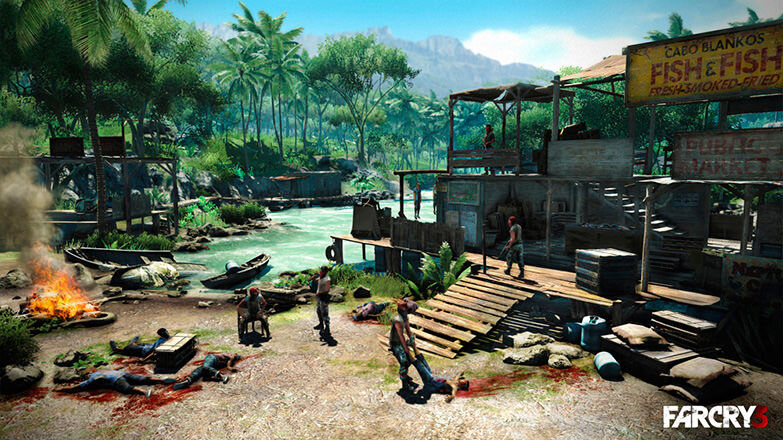
Far Cry 3 system requirements
Requirements
Infographic
Will the PC pull
Similar games
Did Vaas ever tell you what madness is? Well, he may have his own definition. And we here think we know the definition of «buy a game before you know its system requirements.» This matters even when watching old games like Far Cry 3 and Grand Theft Auto V. When Far Cry 3 first came out, many thought it was the best shooter game released in 2012. One of the nice things about older games is that they are becoming more affordable in terms of the PC hardware needed to run them (not to mention discounts and sales!). Despite the fact that FarCry 3 had the most stringent system requirements at the time of release, most modern computers still cannot pull it out. nine0007
If you want to meet the minimum system requirements for Far Cry 3, you need almost any DirectX 9.0c capable graphics card with 512 MB of memory as powerful as a GeForce GTX 8800 or Radeon HD 2900. Nearly 90% of Nvidia cards tested will above this mark. This is impressive when you consider that only about 38% of people meet the minimum requirements for a modern Far Cry granddaughter — a fifth. So once your computer covers the video requirements, an older dual core processor like the Core 2 Duo E6700 or the Athlon 64 X2 6000+ will do. nine0007
The game uses the Dunia engine, a modified version of the powerful CryEngine, and continued to drag the series into Far Cry Primal in 2016. A distinctive feature of this engine is that it supports a wide range of cards, from the first versions of DirectX9 up to DirectX11. This opens up opportunities to gamble in Far Cry 3 for a much larger number of gamers. If you are on a weak PC that meets the minimum requirements, you may need to turn off some graphical settings, such as water physics. This is important to note for people who just want to play the game and not think about how to unleash the full graphical potential of the game. nine0007
A hallmark of Dunia’s development was its unparalleled ability to implement water physics as well as control many other aspects of the game, such as the dynamic weather system. To appreciate all these graphical and computer achievements, gamers at the time of release needed a fairly modern computer. However, in the modern world, the recommended video card requirements for the GeForce GTX 670 or Radeon HD 7970 are considered much closer to the middle range than to the top ones. If computers only needed a video card, they would be much cheaper! But we still need a processor to pass the recommended requirements for Far Cry 3. Ubisoft has set this mark on the Intel Core i7-2700k and AMD FX-4150. If your computer meets these recommended requirements, it will also be able to run about 90% of all existing PC games on the market.
Find a teammate in Far Cry 3
Search service for players in Far Cry 3 for playing together. Join Far Cry 3 teammates and unite in groups and teams
Press Start to play
Far Cry 3 system requirements — Will your game run? — Check your PC!
Updated: December 23, 2022
Check my PC
Buy this game
On this page you will find the system requirements for Far Cry 3 on PC (Windows).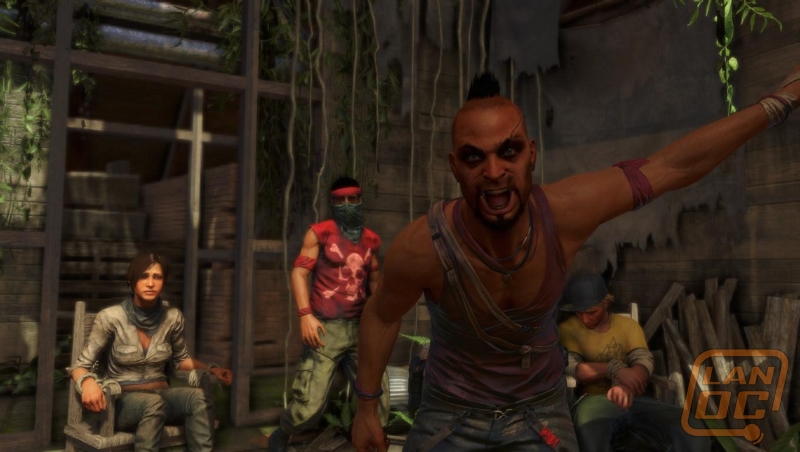 We regularly monitor the relevance and update the data.
The Far Cry 3 requirements below are divided by operating system and contain information about the processor, video card, RAM and required disk space to play Far Cry 3.
Content of the page
- Cry 3 on my PC? nine0039
- Windows requirements
- About the game
- Questions
- Buy Far Cry 3 Cheap
Will Far Cry 3 run on my PC?
According to our tests, 83% of people can run this game on their PC.
Show latest tests.
Check your PC settings for Far Cry 3
Check if you can run these popular games too!
Prices
You can buy Far Cry 3 directly from Steam or one of the marketplaces below. Usually games are cheaper on marketplaces and you can save up to 80%! Check prices below:
Processor
—
RAM
4 GB
4 GB
 0 (Shader Model 5.0)
Video card
512MB Video (1GB Video), DirectX900 / 3000 / 4000 / 5000 / 6000 / 7000 series, NVIDIA GeForce 8800 GTX / 9 / 200 / 400 / 500 / 600 series. Laptop versions of these cards may work, but are not supported. These chipsets are the only ones that will run this game. For the most up-to-date minimum requirement listings, please visit the FAQ on our support website at http://support.ubi.com.Requires a UPlay account
Additional
*Supported Video Cards at Time of Release : AMD Radeon™ HD 2900 / 3000 / 4000 / 5000 / 6000 / 7000 series, NVIDIA GeForce 8800 GTX / 9/ 200 / 400 / 500 / 600 series. Laptop versions of these cards may work, but are not supported. These chipsets are the only ones that will run this game. For the most up-to-date minimum requirement listings, please visit the FAQ on our support website at http://support.ubi.com.Requires a UPlay account
or blog by copying the image address below.
The minimum requirements for Far Cry 3 on Windows are Windows XP, Windows Vista and Windows 7. Your processor must be at least Intel Core2 Duo E6700 @ 2.6 GHz or AMD Athlon64 X2 6000+ @ 3.0Ghz. The minimum RAM size is 4 GB. As for the video card, it should be at least Graphics. You also need to have 15 GB HD space of free disk space. nine0007
Recommended RAM is 4 GB. And the video card is 512MB Video (1GB Video), DirectX9c (DirectX11) Shader Model 3.0 (Shader Model 5.0).
About the game
Discover the dark secrets of a lawless island ruled by violence and take the fight to the enemy as you try to escape. You’ll need more than luck to escape alive!
Source: Steam
- Release date
- November 28, 2021
- Metacritic rating
- 88/100
- Categories
- Singleplayer, Multiplayer, Co-op
- Genres
- Action, Adventure
- Supported Languages
- — Spanish*, Spanish*, French*, French* *, Portuguese, Polish, Danish, Dutch, Norwegian, Swedish, Czech, Russian*, Japanese*, Korean, Chinese (simplified), Chinese (traditional)
* languages with full language support : 15 GB HD space- Sound Card : DirectX Compatible (Recommended Surround Sound 5.
 1 capable)
 - Other Requirements 2900 / 3000 / 4000 / 5000 / 6000 / 7000 series, NVIDIA GeForce 8800 GTX / 9 / 200 / 400 / 500 / 600 series. Laptop versions of these cards may work, but are not supported. These chipsets are the only ones that will run this game. For the most up-to-date minimum requirement listings, please visit the FAQ on our support website at http://support.ubi.com.Requires a UPlay account
Will 3 GB of RAM be enough for Far Cry 3?
No, this is not enough for Far Cry 3, the minimum requirement is 4 GB.
Will 4 GB of RAM be enough for Far Cry 3?
Yes, 4 GB of RAM will be enough for Far Cry 3.
How much RAM is needed for Far Cry 3?
You need at least 4 GB of random access memory (RAM) to play Far Cry 3 on PC.
Which processor is required for Far Cry 3? nine0055
How much disk space do I need to play Far Cry 3?
You need at least 15 GB HD space of free disk space to install Far Cry 3.

- Sound Card : DirectX Compatible (Recommended Surround Sound 5.
