Xenoblade Chronicles: Definitive Edition Walkthrough Wiki|Game8
Welcome to the Xenoblade Chronicles: Definitive Edition (XC1) for Nintendo Switch Guide and Walkthrough Wiki. Story Walkthroughs, areas, boss guides, weapons and armor information, and arts and skill guides can all be found here. If you are getting stuck in Xenoblade Chronicles and need some help to get through, leave it to Game8!
List of Contents
- Walkthrough
- Quests
- Super Bosses
- Extra Skill Trees
- Beginner’s Guide
- Characters
- Gems
- New Features
- News
- Message Boards
- About Xenoblade Chronicles Definitive Edition
- Other Xenoblade Wikis
Xenoblade Chronicles Story Walkthrough
| Prologue | The Battle of Sword Valley |
|---|---|
| Chapter 1 | Colony 9 and Tephra Cave |
| Chapter 2 | Colony 9 (Mechon Invasion) |
| Chapter 3 | Tephra Cave (Revisited) |
| Chapter 4 | Bionis’ Leg |
| Chapter 5 | Colony 6 and Ether Mine |
| Chapter 6 | Satori Marsh and Bionis’ Interior (1st Time) |
| Chapter 7 | Makna Forest and Frontier Village |
| Chapter 8 | Eryth Sea, Alcamoth, and High Entia Tomb |
| Chapter 9 | Prison Island (1st Time) |
| Chapter 10 | Valak Mountain |
| Chapter 11 | Sword Valley and Galahad Fortress |
| Chapter 12 | Fallen Arm |
| Chapter 13 | Mechonis Field |
| Chapter 14 | Central Factory and Agniratha |
| Chapter 15 | Mechonis Core |
| Chapter 16 | Central Factory (Revisited) |
| Chapter 17 | Bionis’ Interior and Prison Island (Revisited) |
| Final Boss | Memory Space |
Epilogue: Future Connected Walkthrough
| Part 1 | Navvir Highlands~Alcamoth |
|---|---|
| Part 2 | Shoulderstone Scree~Gran Dell |
| Part 3 | Teelan’s Laboratory~Zekr Marga Quarry |
| Part 4 | Alcamoth (Revisited) |
Side Quests Guide
| Quests by Area | ||
|---|---|---|
| Colony 9 | Tephra Cave | Bionis’ Leg |
| Colony 6 | Satorl Marsh | Makna Forest |
| Frontier Village | Eryth Sea | Alcamoth |
| Valak Mountain | Sword Valley | Galahad Fortress |
| Fallen Arm | Mechonis Field | Central Factory |
| Agniratha | Prison Island | — |
| Colony 9 Area | ||
|---|---|---|
| Colony 9 | Tephra Cave | — |
| Colony 6 Area | ||
| Bionis’ Leg | Colony 6 | — |
| Central Bionis | ||
| Satorl Marsh | Makna Forest | Frontier Village |
| Upper Bionis | ||
| Eryth Sea | Alcamoth | Valak Mountain |
| Hidden Village | ||
| Fallen Arm | Mechonis Field | — |
| NONE | ||
| Sword Valley | Galahad Fortress | Central Factory |
| Agniratha | Prison Island | — |
Future Connected Side Quests Guide
| Future Connected Side Quests | |
|---|---|
| Part 1 | Part 2 |
| Part 3 | Part 4 |
An RPG can’t be called an RPG without extremely tough optional bosses and Xenoblade Chronicles definitely agrees with this. Check our guides to beating the Super Bosses of Xenoblade here!
Super Boss Guide
| Super Bosses | |
|---|---|
| Final Marcus | Ancient Daedala |
| Despotic Arsene | Blizzard Belgazas |
| Avalanche Abaasy | |
Each character starts out with 3 Skill Trees to choose froom. But there are 2 hidden skill trees for each character that can greatly improve that character’s strength and the others too via Skill Links. Learn how to obtain these skill trees to further bolster your team’s strength!
Extra Skill Trees
| Hidden Skill Trees | |
|---|---|
| Shulk | Reyn |
| Sharla | Dunban |
| Melia | Riki |
| Seven | |
Xenoblade Chronicles can feel a bit complicated when starting out. If you are new to the game, you won’t want to miss our Beginner’s Guide, filled with tons of early game tips to help you make the most of your first playthrough.
Beginner’s Guide to Xenoblade Chronicles: Definitive Edition
| Gameplay Mechanics | |
|---|---|
| Battle System and Combat Guide | Can You Switch Characters in Battle? |
| Stats Explained | Status Effects Explained |
| How to Chain Attack | What Does Tension Do? |
| How to Topple | Topple Lock Guide | What is Spike Damage? |
| Trading and Overtrading Guide | Collectopaedia Guide and Rewards |
| Presents Guide | How to Change the Weather |
| What is Weight? | — |
| Guides for Leveling and Grinding | |
| How to Level Up Fast | AP Farming Guide |
| SP Farming Guide | How to Farm Money |
| How to Raise Affinity | Tephra Cave Glitch |
| Leveling Areas Post 70 | How to Get Affinity Coins |
| Optimization Guides | |
| Best Party and Team Setup | Best Skill Trees For Each Character |
| Best Skill Links for Each Character | Best Gifts for Each Character |
| Art Manuals List | What to Sell | Best Items to Sell |
| Miscellaneous Guides | |
| What Carries Over to New Game Plus? | What is Expert Mode? |
| Achievement Guide and List | What Happens if You Die? |
| Appearance Guide | How to Change Appearance | List of Missables |
| 100% Playthrough Checklist | — |
| Colony 6 Items | |
| How to Get Gogol Horns | How to Get Inferno Element |
| How to Get Black Liver Bean | How to Get Snow Element |
| How to Get Azure Hollyhocks | How to Get Dust Element |
| How to Get Red Frontier | How to Get Empress Beetles |
| How to Get Rainbow Slugs | How to Get Ice Cabbages |
| How to Get Sturdy Armor | How to Get Squall Element |
| How to Get Bunnia Scent Wood | How to Get Fossil Monkey |
| FAQs | |
| How to Get High Entia Emblem | How to Enter Hode’s Lair |
| Where is Banquet Vassago | How to Get Bitter Kiwis |
| How to Enter Power Pipe Ruins | — |
With seven unique playable characters in Xenoblade Chronicles, you may be unsure of who to include in your party. See our character guides to learn each character’s Arts and roles!
List of Playable Characters
| Xenoblade Characters | |||
|---|---|---|---|
| Shulk | Reyn | Fiora | Dunban |
| Sharla | Riki | Melia | — |
Back to the List of Gems
| Gem Equipment Types | ||
|---|---|---|
| Weapon | Armour | All |
| Gem Categories | ||
|---|---|---|
| Attack | Attribute | Defence |
| Field | Special | Support |
| Gem Colors | ||
|---|---|---|
| Red | Blue | Yellow |
| Light Blue | Green | Orange |
| Gem Guides | |
|---|---|
| Gem Tier List | Gem Crafting Guide |
Xenoblade Chronicle: Definitive Edition uses completely remade graphics. Fans of the original Xenoblade for the Wii will immediately welcome the enhanced HD graphics and beautiful scenery this game holds.
Xenoblade Chronicles Definitive Edition: Remake or Remaster?
This game’s Menu Screen and Battle HUB have been totally revamped. The layout is smooth and more accessible than ever.
In adition to a graphical update, Xenoblade Chronicles: Definitive Edition uses brand new recordings of much of the OST. Fans will certainly embrace these new recordings of classic Xenoblade tracks.
While much of the game remains unchanged other than some remasters and QoL chances, this game also features a brand new Epilogue mode, called Future Connected. Little is known about this brand new story as of now, but it will expand on the Xenoblade story and feature both Shulk and Melia.
See All Xenoblade News and Updates
Xenoblade Chronicles: Definitive Edition will be released globally for the Nintendo Switch on May 29th, 2020. It will be available for both physical purchase and download via the Nintendo eShop (Downloading will require 13.7 GB of space).
Xenoblade Chronicles Switch Remake Release Date
A collector’s edition of the game, titled Xenoblade Chronicles Definitive Works Set will also be available for physical purchase. This upgraded set includes the game, as well as an art book that contains 250 pages of game illustrations. It will be made available at the same time as the standard release.
The bundle will go for $79.99 USD (plus tax). It can be found at Gamestop, Amazon, Target, as well as Best Buy, although it is currently sold out by most retailers.
Guide to Pre-Ordering and Pre-Order Bonuses
On May 7, 2020, a new video explaining features present in Xenoblade Chronicles: Definitive Edition was released on Nintendo’s Official Youtube Channel.
New Features Revealed in the Nintendo Direct
Message Boards
| List of Message Boards | |
|---|---|
| Discussion Board (1) |
Questions Board (1) |
| Review Board (0) |
Memes Board (10) |
| Price | $59. 99 USD/ $79.99 CAD 99 USD/ $79.99 CAD |
|---|---|
| Platform | Nintendo Switch |
| Genre | RPG/Adventure |
| Publisher | Nintendo |
| Official Site | Xenoblade Chronicles: Definitive Edition |
Xenoblade Chronicles puts you in the role of Shulk and his friends, as they travel across their world to stop the evil Mechons from invading and causing destruction. Shulk gains use of the Monado, a powerful and mysterious sword which grants the user all kinds of powerful abilities.
Xenoblade Chronicles is set on the Bionis, an enormous dead titan the size of a planet, which is filled with lush landscapes and a multitude of creatures. Thanks to the remade graphics made possible due to the Switch’s upgraded hardware, even fans of the original will be able to experience this world as if it were the first time.
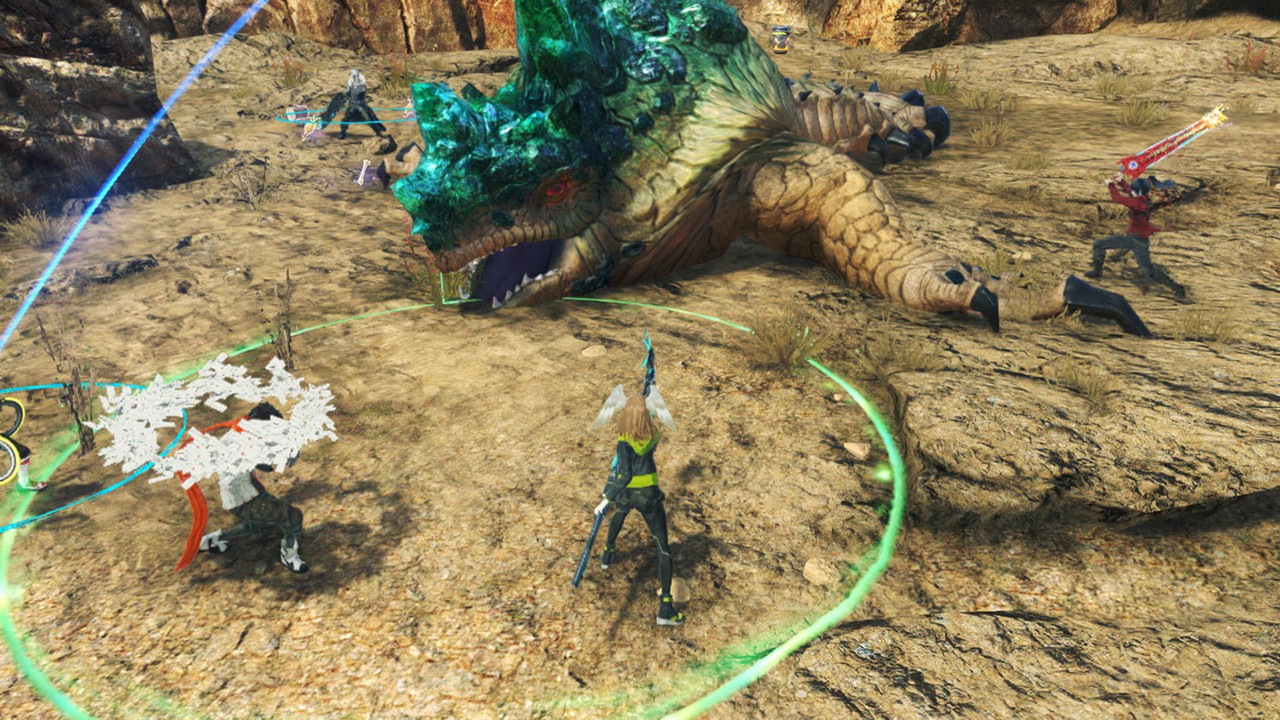
Xenoblade Chronicles is an RPG that boasts a unique combat system that is fought in realtime, much like an MMO.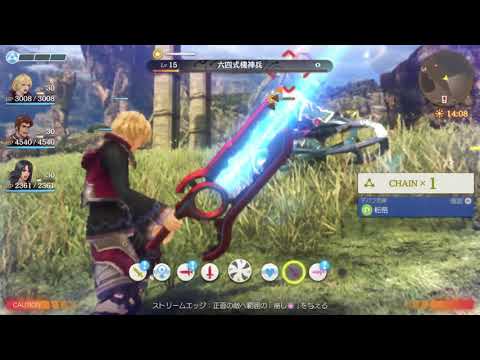 Each character has a unique role in combat, and characters can use Arts, which are unique skills with varying battle effects. However, using too many Arts in succession raises your Aggro, which will make you the target of your enemy’s attacks. Using a skillful combination of Arts, party composition, and Chain Attacks are the key to victory!
Chapter 17: Bionis’ Interior and Prison Island (Revisited) Walkthrough
This is a walkthrough for the Bionis’ Interior and Prison Island (Revisited) section of Xenoblade Chronicles Definitive Edition for Nintendo Switch. For a map of Bionis’ Interior and Prison Island (Revisited) Landmarks and Locations, as well as boss strategy and other tips and tricks, read on!
List of Contents
- Chapter 17: Bionis’ Interior and Prison Island (Revisited) Walkthrough
- Colony 6
- Bionis’ Interior
- Prison Island
- Side Quests
- Maps and Collectopaedia
- Bionis’ Interior Map
- Bionis’ Interior Landmarks and Locations
- Bionis’ Interior Collectopaedia
- Prison Island Map
- Prison Island Landmarks and Locations
- Prison Island Collectopaedia
- Tips and Strategies
- Boss Strategy Guide
- Sureny Telethia
- Sani Telethia
- 1st Disciple
- Master Obart
- Dragon King Alcar
- 2nd Disciple
- Story Walkthrough Related Links
| Objectives | |
|---|---|
| 1 | Head to Colony 6’s entrance. |
| 2 | Return to Junks. |
| 3 | Defeat the Telethias. |
| 4 |
Defeat Sureny Telethia
Beware of Soul Read and focus on removing it with Purge or Soul Blast. |
| 5 | Defeat Sani Telethia. |
| Note 1 |
Now is the best time to explore the Bionis and do all side quests available. Explore and strengthen your characters before heading inside the Bionis.
Vanea will give you a quest regarding 5 Monado Replicas. To complete the majority of these quests. You need to have a level around the high 80’s to low 90’s which might make the game too easy. |
| Note 2 |
There will be a spike in difficulty upon reaching the bionis’ interior. It is suggested to have your levels reach at least 70 to be able to proceed through the level.
But if you plan to do sidequests without making the final battle too easy, a recommended level you should attempt to reach is low 80’s. |
| 6 | Talk to Miqol and ask him to take you inside the Bionis. |

| Objectives | |
|---|---|
| 1 |
Make your way through the vein crossroad.
You will be encountering several Telethia elites on your way to your destination. Their levels are around the mid 70’s, so make sure your levels are close to theirs before proceeding (unless you intend to avoid most of them). |
| 2 | Defeat the 1st Disciple. |
| 3 | Use the teleporter to leave the Bionis’ Interior. |
| Objectives | |
|---|---|
| 1 | Head through the Central Hall until you see a platform. Stand on it to reach the next area. |
| note | This area is home to enemies whose levels range from 72-76. Level your characters to the high 70’s or low 80’s before proceeding. |
| 3 | Proceed to the teleporter stationed on the right side of the room. |
| 4 | Follow the narrow path until you reach the an open area. |
| 5 |
Defeat the Obelis Obart and Demon Pavlosk.
The Obelis Obart and Demon Pavlosk have a rank 6 and rank 5 talent art. Level your shield art to 6 and use it against them if the fight is proving itself to be difficult. |
| 6 | Enter the area where the Demon Pavlosk came from to reveal your next destination. |
| 7 |
Defeat both Sanjibal Behemoth’s to proceed.
The Behemoth inhabits the same area, but the area itself is quite spacy. The Behemoths can be fought one by one to make the fight easier. |
| 8 | Climb the debris, then head to the right side of the room. Use the elevator to lift the elevator that’s blocking the path below. |
| 9 | Descend to the Kitchen by using the walls of the elevator’s path. |
| 10 | Open the gate and examine the Bone Pillar Control. |
| 11 |
Return to the Arena.
Jump to the water to avoid a possible death. |
| 12 | Defeat Master Obart. |
| 13 | Follow the quest guide, then use the teleporter. |
| 14 |
Cross the Gravina Bridge then climb the stairs until you reach the next teleporter
There will be several nebula enemies scattered along the path. You can draft a heavy ether team to dispatch them or make a pure physical team so you won’t take their aggro. |
| 15 | After reaching the Gondorl Cathedral, head forward for a short scene, then head south and climb the tower. Activate the Dragon Summon. |
| 16 |
Use the switch on the left most side of the teleporter to reveal the transporter.
This is the point of no return! Avoid going forward if you still wish to do some other activities, or make a duplicate save file so you can backtrack later. |
| 17 | Defeat the 2nd disciple. |

From this chapter, a ton of new side quests will become available. Click on any of the buttons below to see the side quests in that area.
| Quest | Location | Giver | Rewards |
|---|---|---|---|
| Birthday Shoes | Fortress Entrance | Kantz | +150 Reputation 42500 G 50000 EXP Rex Helm |
| A Young Captain’s Revival | Fortress Entrance | Miller | +500 Reputation 25000 G 75000 EXP Daze Plus V, Shulk’s Skill Tree — Bravery |
| A Young Captain’s Trust | Fortress Entrance | Miller | +500 Reputation 25000 G 75000 EXP Topple Plus V, Shulk’s Skill Tree — Bravery |
| Friendship Tokens | Tranquil Square | Moritz | +250 Reputation 330 G 65000 EXP AP Up V, Friendship Tokens, Reyn’s Skill Tree — Camaraderie |
| The Elite Captain’s Anguish | Fortress Entrance | Raoul | +250 Reputation 22000 G 35000 EXP Topple Up V, Daze Up V |
| Getting to Know Minnie | Tranquil Square | Minnie |
23500 G 23500 EXP Muscle Up V, Strength Up VI |
| Getting to Know Dorothy | Ether Light | Dorothy |
20000 G 20000 EXP Ether Def Up V, Ether Up VI |
| A Token of Friendship | Weapon Dev.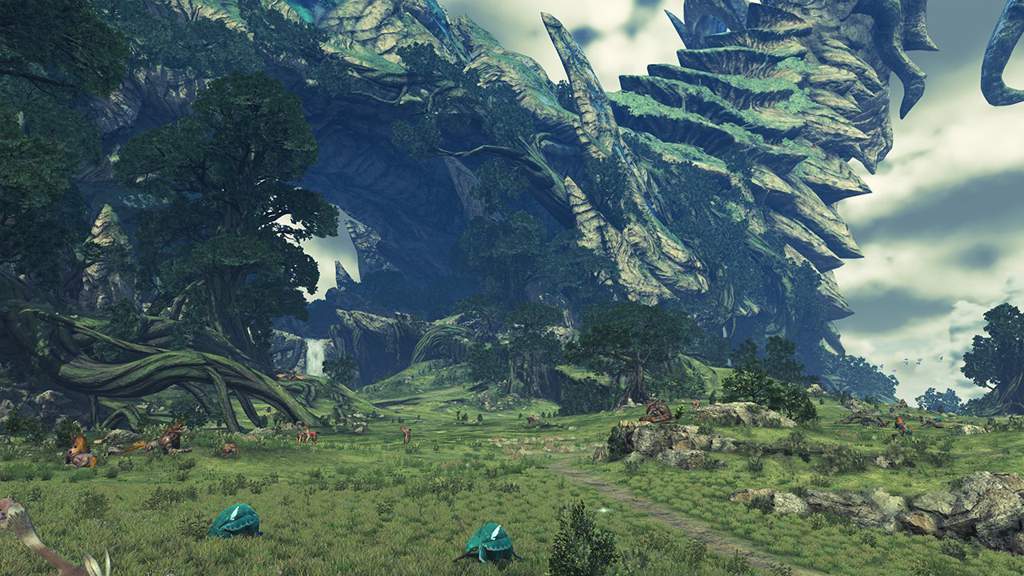 Lab Lab
— |
— |
72000 EXP Vangarre Driver |
Quests in Red Text indicate Timed Quests. As these quests will expire after progressing to a certain part of the game, be sure to complete them while they are still available!
| Quest | Location | Giver | Rewards |
|---|---|---|---|
| The Book of Bafalgar | Bafalgar Tomb | Shura | +100 Reputation |
| The Blood of Bafalgar | Bafalgar Tomb | Shura | +100 Reputation |
| The Path of Bafalgar | Bafalgar Tomb | Shura | +100 Reputation |
| The Coffin of Bafalgar | Bafalgar Tomb | Shura | +150 Reputation |
| The Gratitude of Bafalgar | Bafalgar Tomb | Shura | +300 Reputation 35000 G 80000 EXP Aura Heal IV, Auto-Heal Up III, Truth of the Giants |
Quests in Red Text indicate Timed Quests.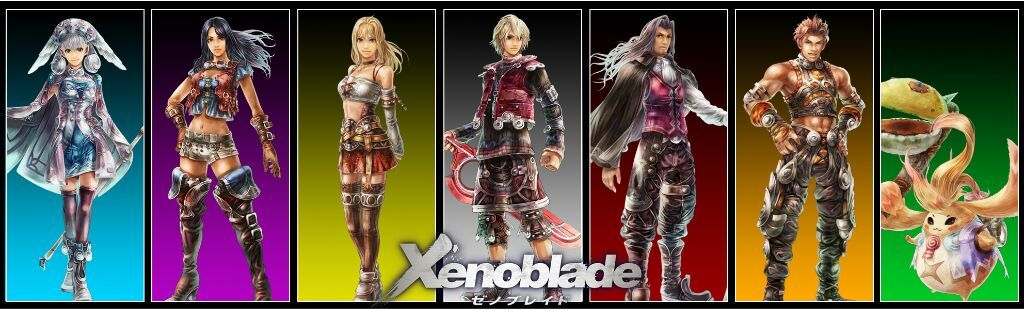 As these quests will expire after progressing to a certain part of the game, be sure to complete them while they are still available!
| Quest | Location | Giver | Rewards |
|---|---|---|---|
| A Flower for a Rose | Refugee Camp | Dulland | +150 Reputation 38000 G 92500 EXP Cosmo Drones, Initial Tension VI |
| Battling Brutes | Refugee Camp | Dulland | +200 Reputation 63500 G 158000 EXP Eternity Knives, Speed V Frame, Speed V Booster, Fiora Skill Tree — Innocence |
| Supplies for Satorl | Refugee Camp | Elior | +100 Reputation 45000 G 58000 EXP Speed V Goggles, Speed V Arms |
Quests in Red Text indicate Timed Quests. As these quests will expire after progressing to a certain part of the game, be sure to complete them while they are still available!
| Quest | Location | Giver | Rewards |
|---|---|---|---|
| Family Secrets | North of the pond | Zel Argentis | +100 Reputation 20000 G 23000 EXP Rondine Cap, Rondine Gloves |
| Betrothal Test | North of the pond | Oleksiy | +100 Reputation 23500 G 26000 EXP Rafaga Gauntlets, Rafaga Boots |
| Stopping the Elopement | North of the pond | Don Argentis | +500 Reputation 28000 G 30000 EXP Satellite Shot, Hierax Top, Sharla Skill Tree — Affection |
| Lifespan of a Machine | Reconstruction HQ | Neonik | +150 Reputation 38000 G 31500 EXP Revival HP Up V |
| A Poet’s Concerns | Near the farm in town | Yura | +150 Reputation 38500 G 33000 EXP Unbeatable IV |
| Delivering the Undeliverable | Stand south of entrance | Shilx | +100 Reputation 23000 G 29500 EXP Spike V |
| Finding the Unfindable | Stand south of entrance | Shilx | +200 Reputation 31500 G 37500 EXP Forma Spear |
| Nopon Determination | Reconstruction HQ | Mefimefi | +150 Reputation 48000 G 72000 EXP Arts Heal VI |
| A Dauntless Trader | Reconstruction HQ | Werner | +150 Reputation 33000 G 37500 EXP Auto-Heal Up V, Fall Defence IV, Terrain Defence IV |
| Securing Provisions | Reconstruction HQ | Dulland | +150 Reputation 36000 G 42500 EXP |
| Replica Monado 1 | Junks Ship | Vanea |
12000 EXP Monado Rudra |
| Replica Monado 2 | Junks Ship | Vanea |
12000 EXP Monado Agni |
| Replica Monado 3 | Junks Ship | Vanea |
12000 EXP Monado Abyss |
| Replica Monado 4 | Junks Ship | Vanea |
12000 EXP Monado Dogma |
| Replica Monado 5 | Junks Ship | Vanea |
12000 EXP Monado Saga |
| Melancholy Tyrea | Watchpoint Junction | Surprise Quest |
58500 EXP Empress Staff, Auto-Atk Stealth VI |
| Defend Colony 6 — Ancient | Reconstruction HQ | Colony 6 Residents | +100 Reputation 15000 G 10000 EXP |
| Defend Colony 6 — Demon | Reconstruction HQ | Colony 6 Residents | +100 Reputation 20000 G 30000 EXP |
Quests in Red Text indicate Timed Quests. As these quests will expire after progressing to a certain part of the game, be sure to complete them while they are still available!
| Quest | Location | Giver | Rewards |
|---|---|---|---|
| Challenge | Sororal Statues | High Entia Refugee | +50 Reputation 58000 G 52000 EXP |
| For a Friend | Sororal Statues | Rozeal | +300 Reputation 20000 G 25000 EXP |
| A Merciful End | Sororal Statues | Rozeal | +500 Reputation 38000 G 40000 EXP Debuff Plus VI |
| A Release from Duty | Sororal Statues | Rozeal | +700 Reputation 72000 G 85000 EXP Aggro Down V |
| The Imperial Ceremony | Sororal Statues | Scarlen |
66000 G 90000 EXP High Entia Emblem |
| Imperial Ceremony Offerings | Sororal Statues | Scarlen | — |
Quests in Red Text indicate Timed Quests.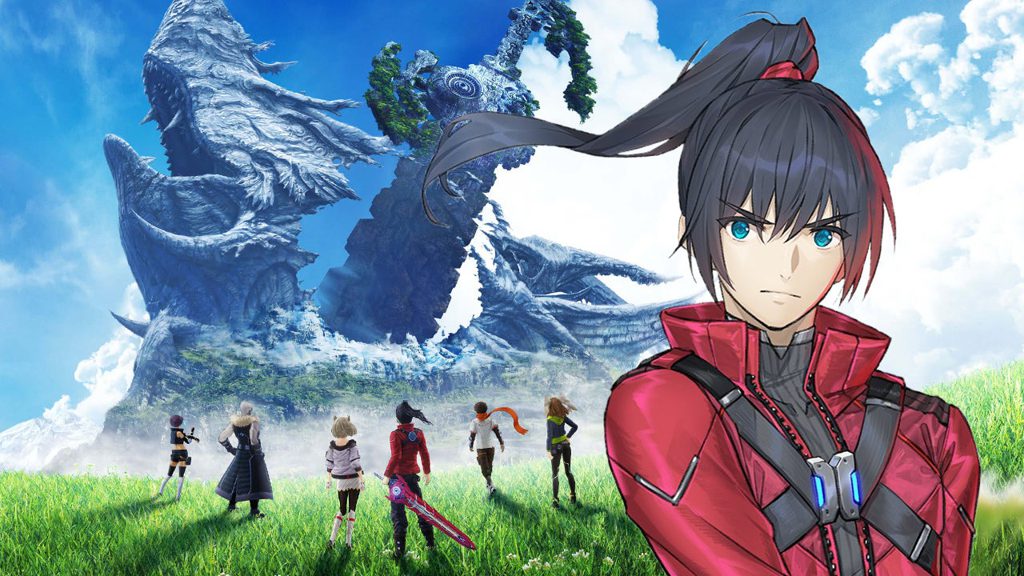 As these quests will expire after progressing to a certain part of the game, be sure to complete them while they are still available!
| Quest | Location | Giver | Rewards |
|---|---|---|---|
| Final Challenge of the Sage | Divine Sanctuary | Nopon Sage | +250 Reputation 38000 G 73500 EXP Meteor Nibbler, Riki Skill Tree — Heroism |
Quests in Red Text indicate Timed Quests. As these quests will expire after progressing to a certain part of the game, be sure to complete them while they are still available!
| Quest | Location | Giver | Rewards |
|---|---|---|---|
| Restoring the Capital | Nopon Tower | Nelo | +200 Reputation 13000 G 22000 EXP Power V Goggles, HP Up V |
| Restoring the Capital 2 | Nopon Tower | Nelo | +250 Reputation 16800 G 28000 EXP Power V Arms, Agility Up VI |
| Broken Ether Furnace | Nopon Tower | Kaleka | +300 Reputation 20000 G 43500 EXP Power V Boosters, Strength Up VI |
| Broken Ether Furnace 2 | Nopon Tower | Kaleka | +500 Reputation 42000 G 72000 EXP Power V Frame, Sedna Drones, Ether Up VI |
| A Memento of Daddy | Reservoir | Atael | +300 Reputation 38000 G 40000 EXP Will-o’-Wisp Staff, Physical Protect VI |
| Bana the Betrayer | Pollen Works | Gadada | +500 Reputation 100000 G 200000 EXP Haste VI, Double Attack V, EXP Up VI |
| Presents for Priceless Pupils | Pollen Orb Storehouse | Dobadoba | +150 Reputation 30000 G 35000 EXP Aggro Up V |
| Safer Energy | Pollen Works | Gadada | +100 Reputation 30000 G 50000 EXP Slow IV |
| Distilling Active Ingredients | Pollen Orb Storehouse | Cherri | +100 Reputation 30000 G 50000 EXP Paralysis IV |
Quests in Red Text indicate Timed Quests. As these quests will expire after progressing to a certain part of the game, be sure to complete them while they are still available!
| Quest | Location | Giver | Rewards |
|---|---|---|---|
| Investigating Satorl | Ether Plant | Miriall | +100 Reputation 20000 G 42000 EXP Poison Defence VI |
| Ancient High Entia Mystery | Ether Plant | Talia | +700 Reputation 59500 G 93000 EXP Meteor Staff, Talent Boost V, Melia Skill Tree — Passion |
| The Missing Boy | Ether Plant | Miriall | +500 Reputation 23000 G 48000 EXP Ether Protect VI |
| The Only Thing I Can Do | Ether Plant | Vidian | +300 Reputation 31000 G 56000 EXP Rex Arms, Rex Greaves |
| I Will Never Forget You | Ether Plant | Vidian | +300 Reputation 43000 G 72000 EXP Rafaga Armour, Rafaga Leggings |
| Secret Research | Ether Plant | Teelan | +300 Reputation 41000 G 68000 EXP Rex Helm |
Quests in Red Text indicate Timed Quests. As these quests will expire after progressing to a certain part of the game, be sure to complete them while they are still available!
| Quest | Location | Giver | Rewards |
|---|---|---|---|
| Vidian Rescue Mission | —— | Surprise Quest | +700 Reputation 58000 G 97500 EXP Gracielle Helm, Gracielle Arms, Gracielle Greaves |
Quests in Red Text indicate Timed Quests. As these quests will expire after progressing to a certain part of the game, be sure to complete them while they are still available!
| Quest | Location | Giver | Rewards |
|---|---|---|---|
| The Missing Partner | Harict Chapel | Kurralth | +100 Reputation 24000 G 30000 EXP Empire Pike, Night Vision IV |
| The Final Giants’ Ruins | Harict Chapel | Zain | +700 Reputation 88000 G 1750000 EXP Damage Heal VI, Arts Stealth VI |
| The Giants’ Treasures | Harict Chapel | Zain | — |
Quests in Red Text indicate Timed Quests. As these quests will expire after progressing to a certain part of the game, be sure to complete them while they are still available!
| Quest | Location | Giver | Rewards |
|---|---|---|---|
| Stunted Growth | Junks | Orkatix | +700 Reputation 44000 G 51500 EXP Agility Up IV, Dunban Skill Tree — Enthusiasm |
| Transmission Bypass | Junks | Orkatix | — |
| The Exhaust Pump | Junks | Orkatix | — |
| The Mini Reactor | Junks | Orkatix | — |
Quests in Red Text indicate Timed Quests. As these quests will expire after progressing to a certain part of the game, be sure to complete them while they are still available!
| Currently no side quests to display. Please check back soon. |
| Lower Level
Enlarge |
Upper Level
Enlarge |
| A | Terminal Trachea |
|---|---|
| B | Interior Landing Site |
| C | Spinal Nerve Tower |
| D | Pars Sympathica Tower |
| E | Terminal Nerve Tower |
| F | Upper Trachea |
| G | Heart Entrance |
| 1 | Third Lung |
|---|---|
| 2 | First Lung |
| 3 | Vein Crossroad |
| 4 | Terminal Vein |
| 5 | Venous Plexus |
| 6 | Third Lung Bronchus |
| 7 | Second Lung |
| 8 | Aortic Pathway |
| Veg | Sarsaparilla | Black Liver Bean | — | — | — |
|---|---|---|---|---|---|
| Animal | Blood Worm | Azure Mouse | Happy Duck | — | — |
| Strange | Tap Tap Tap | High Entia Jewel | — | — | — |
| Vegetables | Haste V |
|---|---|
| Animals | Aggro Down IV |
| Strange | Strength Down V |
| 100% Completion | Z Speed Goggles |
Currently unavailable.
| A | Bridge of Grief |
|---|---|
| B | Prison Gate |
| C | Empty Throne |
| D | Gondorl Cathedral |
| E | Prison Terrace |
| 1 | Damaged Transporter |
|---|---|
| 2 | Central Hall |
| 3 | First Sanctum |
| 4 | Second Sanctum |
| 5 | Banquet Hall |
| 6 | Kitchen |
| 7 | Behemoth Nest |
| 8 | Battle Arena |
| 9 | Arena |
| 10 | Great Canyon |
| 11 | Gravina Bridge |
| 12 | Corridor of Silence |
| 13 | Travalga Bridge |
| 14 | Basverg Belfry |
| Fruit | Dry Lemon | Death Lychee | Hell Raspberry | Deadly Kiwi | — |
|---|---|---|---|---|---|
| Animal | Dancing Squirrel | Lightning Weasel | Angry Monkey | — | — |
| Bug | Señorita Scarab | Emperor Beetle | — | — | — |
| Nature | Absurd Branch | Insanity Moss | — | — | — |
| Parts | White Cover | Modern Resistor | Green Cam | Strong Screw | — |
| Strange | Blue Glow | Blue Blood | — | — | — |
| Fruit | Break V |
|---|---|
| Animals | Good Footing V |
| Bugs | Agility Up V |
| Nature | Strength Up V |
| Parts | Ledios Cuisses |
| Strange | Ether Up V |
| 100% Completion | Ledios Plate |
It might be obvious already at this point in the game, but you can fast travel to previously visited landmarks (except landmarks on the Mechonis due to story events). There will be several sidequests that will become available in Chapter 17, and it is highly suggested to just warp to said locations instead of walking around and visiting each area one by one.
You will be given a quest by Vanea that makes you look for materials to craft 5 different Monados. This is a good time to invest powering Shulk up before heading to the last parts of the game.
This is one of the best ways to spend your time with before ending the game. Rebuilding Colony 6 will unlock several new quests and shops for you to use that can further strengthen your party.
Watch out for Soul Read! Disable the Telethia’s Soul Read to defeat it. Aura removal arts is a must-have in this fight. The Telethia can use Ether Particles, which is an Ether-based attack and also inflicts Ether Down. Getting hit with the ability twice in succession will prove fatal to your party.
Shulk is back in action! He has the best aura removal ability in the game, which is a much-needed move against the Telethia. Just don’t forget to equip some gems to Shulk’s new weapon. Sharla is also good to have with her Cure Bullet or Cure Round to remove the debuff caused by Ether Particles.
The 2nd Telethia fight in succession. This fight is completely different than the first one, as Sani Telethia won’t even use Soul Read to defend itself. It has several area attacks that deal heavy damage to units in front of it. Take note of the weather, Sani Telethia will change it at will and its moves will vary depending on the current weather.
Aside from Telethia Buster VII, which is a physical attack, all of it’s other moves are ether types. Thunder Bolt and Bolt from the Blue can inflict paralysis, but there are no notable moves that can cause too much trouble to a well prepared party.
Shock Wave and Thunderbolt.
Splash Wave, Sunlight Scatter, and Thunderbolt.
Sunlight Scatter, Bolt from the Blue.
Not many debuffs to take note of so Sharla isn’t a must-have. Riki and Shulk’s heal will be enough to sustain your party’s HP in the battle. A good chain attack can also end the fight rather quickly.
Lorithia will summon Nova enemies during the fight. Lorithia’s defenses will change depending on the number of enemies alive. Reducing the number of enemies to 2 will allow you to damage her while reducing them further will make her take more damage than usual. Build up your party gauge by using Burst Affinities. When a Chain Attack becomes available, dispatch all enemies, then use it on Lorithia to bring her down.
Lorithia will be summoning Nova type enemies, so adding Melia in the party is a must (setting her as your leader will be even better). Also, make sure to add Blaze, Wind, and Ice to your art arsenal, as attacking the Nova with Area attacks will allow you to dispatch them rather quickly.
Have Dunban take the frontline, then have Sharla take the back and equip her with Thunder Bullet to give your party a good way to dispatch the Novas. Fiora can replace Dunban if you wish to do so, but using Dunban’s Blossom Dance during a chain attack can allow you to defeat Lorithia with a single chain attack from full health if you destroy all novas and the multiplier is maxed out.
It can use the Talent Arts Annihilation V and Legendary Claw VII. Blocking these moves with Shield is a must, since Annihilation can inflict topple, while Legendary Claw inflicts high damage and can potentially KO all the targets hit. Do not topple Master Obart, as it will activate its, spike abilities which will damage you whenever you hit it.
What is Spike Damage?
Shulk is the only recommended character, and the other two depends on the player. Just avoid toppling it and keeping Shield up, and the fight will prove effortless to beat.
A big guy with a counter spike ability. Everytime you hit Dragon King Alcar, you will suffer 450 damage. The way to approach this fight will vary depending on the chosen characters for the fight which will be detailed below.
If you have the necessary materials, crafting spike defense gems and equipping them to your characters will allow you to approach this fight normally. You can get a maximum of 100% spike defense if you have the necessary gems, so you can ignore Alcar’s counter spike ability with this setup and just lay havoc on him.
Alcar’s counter spike will disappear if he gets toppled. Utilizing a topple lock party will allow you to beat him up without him being able to counter you at all. This requires a high affinity and high skill levels for your characters, as well as some topple plus gems to be executed properly.
How to Topple | Topple Lock Guide
The default strategy. Purging Alcar’s spike ability will allow you to hit him without worry. Just make sure to keep on reapplying purge whenever Alcar recovers it. Adding Sharla to your team will allow you to avoid accidental death with this strategy.
A two-phase fight. You’ll have to bring Dickson’s HP down to 50%, then fight him again to defeat him. He has a paralysis spike ability, and is immune to Purge, so using art heavy characters is recommended for the fight. He also becomes immune to topple at low health, so using a topple lock setup might prove disadvantageous in the long run.
Sharla is the chosen healer in this fight due to dickson’s ability to remove debuffs, making Riki’s value lower.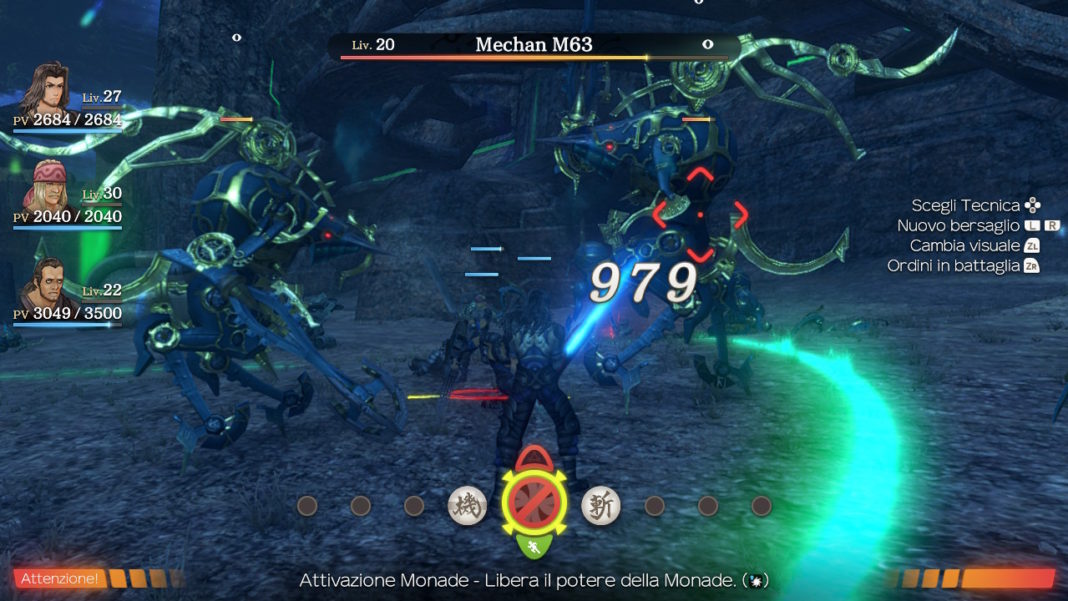 Sharla can also focus on healing, so paralysis won’t be too much of an issue for her. Make sure to position Shulk away from your party to avoid Dickson’s Chaos Punish so you can remove the daze from your allies that get hit.
Xenoblade Chronicles Story Walkthrough
| Prologue | The Battle of Sword Valley |
|---|---|
| Chapter 1 | Colony 9 and Tephra Cave |
| Chapter 2 | Colony 9 (Mechon Invasion) |
| Chapter 3 | Tephra Cave (Revisited) |
| Chapter 4 | Bionis’ Leg |
| Chapter 5 | Colony 6 and Ether Mine |
| Chapter 6 | Satori Marsh and Bionis’ Interior (1st Time) |
| Chapter 7 | Makna Forest and Frontier Village |
| Chapter 8 | Eryth Sea, Alcamoth, and High Entia Tomb |
| Chapter 9 | Prison Island (1st Time) |
| Chapter 10 | Valak Mountain |
| Chapter 11 | Sword Valley and Galahad Fortress |
| Chapter 12 | Fallen Arm |
| Chapter 13 | Mechonis Field |
| Chapter 14 | Central Factory and Agniratha |
| Chapter 15 | Mechonis Core |
| Chapter 16 | Central Factory (Revisited) |
| Chapter 17 | Bionis’ Interior and Prison Island (Revisited) |
| Final Boss | Memory Space |
Definitive Edition — Games on DTF
Not just a remaster.
5116
views
Xenoblade Chronicles: Definitive Edition is coming to Nintendo Switch on May 29th. Alas, in the Russian-speaking space, very little is written about the games of the series and about this game in particular. Therefore, I decided to compile most of the known information about the Definitive Edition into one article.
What kind of game is this?
A little explanation. Xenoblade Chronicles is a JRPG developed by Monolith Soft that was released in 2010 for the Wii console and five years later for the New Nintendo 3DS.
The plot of the game takes place literally on the dead bodies of two titans — Bionis and Mechonis. Slain by each other many centuries ago, they nevertheless became a new home for other life forms.
Mechonis and Bionis
One of the inhabitants of Bionis named Shulk becomes the owner of the Monado sword, thanks to which one can see the future. After the invasion of his hometown by the aggressive inhabitants of Mechonis, Shulk and his friends embark on a journey across two worlds in order to find out the truth about their past and future.
Coming out ten years after the release of the original, Xenoblade Chronicles Definitive Edition can be considered a remaster — but there is much more new content here than just tightened graphics. But first, let’s talk about her.
Graphics
The Xenoblade games put a lot of emphasis on the open world, and it is one of the main components of these games. Naturally, it could not be left as it was.
And from the point of view of the beauty of landscapes, one can hardly find fault here — everything looks really very cool:
The worlds in the Xenoblade series have always been incredibly beautiful — even when the games were released on low-end consoles.
But if you’re familiar with the original game, at least from the cutscenes, you’ll notice that the characters look more… anime? Top remaster, bottom original:
It cannot be said that their design has changed — not a single detail of the clothing has been changed. It is the faces that have acquired more vivid features. Especially the big eyes, which didn’t stand out at all in the original.
I do not presume to judge whether this is good or bad — let everyone decide for himself. But the graphics in general have reached a new level, and you can’t even say that once this game was released on the Wii, working at 480p.
If you don’t like the appearance of the characters compared to the original, then take comfort in the fact that in the cutscenes they have become much more expressive and emotional.
Gameplay… in which everything is the same.
Apparently, the gameplay will not undergo major changes. It’s still the same open-world party RPG. We run with our party of three characters, complete quests (the abundance of side quests here is not quite typical for a JRPG), and, of course, fight monsters. The combat system here consists of the timely use of abilities: there is no attack button at all. Seeing a hostile creature, the heroes will immediately begin a battle with him, circling around and showering with a hail of blows. The player is solely responsible for the use of abilities. There is no mana or energy for their use here — abilities go into «recharge» after use and become available again after a certain time.
Combat system visually.
But not by single battles — after all, the central idea of Xenoblade is to explore the world. This part also remained unchanged. The changes will only affect the interface — as they promise, inventory management should become much more convenient. The quest screen is also much more convenient. Now players can clearly see on the screen what tasks are set during certain quests, select active quests and instantly transfer to the completion point. And quests related to the collection of materials are now much easier to complete — the necessary materials are displayed directly in the menu, and you can always track whether you have collected the right amount.
We also implemented the search for the necessary NPCs much more conveniently. Now all the characters that the heroes have ever met are entered into a special profile where you can see: the daily routine of the characters, where they live and in what places they appear, what items they sell, and much more. Considering that the game has a fairly large open world, the ability to find the right character at any time using profile information can help out.
But there is also at least one innovation that concerns gameplay and combat. Time Attack mode will allow players to be transported to a special challenge arena where they will have to endure a series of battles with various monsters. Within the framework of this mode, you can fight on your own terms (any characters, any equipment) or with various restrictions that make the battle more difficult.
Naturally, this is not just so — for victories in battles they give crystals that can be exchanged for gems (inserted into equipment, increasing performance), new costumes and more. So the mode is in no way separated from the main game.
New content
However, the matter is not limited to the Time Attack mode. At the last Nintendo Direct, a new epilogue for the game, Future Connected, was announced.
This is a completely new story that continues the story of Xenoblade Chronicles and takes the heroes to a new corner of the game world. So far, it is only known that the combat system will undergo some changes, new types of opponents will appear. And, of course, it will be possible to find out the fate of the heroes a year after the end of the original Xenoblade. And those who have already played the original can launch Future Connected without even turning on the main game.
Why would the original Xenoblade need a new epilogue at all? Perhaps the creators of the series want to smoothly bring players to either an even greater connection between other parts of the games, or to a completely new game. But we will know for sure only after the release.
And now for those little things that you should not dwell on for a long time:
— the ability to switch the soundtrack between the original version and the new arrangement
— the choice between English and Japanese dubbing
— new difficulty levels: Casual and Expert
— Event Theater for viewing story scenes
— choice of equipment appearance — keep the characteristics of the item without sacrificing style their screams in battle)
— fewer menu windows — a lot can be opened from the main screen with characters, including Affinity Chart (their relationship with each other)
If you want to learn more about the game world and characters, while also getting some of the information from the article more clearly, then be sure to watch the following videos:
That’s it. And if you have any questions about the original, feel free to ask in the comments. 🙂
Just a reminder: Xenoblade Chronicles: Definitive Edition comes out May 29 on Nintendo Switch.
Walkthrough Xenoblade Chronicles: Definitive Edition: We give advice to beginners and talk about important things
Platforms:
SWITCH
Categories:
GameMAG
Tags:
guide
passage
trophies
achievements
achievements
tips
achievements
Xenoblade Chronicles: Definitive Edition
Source
Games in material
- Comments
- Forum
For those who haven’t played the original Xenoblade or any of the franchise’s titles at all, this game can be intimidating at first glance due to its many bells and whistles.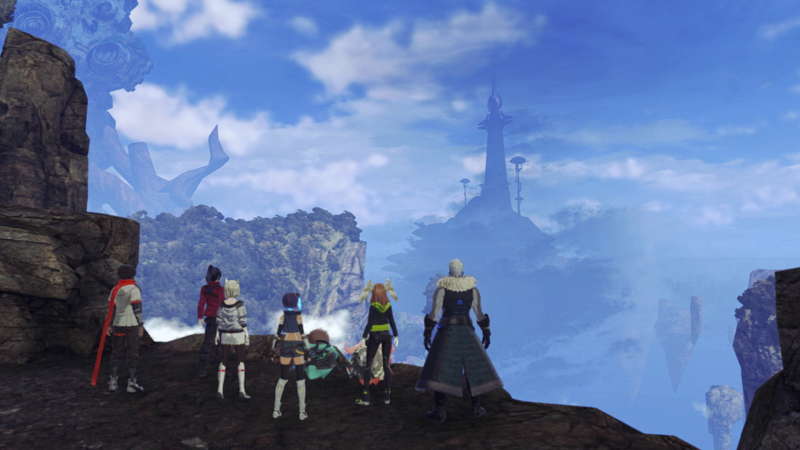 However, this guide should help you understand some of the nuances of the gameplay and make them more understandable. Here we will give you tips on what to do, and this will make it easier for you to get involved and just enjoy the game.
Do not run through the story
Although the game has an incredible story, and we think that many players really want to see all that it has to offer as soon as possible, you should pay attention to the gameplay — in particular the exploration of the world . Do not count on the fact that you can overcome all obstacles with the help of random or old equipment. More often than not, you will have to be prepared, as the game is not the easiest. Many players are in a hurry to see the next piece of the plot and stumble upon obstacles that they cannot overcome.
In fact, you don’t need to specifically download the game. Just take the time to explore the world. Take more sidequests in cities and other settlements and run to look at the location in detail, opening the fog of war on a large map. While you are exploring the world, the side quests will run on their own. Don’t forget to fight the monsters.
Of course, it’s ideal to study each map, but below we have compiled a list of points where before and after it would be worthwhile to engage in various activities of the game:
- After reuniting with Rain at the Weapon Dev. Lab.
- After the Mechon attack on Colony 9 (Colony 9)
- After defeating Arachno Queen
- Before leaving for Colony 6
- After reaching the Glowing Obelisk in the swamps (Satorl Marsh).
- Before/after the start of The Ancient Ceremony
- After recruiting Ricky
- After defeating Leone Telethia
- After completing High Entia
- After completing Prison Island
- Before/after visiting Ose tower
- Before leaving for Mechonis Field
- After meeting with Vanya
- After completing MC
It takes time to get used to the combat system
The combat system is easy enough to understand early on, but it will become more and more complex as you unlock more characters and techniques ( Arts ). Don’t be afraid to take the time to better understand how each character’s attacks work and strategize. On your way there will be a lot of meat for training.
You need to know that some attacks only have real effect from a certain side. In the Definitive Edition, the game provides exclamation point hints for skills to use if you are in the right place relative to an enemy. For example, Shulk’s Stream Edge skill only breaks the shields of enemies from the front. Back Slash — Deals double damage from behind. Others only work from the side.
If you combine blows of different heroes into bundles, you can turn over and slow down enemies. To do this, see the description of the skills and follow the sequence of effects: Break -> Topple -> Daze. For example, it could be the following chain: Stream Edge (Shulk) -> Wild Down (Rhine) -> Shaker Edge (Shulk).
Various team members
Many players feel comfortable with the «original» team member Shulk , Reina and Sharls , and/or are afraid to try other characters that will join as the story progresses, and/or just can’t get used to them. Don’t be afraid and just change Sharl as soon as the opportunity presents itself. Sharla , although an excellent airbag, is not the most effective character. If everything new scares you, then we will give you a few explanations why you should use other characters.
- Dunban is an agile tank with weaker techniques and not as strong defense as Rein, but he can dodge physical attacks for a long time and is much stronger. The main strategy when playing as him is to use Gale Slash and continue the attack with one of the three character-specific techniques.
- Melia — mage-summoner. Her main fighting style is based on using her «Summon» techniques ( Summon ) and then using them as ammo for her arts » Talent Art «, « Elemental Discharge » (which can be used even when it is not full). She can become one of the strongest characters in the game due to her high ether level.
 Don’t forget to use her elemental duplication skill Summon Copy after summoning a creature with the main skill.
- Ricky — imposes negative statuses, and after applying the technique « Say Sorry » deals huge damage if the enemy was under debuffs. Can heal a squad with skill « You Can Do It «, has a great aura » Hero Time «, which randomly greatly increases one parameter, preventing the «voltage» of the party from falling, and the skill » Yoink! » allows him to steal stats, items, and even experience from enemies.
- The seventh character is a Prothean. Can be both a physical and ethereal attacker, as well as an agile or shock-resistant tank. Techniques have good bonus effects such as double damage and debuffs.
Don’t be afraid to try new things and you might find a new favorite character to play or have on your team.
Side Quests and Grinding
Unlike the original Wii version, where you needed a detailed guide to find the right items or monsters, the Definitive Edition has a handy mission tracking system. The map displays not only items, but also the necessary monsters during their appearance in the game world.
Take basic side quests as soon as they become available
Basic quests should be called quests that give ordinary NPC without any special backstory. Such tasks are subtitled « Monster Quest 1 «, « Collection Quest 3 «, « Challenge 2 «, etc.
All of these quests can be easily completed by simply deviating slightly from the story path. Therefore, when you get to a new location, we recommend that you take all the basic quests (that you can find) and go explore the world, visiting special marks on the map.
Explore
The game rewards you with experience points, vehicle points and skill points for discovering new special places and locations throughout the game world. The game has a lot of interesting and secret places that are worth visiting. By sticking to the story and random side missions, you’ll never get there. Try to explore as much as possible when you enter a new zone.
Agility
Agility affects accuracy and evasion. So if you have low Agility, you will both hit and dodge less often. Keep in mind that this only affects physical attacks from different directions.
Auras and buffs
Auras and buffs are passive effects in combat that last for a certain time. They work very similarly to each other, but have important differences that are not entirely obvious.
Auras of usually (not always) give one positive effect, but also a negative one, and they only affect the character who uses them. Icons of such techniques (arts) are colored orange .
‘s buffs usually provide buffs and may affect one or all characters in combat. The icons are colored blue , just like the support.
Monado Shield
Monado Shield is a Monado sword technique that Shulk will learn right before the fight with Arachno Queen ( Arachno Queen ) in Tephra Cave ( 9011 Tephra Cave). The purpose of this technique is to protect the team from powerful techniques ( Talent Arts ) of enemies. That is, opponents’ special attacks can be blocked.
But strong enemy techniques have levels (eg Arachno Crush I , Ultra Poison Stab III , Over Eater VI and so on). If the level of Monado’s shield is less than the level of the enemy’s special technique, then his defense will not work. Therefore, as soon as you reach the location Satorl Marsh , you should start leveling it.
In these locations we highly recommend leveling up to the following:
- Level III (3) — Satorl Marsh
- Level IV (4) — Valak Mountain
- Tier VI (6) — Sword Valley
- Level VII (7) — First zone at the end of the game
- Tier IX (9) — Final Fights
Do not try to pump it as fast as possible, because this is due to certain conditions under which the level increases.
Hint: You can figure out which special technique an opponent is using when Schulk’s foresight is based on the Roman numerals next to the skill name that appears next to the timer.
Kill unique monsters
Unique monsters are stronger versions of regular enemies with original names and more powerful stats. Battles with them are one of the most important game elements of the entire series. Of course, you get more than EXP , AP and SP from them, but they also always drop a golden treasure chest and Affinity coins (after the first kill of this enemy).
Golden chests contain rare materials, weapons and armor (which usually includes non-equippable gems), and crystals. We will talk about coins Affinity below.
Gems
Gems are additional items of equipment that can be added to your armor and weapons. They give the characters a bunch of different effects, improving stats, increasing the duration of effects, allowing them to move around the field faster, and so on. You can get them by crafting with crystals at the gemmaster ( Gem Man ) in Colony 9 by doing side quests or completing the Collectopedia.
We also recommend sorting them by the Attributes parameter ( Attributes ).
How to run past strong monsters and not fight them
If the desired item is guarded by a strong monster, then do not despair. You don’t have to fight him. Set the appropriate stealth gem for certain monsters and you can easily sneak past enemies without having to fight them.
Restore Colony 6 to at least level 1
After you reach Sororal Statues in Satorl Marsh , and then complete the side quest at the main entrance to Colony 6, you will be able to restore the now ruined settlement .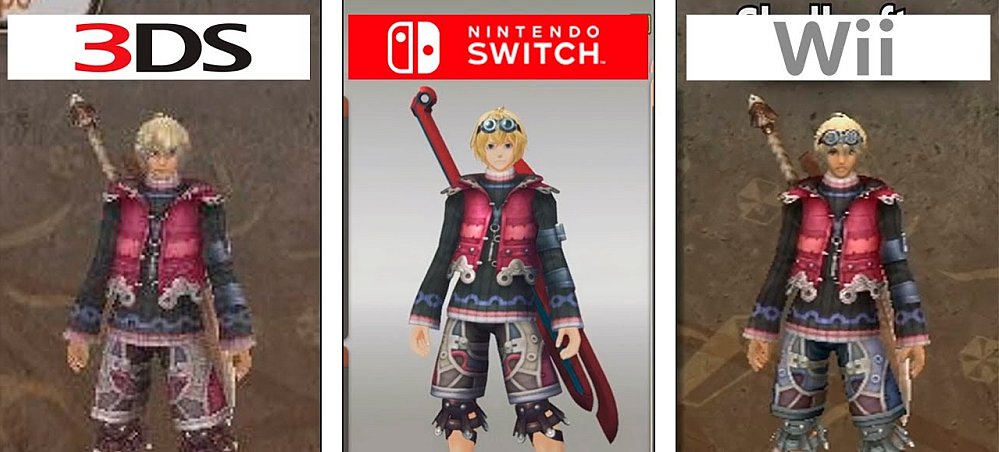 However, you will have to look for certain items for this and you will need a lot of money. Doing this is completely optional. But we strongly recommend restoring housing ( Housing ), trade ( Commerce ), nature ( Nature ) and special ( Special ) colony categories up to level 1. It’s worth doing even if you don’t plan to complete the game in 100%.
Leveling everything up to level 1 will give you an extra small reactor ( Ultra Small Reactor ). If you give it to the gem workshop ( Gem Man ) in Colony 9, then he will create a mobile ether furnace for you. Thanks to her, you will be able to create gems anywhere in the world, and not just in the ninth colony. Gems are very useful, and the ability to make them anywhere is very tempting.
Pay attention to the skill tree
skills are passive combat effects that are mostly unique to each character. You unlock them for skill points ( Skill Points or SP ) by choosing from the skill tree. SP you get for winning battles and discovering new zones and places. Only one skill tree can be selected at a time. By choosing one of the trees, you significantly improve one of the characteristics.
Very important , pay special attention to when all 5 skills on each tree will be maxed out. Because otherwise all those SP that you get later will be wasted.
Skill Link
After defeating the Arachno Queen ( Arachno Queen ) you have the ability to link one character’s skills to others. Orange skills are activated only when the character who originally owns this skill is also on the team. Blue skills are always active if they are linked, no matter what. The only skills that can’t be linked at all are diamond skills. And you can only link up to five skills per character.![]()
There are also two things to consider when you want to link more skills: proximity of team members and Affinity coins.
In order to link more skills, you must first develop affinity between the two characters. With yellow Affinity you can only link one character at a time. You can increase this figure to five characters with each new level Affinity .
Coins Affinity you get for leveling up your character and, as mentioned earlier, for killing unique monsters. They are the ones who determine what skills you can link. Basically, it’s a skill-binding currency.
Team Affinity
Team Affinity ( Party Affinity ) is a very useful thing to keep in mind. It allows for longer Gem Crafting sessions, more of the aforementioned skills, and more scenes from Heart-to-Hearts . It also affects the duration of chain attacks ( Chain Attack ).
