Windows 10 Update with Error Code 0x800F0922 – EaseUS
Error Code 0x800F0922 in Windows 10 update refers to an error with the downloading problem with the newest update of Windows 10. It also means that low System Reserved partition space is left for loading new system or the system fails to connect to Windows Update server.
Here below are relative reasons and solutions for you to repair Windows 10 update with error code 0x800F0922 issue. Read and find effective solutions to fix the problems now.
Causes for Windows 10 update error code 0x800F0922
Finding reasons or causes for Windows 10 update error codes such as 0x800F0922 will greatly help to figure out solutions for the Windows 10 update error codes issues. Here below are some major reasons for Windows 10 update error code 0x800F0922:
1. Low System Reserved partition space
When there is not enough free space for the system reserved partition, the computer will not be able to load new Windows 10 installation files with an error code such as 0x800F0922.
2. Fail to connect to Microsoft Windows Update server
Due to a VPN connection in your home or office network, the computer may not be able to connect to the Microsoft Windows Update server and then the Error Code 0x800F0922 may pop up.
3. The .Net framework installation portion of the Windows 10 upgrade fails.
Tip: Backup system and important data first before fixing error code 0x800F0922
With system backup image and data backups, it will greatly help you to avoid data loss issue or system failure error while trying to fix Windows 10 update with error code 0x800F0922 issue. And professional Windows backup software — EaseUS Todo Backup allows you to free back up and restore system and data for free within 30 days.
Step 1. On the main page, click «Select backup contents«.
Step 2. Among the four available categories, click OS.
Step 3. EaseUS Todo Backup will automatically select your system partition, you only need to select the backup destination.
Step 4. Both Local Drive and NAS are available for you to save the backup file.
Step 5. After finishing the backup process, you can check the backup status, recover, open, or delete the backup by right-clicking the backup task on the left.
When you fail to install or upgrade to new Windows system, you can restore to the previous system by restoring system image from EaseUS Todo Back without losing any data.
Tech Support: Solutions for Windows 10 Update Error Code 0x800F0922
Method 1. Extend system reserved partition space
You can try to use some professional partition manager software to extend or add space to the system reserved partition. You may try EaseUS Partition Master Free and use its resize feature to extend the system reserved partition space for fixing error code 0x800F0922 in Windows 10 update.
Method 2. Run Windows 10 Update troubleshooter to fix error code
1. Click Windows icon and press W to open search function;
2. Type: troubleshooting and press Enter;
3. Select view all when the troubleshooting window opens, select Windows update;
4. Select advanced and choose run as administrator;
5. Click Next and follow the onscreen prompts.
Method 3. Run DISM(Deployment Image Servicing and Management tool)
1. Press Windows + X and select command prompt admin.
2. Type: dism.exe /online /cleanup-image /scanhealth and press «Enter».
Wait patiently. When the scan is complete, a message «the operation completed successfully» will pop up.
3. Type: dism.exe /online /cleanup-image /restorehealth and hit «Enter».
This will take a while to run completely, but it will restore any missing or corrupted files necessary for the Microsoft Windows 10 update.
4. Restart PC again and retry to update to Windows 10 new build once again.
Method 4. Fix VPN connection problem to solve Windows 10 update error code
Disconnect network > Turn off VPN software > Run Microsoft Windows 10 Update > Restart PC > Reconnect network and turn VPN back on.
Method 5. Fix .NET framework with Windows 10 update failure issue
1. Press Windows + X and select control panel > Click cursor in the search field and search: windows features;
2. Select: turn Windows features on or offline, select the checkbox to the box next to
.Net framework;
3. Click OK and proceed with Windows 10 update again.
So if you are facing Windows 10 update failure problem with error code 0x800F0922, or if you fail to install Windows 10 update KB 3163018 with the 0x800F0922 error code, follow below-provided solutions and you’ll find the relative solution for your present Windows 10 update error issues now.
0x800f0922 Windows Update Error [Solved]
This error means that the system can’t load the new update
by Ivan Jenic
Ivan Jenic
Troubleshooting Expert
Passionate about all elements related to Windows and combined with his innate curiosity, Ivan has delved deep into understanding this operating system, with a specialization in drivers and. .. read more
Published on
Reviewed by
Vlad Turiceanu
Vlad Turiceanu
Editor-in-Chief
Passionate about technology, Windows, and everything that has a power button, he spent most of his time developing new skills and learning more about the tech world. Coming… read more
Affiliate Disclosure
Translate
- The 0x800f0922 error was initially an update issue for Windows 8.1.
- Now, users often get error 0x800f0922 when performing regular Windows 10 updates.
- The issue appears often when your PC can’t connect to an update server or when you have less than 500 MB in the system reserved partition.
- So if you’re notified that Windows update failed with a 0x800f0922 stop code, have a partitioning tool at hand.

XINSTALL BY CLICKING THE DOWNLOAD FILE
To fix various PC problems, we recommend Restoro PC Repair Tool:
This software will repair common computer errors, protect you from file loss, malware, hardware failure and optimize your PC for maximum performance. Fix PC issues and remove viruses now in 3 easy steps:
- Download Restoro PC Repair Tool that comes with Patented Technologies (patent available here).
- Click Start Scan to find Windows issues that could be causing PC problems.
- Click Repair All to fix issues affecting your computer’s security and performance
- Restoro has been downloaded by 0 readers this month.
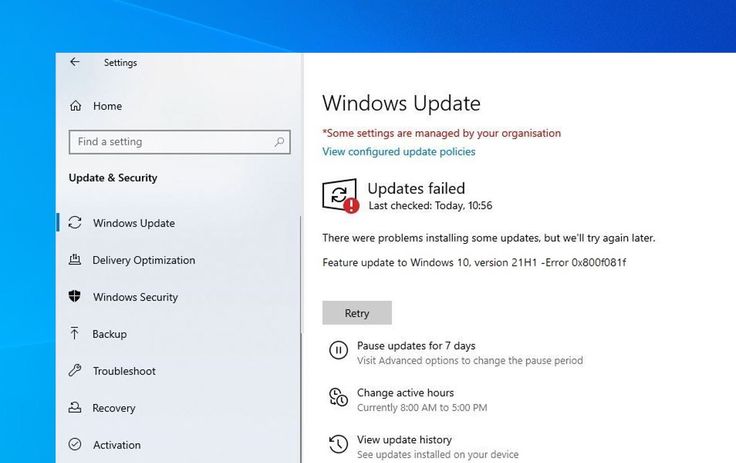
Through frequent Windows updates, customers get improved security and fixes for common system bugs. Sadly, sometimes errors such as 0x800f0922 can prevent you from getting those updates.
Why is that so? Well, the reasons are similar.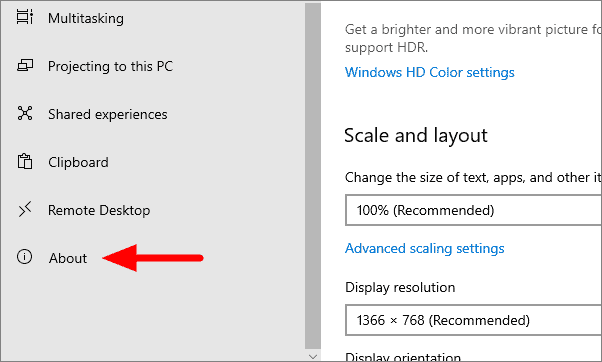 But, instead of upgrading to the new OS, the error occurs with the new build.
- Low space on the System Reserved partition – As we mentioned above, you probably don’t have enough space to load the new update; you will need at least 500 MB for Windows 10
- Can’t connect to the update server – Connection problems may be the root of this problem; the servers are not available at the moment or your local connection is not strong enough
Now, there is no shortage of problems when trying to install updates. But some issues are more stubborn than others.
Usually, running a Windows Update repair tool should suffice. So let’s see what 0x800F0922 is all about.
What does error code 0x800f0922 mean?
Error code 0x800F0922 means that the system couldn’t download the newest OS update.
That is in fact a consequence of the fact that there isn’t enough System Reserved partition space for installing the new update or you just can’t connect to the Windows Update server.
Sometimes you might get Windows Update Error 0x800f0982 but this one is just as easy to fix.
Here are some similar issues that users reported:
- Error 0x800f0922 Windows Server 2012 r2 – Even if this is an issue with Windows Server, you might be able to fix this problem with one of our solutions.
- Windows 8.1 update error 0x800f0922 – This can appear on Windows 8.1 as well but our solutions are universal, and they will work with older versions of Windows.
- Windows failed to install the following update with error 0x800f0922 – This is just a variation of the original error. If you encounter this issue, try disabling your antivirus and check if that helps.
- 0x800f0922 Framework 3.5 – This issue is caused by the .NET Framework. If the .NET Framework 3.5 is missing from Windows, enable this feature and try to update again.
- 0x800f0922 Secure Boot – This error can appear due to the Secure Boot feature.
 However, you can fix the problem simply by disabling this feature in BIOS.
We prepared a few workarounds that should resolve this issue in no time. You can check them out below. Update errors 0xc1900104 and 0x800F0922 sometimes go together, but this solution should work for both of them.
How can I fix the Windows update error 0x800f0922?
In this article
- What does error code 0x800f0922 mean?
- How can I fix the Windows update error 0x800f0922?
- 1. Turn off your firewall
- 3. Check your internet connection and switch off the VPN
- 4. Check the .NET Framework
- 5. Use a third-party partitioning tool to change partition size
- 6. Delete certain registry values
- 7. Remove all your temporary files
- 8. Disable the Secure Boot
- 9. Perform a Repair Upgrade
- How can I fix Windows 11 update error 0x800f0922?
1. Turn off your firewall
- Search for windows firewall and select Windows Defender Firewall from the results.

- Open Turn Windows Firewall on or off.
- Turn off the firewall for both private and public networks.
- Save your selection.
- Try updating now.
Note: Remember to enable the firewall before proceeding to install the updates. Additionally, your security may be endangered, and we don’t want that for sure.
In addition to Windows Firewall, your antivirus software can also cause this issue to appear. To fix the problem, it’s advised to disable certain antivirus features and check if that helps.
If the issue still persists, you need to completely disable your antivirus.
In the worst-case scenario, you might have to uninstall your current antivirus. If removing the antivirus solves the problem, it’s advised to switch to a different antivirus solution.
2. Repair your installation with SFC and DISM scans
2.1 Run an SFC scan
- Search for cmd and click on Run as administrator to open Command Prompt.

- Enter sfc /scannow and press Enter.
- The scan can take about 15 minutes, so don’t interfere with it.
Note: If you can’t run an SFC scan or if it doesn’t solve the problem, you should use a DISM scan instead.
2.2 Run a DISM scan
- Start Command Prompt as administrator and run the following command:
DISM /Online /Cleanup-Image /RestoreHealth - DISM scan can take up to 20 minutes, so don’t interrupt it.
Note: Once the DISM scan is finished, check if the problem is still there. If you were unable to run an SFC scan before, or if the DISM doesn’t solve the problem, be sure to repeat the SFC scan again.
An effective solution would be to opt for a reliable third-party tool that removes damage done to your Windows OS and restores its stability by bringing the registry keys to their default settings.
In just a few moments, the software scans your PC and proceeds to fix Windows errors and other issues, like system junk that slows down your device and damaged DLLs.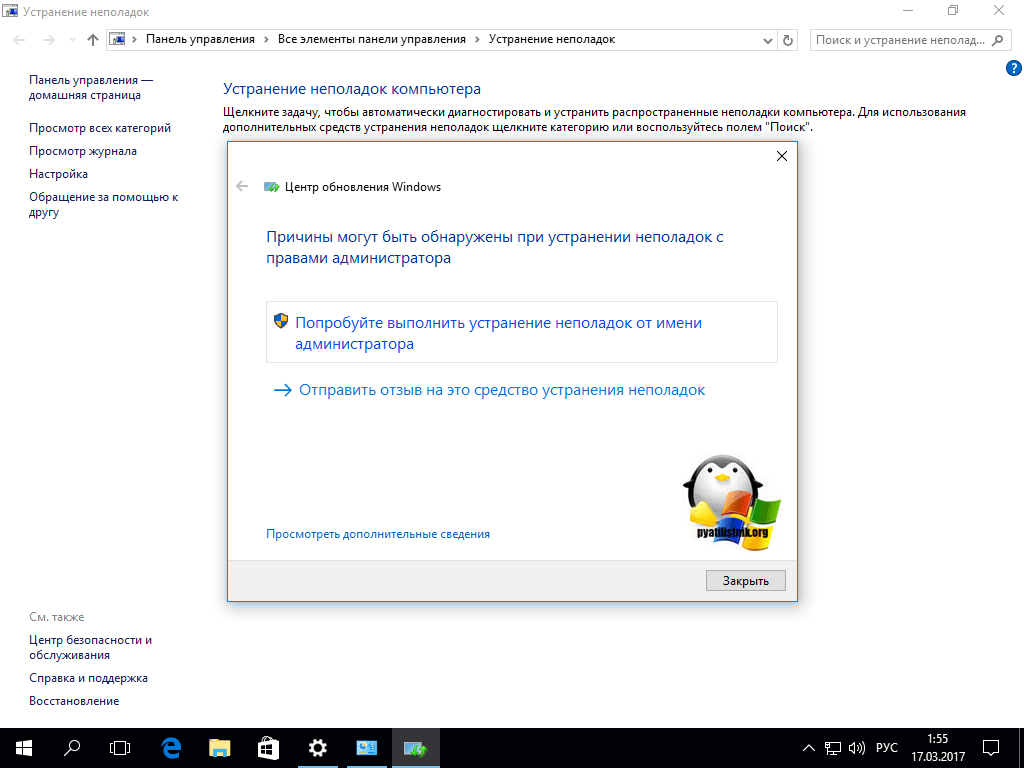
Windows Update is meant to improve the overall performance of your operating system, integrate new features, and even upgrade the existing ones. However, there are times when certain errors may occur out of the blue.
Thankfully, if you happen to run into such issues, there is a specialized Windows repair software that can help you solve them in no time, and it is called Restoro.
This is how you can fix registry errors using Restoro:
- Download and install Restoro.
- Launch the application.
- Wait for the application to find any system stability issues and possible malware infections.
- Press Start Repair.
- Restart your PC for all the changes to take effect.
After the process is completed your computer should work perfectly fine and you will no longer have to worry about Windows Update errors of any kind.
⇒ Get Restoro
Disclaimer: This program needs to be upgraded from the free version in order to perform some specific actions.
3. Check your internet connection and switch off the VPN
- Try to connect via a browser. If there is no connection, move on.
- Restart your router and PC.
- Try using a wired connection instead of Wi-Fi.
- Disable VPN if you are using any.
- Run the Troubleshooter.
- Disable bandwidth-hogging programs like a torrent client and download managers.
If your VPN was the problem, you might want to consider switching to a different solution.
Sometimes, VPN tools can interfere with your network connection and cause this issue to appear, therefore it’s important to use a good VPN tool.
There are many great VPN tools available, but be sure to try out a dedicated tool that will provide you a secure IP and will make your PC untraceable while you’re online.
4. Check the .NET Framework
1. Open Windows Search and type Windows Features in the text box.
2. Click on Turn Windows Features on or off.
3. Check any boxes related to .Net Framework.
4. Click on OK.
5. Restart your PC.
Another quick fix for the 0x800f0922 error is to ensure that all .Net Framework related features are turned on, and to manually enable those which currently aren’t.
Note: Use this with caution since there are some essential features. Just enable the .NET Framework and move on. On the other hand, if the update error is relentlessly reappearing, move on to the next steps.
5. Use a third-party partitioning tool to change partition size
If somehow, due to the excess of data, your system partition lacks space, you may use a third-party tool to extend it. Have in mind that at all times you’ll need at least 500 MB of free space in order to install updates.
If you have less than that, you can try to delete some files, use a built-in system tool to clean up junk or extend the partition with a third-party partitioning tool.
If you’re looking for good partitioning software, we strongly recommend considering Paragon Partition Manager Advanced. This tool is incredibly simple to use, and it will allow you to modify your partitions any way you like.
Partitioning your drives is not a very simple task for everyone but this professional-grade partitioning tool will help you divide your hard disk extremely easily, making you look like a Pro.
This solution creates partitions quickly, and it will make sure that the storage space is used optimally.
And if you’re worried about risks, Paragon comes with built-in backup functions that help you save the current configuration before working on a hard drive.
That means that in case you run into any possible problems, you won’t suffer any damage and the built-in recovery wizard will restore your system immediately.
6. Delete certain registry values
- Search for regedit and press Enter or click OK to start the Registry Editor.
- In the left pane, navigate to:
HKEY_LOCAL_MACHINESOFTWAREMicrosoftWindowsCurrentVersionWINEVTPublishers - Right-click the Publishers key and choose Export from the menu.
- Select the location where you want to export this key and enter the desired file name.
- Click Save (in case anything goes wrong after modifying your registry, you can simply run the file created in this step to restore it).
- Locate the following keys and delete them:
HKEY_LOCAL_MACHINESOFTWAREMicrosoftWindowsCurrentVersionWINEVTPublishers{e7ef96be-969f-414f-97d7-3ddb7b558ccc}HKEY_LOCAL_MACHINESOFTWAREMicrosoftWindowsCurrentVersionWINEVTPublishers {8c416c79-d49b-4f01-a467-e56d3aa8234c}To delete a key, simply right-click it, choose Delete from the menu, and click Yes to confirm.
Note: If you can’t access the Registry Editor, we can help you solve the issue quickly and easily with an expert guide.
7. Remove all your temporary files
- Press the Windows Key + R, enter %temp%, and press Enter or click OK.
- Delete all its content.
- Press the Windows Key + R, enter TEMP, and press Enter or click OK.
- Delete the contents of the TEMP folder.
8. Disable the Secure Boot
The Secure Boot is a useful feature that can protect your PC from certain malware, but this feature can also cause problems with certain updates.
Many users reported that they encountered error 0x800f0922 due to the Secure Boot feature.
In order to fix the problem, it’s advised to temporarily disable it. To do that you just need to enter BIOS and disable Secure Boot from there.
To see how to perform this procedure, we strongly advise you to check your motherboard manual for detailed instructions.
You can get the necessary information about your motherboard if you use a third-party motherboard information tool.
Once you disable the Secure Boot, try to install the update again. Once the update is installed, you can go back to BIOS and enable the Secure Boot again.
9. Perform a Repair Upgrade
- Download the Media Creation Tool and run it on the affected device.
- During the initiation process, choose Upgrade this PC now.
- Then, select Keep personal files and apps.
- Wait for the process to finish and reboot.
As you can imagine, this is actually a reinstallation of the Windows 10 OS without affecting your files and apps.
Since it’s a fresh copy, it should be void of glitches and bugs and you should be able to freely use your device.
How can I fix Windows 11 update error 0x800f0922?
- Press the Windows key + I to open the Settings app.

- Navigate to Troubleshooters in the right pane.
- Now click on Other troubleshooters.
- Locate Windows Update and click Run next to it to run the troubleshooter.
If running the troubleshooter does not pay off, we have more easy tricks for you to try in order to fix the Windows 11 update error 0x800f0922.
And that’s it. We hope you’ll manage to resolve your update error 0x800f0922 with these workarounds. If you are having any questions or suggestions on your mind, the comment section is always open.
Still having issues? Fix them with this tool:
SPONSORED
If the advices above haven’t solved your issue, your PC may experience deeper Windows problems. We recommend downloading this PC Repair tool (rated Great on TrustPilot.com) to easily address them. After installation, simply click the Start Scan button and then press on Repair All.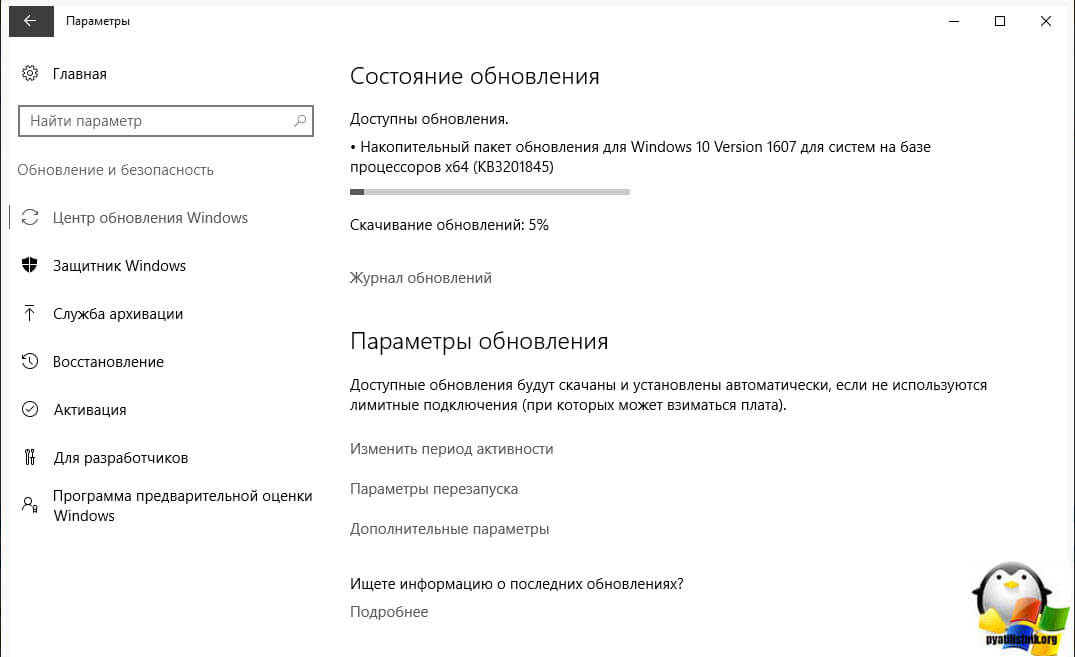
Was this page helpful?
There are 1 comments
Share
Copy link
Newsletter
Software deals
Friday round-up
I agree with the Privacy Policy regarding my personal data
10 Ways to Fix Error 0x800f0922 When Installing Windows 10 Updates
The Complete Guide to Windows 10
Error Code 0x800f0922 occurs while processing a Windows 10 update. Although it has been reported for years, this error still recurs today . This article will show the possible causes of this update error and the corresponding fixes.
Possible Causes of Error 0x800f0922
There are many potential causes for this error code. Here is a list that might be responsible for triggering 0x800f0922:
- Limited space reserved by the system.
- Failed to connect to the Microsoft Windows Update server.

- Failed to install .NET framework as part of an update.
- Corrupted system files.
- Firewall interference.
- Malware and viruses.
How to fix error 0x800f0922 when installing Windows 10 updates
You don’t have to try them all; just work through the list until you find one that works for you.
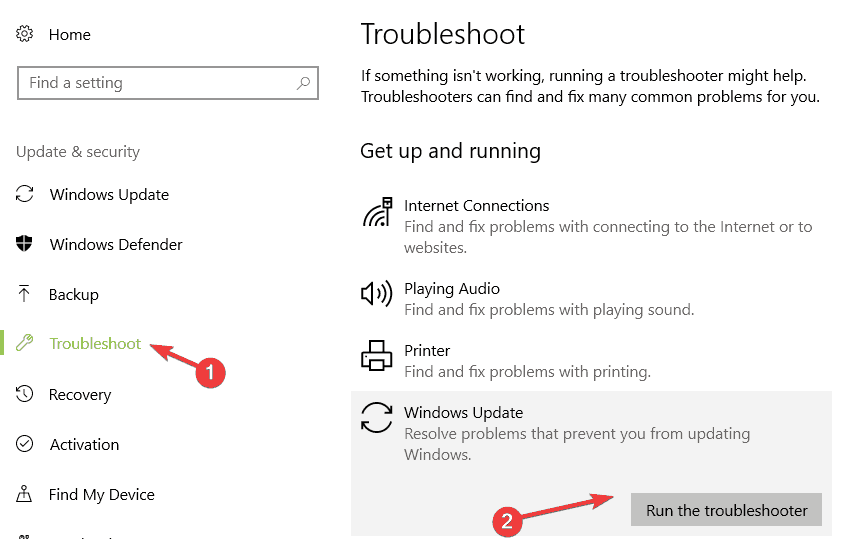
Run the Windows Update Troubleshooter
The Windows Troubleshooter is a built-in feature for finding and fixing problems that are not working on your PC. If you are getting an error code while downloading and installing a Windows update, you can always seek help from the update troubleshooter.
- Type Troubleshoot in the Windows search box and click Troubleshoot settings.
- Click Advanced Troubleshooting Tools.
- Select Windows Update and then Run the troubleshooter.
Wait a while for the Windows troubleshooters to find and fix the problems. Once completed, check if error code 0x800f0922 persists.
Check partition size
Windows 10 requires at least 500 MB of space on the system reserved partition to update the system. Therefore, it is necessary to increase the size of the partition for a successful update if there is little space on the partition. To check the available size of the system reserved partition:
- Enter disk partitions in the search field and select Create and format hard disk partitions.
- Use the pop-up windows to check if the space reserved by the system partition meets the 500 MB requirement.
- If this meets the requirements, skip this method and try other methods.
- If there is not enough space, use the free tool to increase the partition size. Most online partitioning tools support formatting, deleting, moving, resizing, splitting, and merging partitions. Just choose, download and install one of them like MiniTool Partition Wizard and follow its instructions to resize your partition.
After resizing the system reserved partition, try processing Windows update again.
Check your network connection
Poor network connection and VPN make the connection to the Microsoft Windows Update server slow and unstable. This may give you an update error code. Here we recommend that you restart your router and disable your VPN temporarily:
- Disconnect your router and wait a few minutes.
- Plug the router back into power. Wait for it to fully load.
- Check your internet connection by browsing any website. If your browsing speed is slow, try using a wired connection instead of Wi-Fi.
- Disable VPN software if you are using it. Then run the upgrade to Microsoft Windows 10 again.
- If the upgrade was successful, restart your computer and enable the VPN software again. If the network and VPN are not responsible for the update error, try again.
Check out the .NET Framework
.NET is a software framework designed and developed by Microsoft. It supports running websites, services, desktop apps, and more on Windows.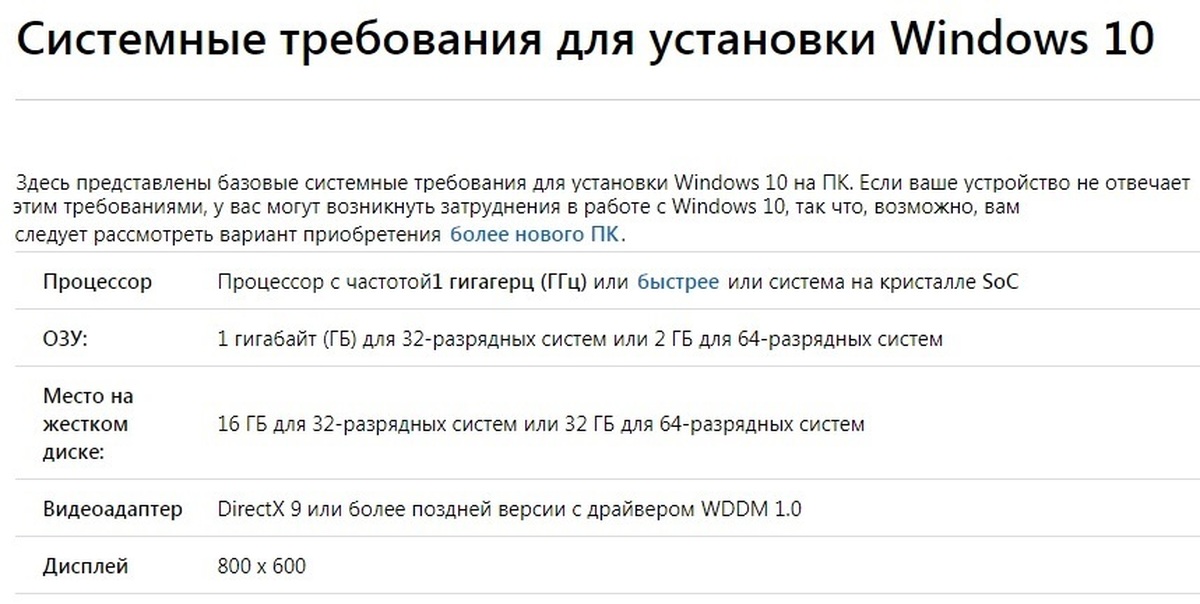 If the .NET Framework installation fails, Windows Update will display error code 0x800f0922. Hence, make sure you install it successfully, you can enable it manually in Windows Features.
- Type Windows features in the search box and click Turn Windows features on or off.
- Select any of the .NET Framework related checkboxes and click OK to save the changes.
- A pop-up window will appear and select Allow Windows Update to download files.
- Windows will download the required files and install these features.
- Restart your computer.
After the reboot, try running the update again to see if the 0x800f0922 error is gone.
Disable firewall
Windows Defender Firewall is designed by Microsoft to protect computers from unauthorized access, use, and possible infection. However, this built-in software can sometimes over-react, blocking some connections and activities. Therefore, temporarily disabling the firewall may help resolve error code 0x800f0922.
- Enter Defender Firewall and select Windows Defender Firewall.
- Click Turn Windows Defender Firewall on or off.
- Temporarily disable Windows Defender Firewall for domain, private and public network settings. Click OK.
- Try updating now.
Be sure to enable the firewall after the update is complete. Be especially careful when using the Internet during this period, as your security may be at risk.
If the error code is still present, go to the next fix.
Restore system files
Corrupt, missing, or corrupted system files are preventing the successful Windows Update process. Your system also needs these intact and healthy files to keep it running well. Therefore, we recommend that you regularly scan and restore system files.
The System File Checker (SFC) is a useful utility that checks system files for corruption and fragments. It checks all important Windows files and replaces problematic ones after scanning.
- Type cmd in the search box and click «Run as administrator» to launch Command Prompt.
- Type sfc /scannow and press Enter.
The scan may take up to 15 minutes, so please wait patiently and check if the problem persists after the scan. If you are unable to run an SFC scan or if it does not solve the problem, run the DISM (Deployment Image Servicing and Management) tool before running SFC. DISM is a command line tool that can be used to troubleshoot system issues.
- Type cmd in the search box and click «Run as administrator» to launch Command Prompt.
- Copy and paste
DISM/Online/Cleanup-Image/RestoreHealthand press Enter. - Type sfc /scannow and press Enter.
Wait for the scan to complete and check for improvements to the Windows update failure issue.
Run antivirus
If your computer is infected with a virus, some tasks, such as updating Windows, may be difficult to complete. Therefore, running a system scan to detect and remove viruses can help resolve the issue. You can use your preferred antivirus software to run the scan. Or Windows 10 has a built-in Windows Security tool to protect your device from threats.
- Search «Windows Security» in the search box and click «Windows Security» to launch the application.
- Select Virus & Threat Protection.
- Click Scan Options.
- Select Full Scan and Scan Now.
The scan will go through all the files on your computer and take some time. After that, let this tool remove any threat on your computer and restart your computer. Then run Windows Update again.
Delete all temporary files
The presence of unnecessary cache or temporary files can also cause error 0x800f0922, which will interfere with the update process. Deleting these temporary files will solve this problem.
- Right-click the Windows icon and select the Run option.
- Enter %temp% in the empty field, and then click OK.
- This will launch a folder containing a list of temporary files.
- Delete all content that exists inside and restart your computer.
Perform a clean boot
Sometimes the presence of third party programs can also cause this conflict and thus prevent Windows from updating smoothly. Performing a clean boot will surely help you diagnose the causes of update error code 0x800f0922.
How to clean boot Windows 10
Change the registry
If you’re still getting error code 0x800f0922, changing certain key entries in the registry might fix this update issue on your PC. However, this task is relatively difficult, as any incorrect modification can damage the entire operating system.
- Open Windows Search by pressing Win + S.
- Type regedit into the text box and press Enter.
- When the Registry Editor opens, navigate to the following:
HKEY_LOCAL_MACHINE\SOFTWARE\Microsoft\Windows\CurrentVersion\WINEVT\Publishers - Right-click the Publishers folder and select Export from the context menu.

- Select the location where you want to export this key value, and then enter the desired file name.
1
- 0x80070003
- 0x80070424
- Open Settings and then Update & Security > Troubleshoot .

- In the right pane, locate Windows Update and click Run the troubleshooter.
- Complete the process by following the on-screen instructions and restart your computer.
- Go to
C:\Program Files (x86)\Microsoft\Edge\. - Delete the Edge folder and try installing the update again.
- Find Control panel through the search bar next to Start Menu and open it.
- Set View to Small or Large Icons , and then select Programs and Features from the list.
- Once opened, navigate to Turn Windows features on or off in the right pane of the window.
- If .NET Framework 3.5 (includes .NET 2.0 and 3.0) is not selected, do it yourself.
- The same is recommended for its subcomponents. Just click on the plus icon next to .NET Framework 3.5 (includes .NET 2.0 and 3.0) and select other components.
- Finally, press OK to save the changes and wait for your system to restore the missing components, if any.

- Open Command Prompt by typing
cmdin the search box next to the Start Menu button. - Right click on Command Prompt and then select Run as administrator .
- Once the console opens, type
sfc /scannowcommand and press Enter . - When the recovery process is complete, restart your computer.
- Open Command Prompt as we did in the previous step.

- Copy and paste this command
DISM.exe /Online /Cleanup-image /Restorehealth. - Press Enter and wait for Windows to finish scanning and repairing.
- Then restart your computer and install the update again.
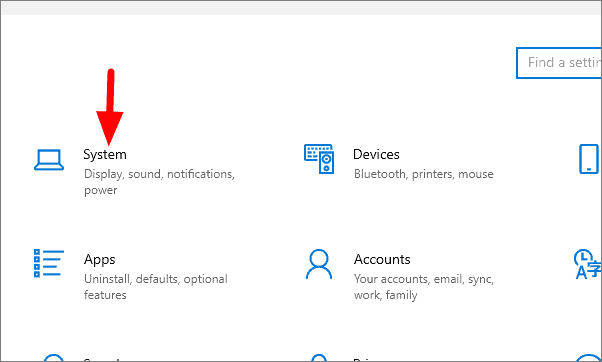
- Press Windows Key + I and then Update and Security .
- Then go to Windows Security and Firewall and Network Protection in the right pane.
- Select the current network and turn off the firewall.
- Now try installing the same update that was having problems.
- Press the Windows Key + R keys and copy-paste this % TEMP% .

- After opening, select all the folders you see inside, right click and select Delete . Also empty the trash if necessary.
- Restart your computer and try installing updates again.
- Press Windows Key + R buttons together and paste
services.msc. - Locate the service called Application Readiness , right click and select Announcements .
- If possible, change Start type to Manual and press Start at the end.
- After starting the service, click Apply and OK to save the affected changes.

- Open Command Prompt by typing
cmdin the search box next to the Start Menu button. - Right click on Command Prompt and then select Run as administrator .
- Copy and paste this list of commands one by one, pressing Enter after each one. (This action will disable the services responsible for Windows Update )
- Then we have to rename the above mentioned folders. Just paste these commands by pressing Enter after each one.

- Finally, all that’s left to do is bring back the disabled services. Enter these commands in the same way as we did before.
- That’s all. Go to Windows Update and try the installation again.
- Open a new Notepad . To do this, right-click on any free area on the desktop, select What’s New and Text Document .
- Then paste this list of commands into notepad:
- After pasting all commands, press File > Save as and name the file WUReset.
 bat . Be sure to set Encoding to ANSI and save the file anywhere.
 - Finally, right click on the file and select Run as administrator and enjoy automatic resetting of windows update components.
- First you need to download the utility from the Microsoft website.
- Then run the downloaded file.
- After you agree to the Terms of Use, you will be presented with two options to choose from. Select Upgrade this computer now .
- Select Keep personal files so that they are not affected.

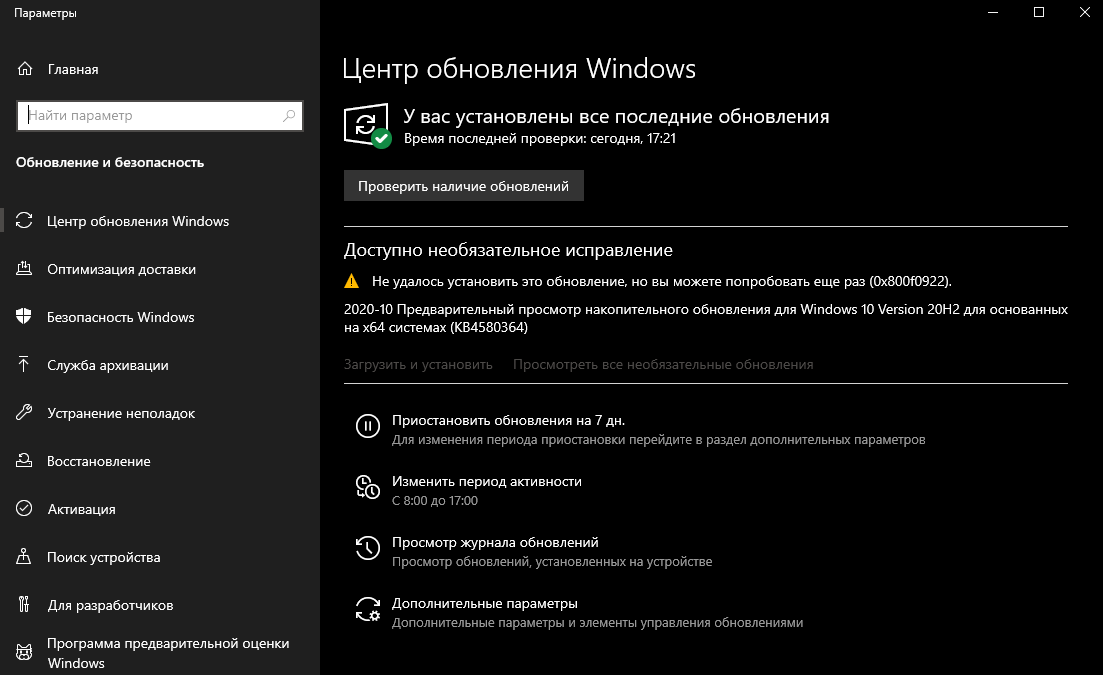
How to fix the Windows Update Center for the Windows 0x800922
What is a mistake 0x800922
0x800f0922 — this is a Windows error that arises when the latter renewed is the latest accessible accessible accessible accessible access. Many users have reported that this issue is related to cumulative update KB5003173 for Windows 10 21h2, 20h3, and 2004. This is usually due to broken .NET Framework components or connection issues preventing the updates from completing successfully. Also, the error often occurs after improper uninstallation of Microsoft Edge. Some cumulative updates, including KB5003173, may download additional components for Edge, causing updates to fail when an empty folder is found C:\Program Files (x86)\Microsoft\Edge\ . There are other reasons that can cause error 0x800f0922 — an incompatible firewall, missing system files, and corrupted update components.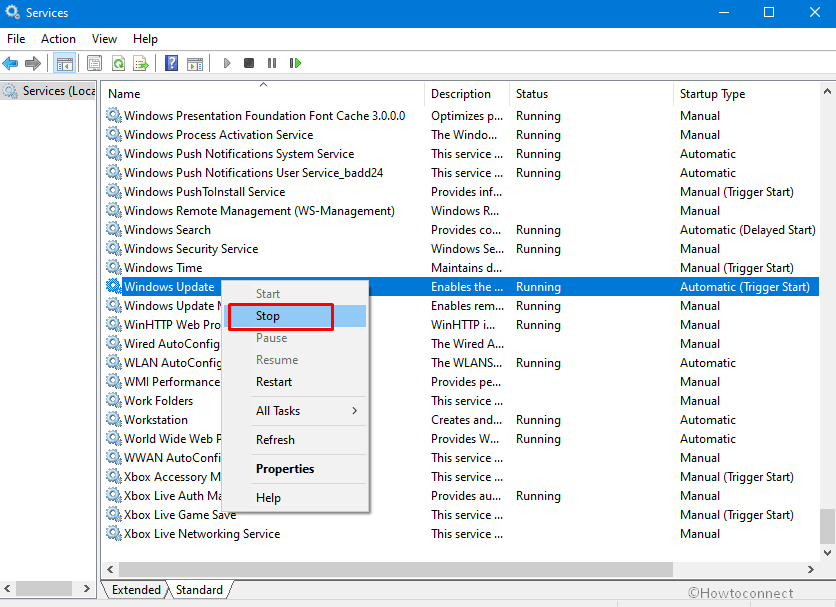 Below we will discuss all the possible solutions related to each of the causes.
Download Windows Repair Tool
Download Windows Repair Tool
There are special Windows repair utilities that can solve problems related to registry corruption, file system malfunction, Windows driver instability. We recommend that you use Advanced System Repair Pro to fix «Windows Update Error 0x800f0922» in Windows 11, Windows 10, Windows 8, or Windows 7.
1. Use the Windows Update troubleshooter
This is unlikely to help, but still worth trying as a first workaround. Use the Windows Update troubleshooter. This is a built-in utility designed to find and fix potential causes of update problems. Windows will scan your system for potential problems and try to fix them eventually. Follow these simple steps:
As mentioned, this method is rarely helpful in resolving error 0x800f0922. If all else fails, move on to the other solutions below.
2. Delete the Microsoft Edge folder.
As mentioned above, one of the most likely causes of the error could be incorrect uninstallation of the Microsoft Edge browser. If you remember that you deleted it yourself, check if the Microsoft Edge folder is still in the system. If so, you’ll just have to remove it. This way, your system will no longer conflict with this folder the next time you run updates.
That’s it. After deleting the folder, you will be able to resume successful updates.
3. Enable the .NET Framework
The upgrade process may also fail due to disabled .NET Framework components. The solution is to open Windows Programs and Features and enable these features if required. Here’s how:
4. Check the integrity of system files.
Corrupted or missing items involved in various system processes can cause problems updating your system. Below we will use SFC (System File Checker) and DISM (Deployment Image Servicing and Management) to check if this problem still exists. Both scans will help detect and repair missing components, if any. Be sure to use both scans as they can affect the resolution of the error in different ways. Here’s how:
Using SFC
Using DISM
After both of these scans are complete, try running the update installation again. If this does not help, proceed to further options for solving the error below.
5. Disable Firewall.
If you have a third-party anti-malware program installed on your system, try disabling it and see if the error goes away. Quite often, third-party firewalls cause incompatibility issues that prevent proper communication between Windows and update servers. You can also try disabling the built-in firewall from Windows Defender. For the duration of the shutdown, it is recommended that you stop any online activity to prevent hacking due to the weaker system protection (which results from disabling the firewall). Here’s how to disable the built-in firewall:
Regardless of whether you have successfully installed the required update or not, it is extremely important to enable the disabled firewall back. Do it immediately using the same steps as above.
6. Delete temporary files.
Another quick and sometimes effective solution is to clear the contents of the %TEMPT% folder. This folder can contain redundant files that sometimes interfere with the upgrade process. So let’s try to clear its contents by doing the following:
7. Enable the Application Readiness Service
Application Readiness is the name of a Windows service designed to prepare applications for use when a user first logs on to this computer and when new applications are added. Since this service is associated with updates, disabling it may result in related failures. Let’s test it using the following steps:
If the inscriptions Start cannot be clicked and Applications ready is already running, then everything is fine and nothing needs to be done.
8. Reset Windows Update components.
Still not able to resolve the issue with the previous solutions? — then try to restore all Windows Update components from scratch. This will re-create the update components to ensure there is no corruption preventing the process. The whole procedure includes restarting the BITS, Cryptographic, MSI Installer and Windows Update services, as well as renaming some update folders (SoftwareDistribution and Catroot2). These folders contain temporary files needed to run Windows Updates. Based on this, we will force Windows to remove the corrupted items and create the update-related components from scratch. Below we will show you two ways to perform this method. The first requires you to enter and execute each console command in sequence manually. The other is done with a so-called batch script written in Notepad and saved in the WUReset.bat format. It doesn’t make much of a difference which one you choose. Although the whole procedure may seem complicated and long, it does not require much time and knowledge to complete. Just follow the instructions below:
Manually
 net stop wuauserv
 net stop cryptSvc
 net stop bits
 net stop msiserver
 ren C:\Windows\SoftwareDistribution SoftwareDistribution.old
 ren C:\Windows\System32\catroot2 Catroot2.old
 net start wuauserv
 net start cryptSvc
 net start bits
 net start msiserver
Using Batch File
This is an alternative method to the above. A batch script is used to run the same set of commands to reset all Windows Update components, encryption services, and folders such as SoftwareDistribution. This is not as difficult as it might seem at first glance — even easier than the previous method. All you need is Windows Notepad and some copy-paste magic. Batch scripts are better than manual input in that they allow you to execute all the necessary commands at the same time. If you ever run into similar problems in the future, you can follow the already created . bat file and reset the update components if this method is effective now:
 @ECHO OFF
 echo Simple Script to Reset / Clear Windows Update
 echo.
 PAUSE
 echo.
 attrib -h -r -s %windir%system32catroot2
 attrib -h -r -s %windir%system32catroot2*.*
 net stop wuauserv
 net stop CryptSvc
 net stop BITS
 ren %windir%system32catroot2 catroot2.old
 ren %windir%SoftwareDistribution sold.old
 ren "%ALLUSERSPROFILE %\Application Data\Microsoft\Network\Downloader" downloader.old
 net Start BITS
 net start CryptSvc
 net start wuauserv
 echo.
 echo Task completed successfully...
 echo.
 PAUSE
9. Use the Media Creation Tool.
If all the above solutions still do not work, you can try to work around error 0x800f0922 using a special Microsoft utility called the Media Creation Tool. This is a small piece of software that helps users find the latest updates and install them despite various errors without affecting personal data. To do this, follow the steps below:
