Splinter Cell: Pandora Tomorrow: Hilfe für Sam Fisher!
Wieder einmal gibt es spannende Kost für die Anhänger der Schleich-Fraktion. Auch in Sam Fishers neuem Abenteuer ‘Splinter Cell: Pandora Tomorrow’ ist Grips und das richtige Händchen für heimliches und geschicktes Vorgehen mit einem Hauch Akrobatik gefragt. Dass das nicht immer ganz einfach ist, dürfte selbstverständlich sein. Für diejenigen, denen das Schleichen nicht so im Blute steckt, haben wir daher eine umfangreiche Komplettlösung zusammengeschneidert, die euch auch an den härtesten Passagen nicht verzweifeln lässt. Wort- und bildreich erklären wir euch Schritt für Schritt, wie ihr eure Gegner austricksen und die jeweilige Mission erfolgreich beenden könnt.
Mission 1: Timor
Der Anfang gleicht noch einer Art kleiner Einführung, so dass ihr nicht auf auftauchende Gegner achten müsst. Zieht euch am Steg nach oben und folgt dem Weg über die Leiter nach oben. Dort packt ihr den kleinen Balken, an dem es in einer kleinen Rutschpartie nach unten geht. An der Querverstrebung verläuft eine weitere Stange, die euch über das Wasser auf die andere Seite bringt. An dem Haus geht es zunächst nach rechts, wo ihr die Tür öffnet und im nachfolgenden Raum macht ihr euch mit dem Dietrich am Schloss des nächsten Portals zu schaffen. Jetzt steht man vor einem kleinen Rohr, das ins nächste Stockwerk führt, wo man durch ein kleines Sperrgitter wieder nach unten gelangt. Wieder im Freien, lauft ihr bis zum Ende des Weges, kriecht unter den Brettern hindurch und folgt dem kleinen Pfad bis ihr zur 5.72-Munition gelangt. Diese wird natürlich sofort eingesackt. Mit dem Rücken an den Holzzaun gepresst, geht es nach rechts bis hin zur kleinen Lücke. Wer will, kann schon vorher die Laterne aus sicherer Entfernung zerschießen, was die kommenden Ereignisse etwas leichter gestalten wird.
|
Späht kurz um die Ecke und wartet, bis sich der Wachmann wieder auf die Kiste gesetzt hat. Nutzt diese Gelegenheit und schleicht gehockt an ihn heran, dann packt ihn von hinten, um ihn außer Gefecht zu setzen. Jetzt kommt die Wärmebild-Brille zum Einsatz, denn vor euch wartet eine unliebsame Überraschung.
|
Auf dem Weg vor euch wurden einige Minen in den Boden gesetzt, die ihr mit dem hilfreichen Goodie glücklicherweise sehen könnt. Schleicht euch auf der rechten Seite an ihnen vorbei und lauft weiter. Schaltet die Brille nicht ab, denn schon nach wenigen Metern warten erneut ein paar Minen auf euch. Springt auf die davor stehende Kiste und hangelt euch an der Hausfassade links über den tödlichen Fleck Erdboden hinweg. Auf der rechten Seite erblickt man nun einen engen Spalt zwischen zwei Häusern, den man per Spagatsprung nach oben erklimmen kann. Durch den nächsten Raum geht es dann per Stangenrutsch nach unten. Haltet euch immer links vom Wasser im schützenden Schatten und schleicht langsam in Richtung des Wasserrades. Kurz davor steigt ihr nach rechts aus dem kühlen Nass wieder an Land.
|
Vor euch sitzt wieder ein Wachmann auf einer Kiste, den ihr wieder von hinten schnappt, aber diesmal nicht ausschalten solltet. Quetscht ihn aus, um wichtige Informationen zu erhalten, verpasst ihm danach einen Schlag und versteckt ihn in der dunklen Ecke nahe des linken Hauses. Aus diesem kommt jetzt sein Kumpel heraus, um ihn zu suchen, verschwindet dann aber auch recht schnell wieder im Gebäude. Kümmert euch nicht um ihn, sondern klettert an der Stange auf der rechten Seite auf das Häuserdach.
Über die Leitern geht es zwei Stockwerke nach oben und am besten geht ihr jetzt schon in gebückter Haltung um die linke Ecke. Drückt euch mit dem Rücken an die Wand, damit ihr ungesehen unter dem ersten Fenster mit Wachmann durchkriechen könnt. An der nächsten Ecke haltet ihr für einen Moment inne und wartet darauf, bis das Gespräch beendet ist.
|
Wieder hockend an die Wand gedrückt, huscht ihr an der Balkontür vorbei und lauft bis zur nächsten Ecke. Dort könnt ihr euch an den Rohren und am Dachsims auf den angrenzenden Vorsprung hangeln, wo ihr auch schon Zeuge des brutalen Verhörs werdet. Schiebt leise das Fenster auf, schleicht euch von hinten an den Unhold heran und schickt ihn mit einem Schlag ins Reich der Träume. Redet kurz mit Douglas und begebt euch dann durch die rechte Tür. Gleich auf der rechten Seite steht ein Wachmann auf dem Balkon, den ihr von hinten erledigt und in eine dunkle Ecke zieht. Nun folgt ihr dem hell erleuchteten Flur und achtet darauf, möglichst keinen Lärm zu machen.
|
In gebückter Haltung geht es die Treppe nach unten, wo ihr erst mal ein wenig ausschnaufen könnt. Wartet bis der laufende Wachmann in den hinteren Teil der Halle verschwunden ist und versteckt euch hinter der kleinen Bar. Ist der Bewaffnete erneut an euch vorbeigezogen, schleicht ihr gebückt an der rechten Seite des Raumes entlang, bis ihr zu dem Tisch mit der Flasche gelangt. Nehmt diese in die Hand und werft sie über die kleine Trennwand in den hell erleuchteten Teil der Halle. Dadurch werden die Männer abgelenkt und ihr könnt euch an der rechten Wand vorbei an den Säulen in Sicherheit bringen.
|
Es kann durchaus sein, dass ihr diese Stelle ein paar Mal absolvieren müsst, da einer der Wachposten manchmal einfach stehen bleibt und euch dann entdeckt. Lauft nun den Gang entlang nach links und durch die Tür ins Freie. Hier wartet eine besondere Herausforderung auf euch, denn die Gegenseite ist ebenfalls mit einem Nachtsichtgerät ausgestattet, so dass die Dunkelheit keinen Schutz mehr bietet. Doch es gibt einen einfachen Trick.
|
Wartet einfach, bis die Scheinwerferkegel vor euch auftauchen und folgt dann einfach deren Verlauf durch den kleinen Park. Am besten prägt ihr euch vorher den Weg gut ein, damit ihr nicht doch entdeckt werdet. Auf der anderen Seite angelangt, geht es durch die rechte Tür nach oben. Den wartenden Scharfschützen schaltet ihr in gewohnter Manier von hinten aus und schreitet durch die nächste Tür, wo ihr die gesuchte Ingrid findet.
|
Nach dem Gespräch öffnet ihr das Fenster und seilt euch an der linken Seite des Gebäudes ab. Jetzt dürft ihr auch endlich eure Waffe benutzen, um die Gegner zu töten, was ihr nun sofort tun solltet. Schaltet die Wärmebild-Brille ein und wartet im Dunklen auf die beiden Wachmänner, die ihr nacheinander erledigt. Weitere Männer tauchen glücklicherweise nicht auf. Steigt danach auf die beiden kleinen Scheinwerfertürme, um den Strom abzuschalten und haltet euch möglichst links. Nach wenigen Metern stoßt ihr auf einen Holzsteg am Wasser und entdeckt an dessen Ende ein Schlauchboot. Steigt in das Boot und beendet damit die erste Mission.
Pandora Tomorrow Cheats, Codes, Cheat Codes, Walkthrough, Guide, FAQ, Unlockables for PlayStation 2 (PS2)
Tom Clancy’s Splinter Cell: Pandora Tomorrow
Easier aiming with pistol
To aim better with the pistol, press Square to pull it out. The crosshair should appear normal. Then, press Up on the D-pad and the crosshair should become a laser sight. This makes it very easy to aim, since the laser sight is smaller and thinner than the normal crosshair. This allows fast kills and head shots. Note: If you are in dark corners and have the laser sight on, the enemies will notice and attack you.
Easier aiming with SC-20K
Press R3 to zoom in the sniper scope, then press L1 to hold your breath. You should be able to get a good shot while Sam remains still.
Knocking out guards
To knock out a guard without using a Sticky Shocker or a Air Foil, shoot a Sticky Cam at their head. Note: It must hit him directly in the head for the guard to get knocked out.
Stealth
To move quieter, crouch down and walk slower. This will make your steps softer, and keep you undetected to a limit. To decrease your chances of being seen, shoot out the lights with your gun. Be careful, as if there is an enemy is under that light they may see you shooting it out.
Bypassing motion detectors
Before passing by a motion detector, pick up the body of a dead or unconscious guard. Then, proceed to walk past the motion detector. The motion detector should not go off, due to it seeing the guard on your shoulders, thus making you invisible to it.
Find mines easily
In order to find mines in the camp mission, turn on the thermal vision.
Whistling
To whistle, press R2. This will usually make a guard approach the sound. Note: Hide in a dark area and whistle, then jump the guard when he stops.
Talking to teammate after losing in multi-player mode
When you are playing in an online match and lose all of your respawn lives, mute your teammate and then unmute him. Both of you can now communicate with each other.
Level select
When you complete the game on the normal or hard difficulty setting, when you go back into the game make sure you go over towards the level select instead of checkpoints. You could lose your data and have to do it over again if the wrong choice is made.
Defeating Norman Soth
After you have climbed up the elevator cables and have gotten on top of the other elevator, crawl through the hole in the wall. Norman Soth and two other mercenaries are on the top pathways. While in the hole, there will be one guard on the top path, slightly to the right. You should be able to shoot him in the head. Then, a timer will start and you will have one minute to kill Norman Soth and his other mercenary. When you shoot the first mercenary, drop out of the hole onto the first pathway. The second mercenary will go to exactly where the you shot the first mercenary. Shoot the second mercenary in the head. Note: The second guard will be aiming at the hole, so he will not see you if you drop out of the hole. The last person to kill is Normon Soth. Start running down the pathway and turn left on the second to last walkway on the left. Look up and turn on your thermal vision. You will see Normon Soth. Get a clear shot and shoot him in the head. After that you must retrieve the smallpox box from the top pathway. If you are on the second to last pathway on the left, go up the ladder. There will be another ladder; use it to climb up. Drop off the ledge onto the pathway.
 Run down the middle pathway to find the smallpox box.
Capturing Suhadi Sadono
After killing off all of Sadono’s guards, lure him into a dark corner then shoot him with a Ring Airfoil. Then, run up behind him and grab him. You can now force him to use the retinal scanner and complete the mission. Also, rather than picking off each one of the bodyguards, you can go to the right all the way around the room in the shadows. You should then reach the stage behind Sadono. Follow the curtain’s shadow to Sadono. There will be a gap. Stand up and run until you see the «Grab Character» option appear. Grab him. You will be shot at and probably get hit, but once you grab him they will stop and you will hear someone say «Don’t shoot, you might hurt Sadono». After that you are home free as they will not follow you.
Programmer credits
In the Jerusalem mission, get to the part where you are following Dahlia Tal and can go up onto the roof and through an apartment to avoid being seen in the open area while she continues on. When you go through the apartment, you must sneak past two Israeli men watching television. If you zoom in on the television, you can see that it continuously scrolls a message in French from the development team thanking two people for their help with the game.
Prince Of Persia references
On the mission when you are on the train, look in the second car where the guard is located. Knock him out then go behind the fenced door. Look down you will see a magazine featuring Prince Of Persia. Also on the third level when you are in Paris on the train, at the beginning there will be a room with an engineer. Knock him out. On the floor of the room is a Prince Of Persia strategy guide.
Various references
On the first half of the Jerusalem level, there is a book store directly behind an alley with a swinging lamp. Next to it is another smaller alley with a swinging lamp. If you look inside the large window you can see many different picture references to The Punisher, Ubi Soft’s XIII, an anime, and a picture of the infamous «Sniper Kitty» among many other things. Use the binoculars to get a much better look.
Around The Web
Around The Web
X
«Like» CheatCC on Facebook
Follow @cheatcc
Tom Clancy’s Splinter Cell: Pandora Tomorrow Walkthrough
Mission one: Dili, East Timor — Easy to learn, hard…then
Mission objective: training, hostage rescue
License to kill: none
Alert level limit: 1
Alternative paths: several the main purpose of which is to introduce you to the basic techniques and management.
Before starting the level, you must remove the handcuffs from Sam Fisher’s hands. It’s easy to do, just play with the up, down, right, left buttons, as you see that the lock gives in, then you have found the right combination.
At the beginning of the level, listen to Lambert’s voice and do what he says. When you get to the pier, look up to find a cable leading to a cabin nearby. Cling to it and jump off when you see yourself hanging over the terrace of the house. Go into the house and unlock the lock of the back entrance with a master key. Climb up the pipe and find the hatch on the floor. Open the hatch and jump down.
After talking with Lambert, go forward and duck duck under the porch of the house. Climb up to the veranda. Once the game saves itself, grab the 5.72 ammo from the porch railing and drop down to the ground. See the fire? Go to the right wall and press your back against it. Go right to the first exit. If you want, then play in the capture group (at the edge of the opening, press the right and space).
Here is the first victim, sitting with his back to you. Easy prey. Sneak up on her from behind and grab her. Drag the victim to a dark corner (the stealth scale should flash in the leftmost position). Stun the victim.
After the next self-save, put on thermal imagers, as there are mines ahead. Go around them on the right, diving under the veranda.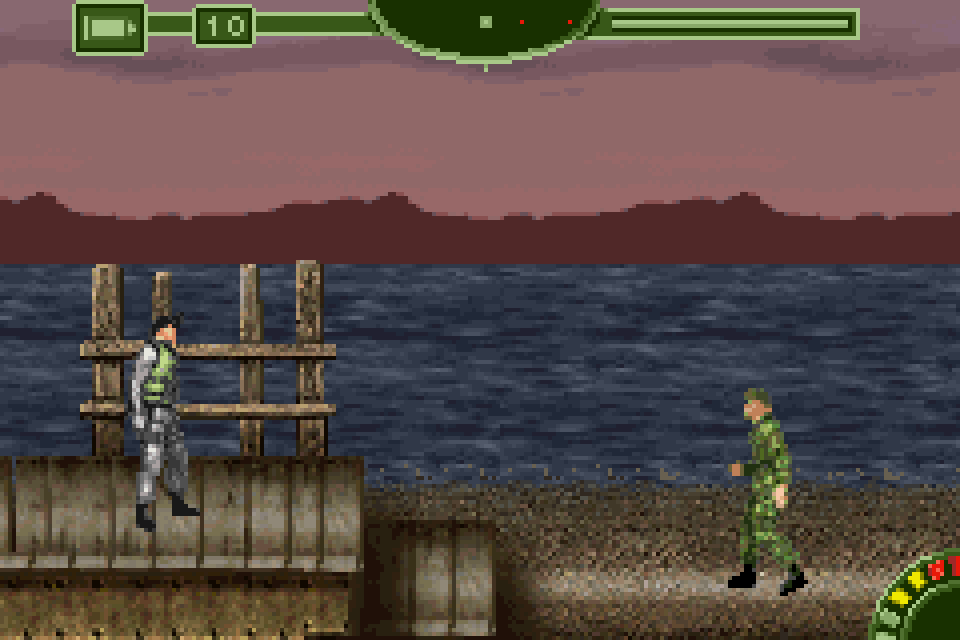 There are again mines ahead, but this time no verandas are visible, but some kind of box has perched on the left. Stand on the box and jump up so that Sam is hooked on the pipe. Go further and go into the space between the two walls. Starting from the walls, hook on the left edge. Go further and go down to the courtyard, where something is burning, frogs are croaking in the pond, and a sentry with a flashlight is wandering along the shore. There are several ways to bypass this sentinel. Here is one of them.
Wait for the guard to go left, cross the pond and hide in the shadow of the truck at the gate. When the guard approaches the truck and turns his back on you, quickly jump out of cover and stun him. Hide the body and go down into the pond. Do not wander across the bridge — it is mined. Go straight along the water and near the water mill, go out onto land.
The guard sitting with his back can be painlessly stunned, just don’t forget to drag him to a dark place, as his partner will come out to the noise from the nearby house. You can stun him too, or you can just wait until he goes back to the house. Then go to the stone wall and climb up the pipe. Here you are at the embassy, and the training has come to an end.
Embassy
Climb the stairs to the top of the building. When you turn around the corner, where there is a lot of broken glass on the floor, and the face of the guard is visible in the window, bend down and quietly sneak past. Don’t step on the glass!
When you hear Lambert’s voice calling to freeze — freeze! If you make a careless move, it will be the end of the mission. Wait for the terrorist leader to leave and duck past the glass doors (they don’t open). Go to the edge of the balcony and approach the wall, an option () should appear. Cling to the pipe and crawl to the balcony with a window. Jump down and listen. The room you need is right on the course. There are several ways to neutralize the tormentor of your friend, I will give the second, not so obvious, but more effective. Do not climb through the window, as you may be seen, instead go to the edge of the balcony and jump (jump) to the neighboring balcony, from which an opening, hung with a curtain, leads into the room. Tiptoe into the opening and sneak up on the tormentor. Knock out the terrorist and drag his body to a dark corner. Talk to Douglas. You have a new task — the release of a girl working in the CIA as a translator from Hebrew.
Exit the room through the door opposite the window. Go back along the corridor to the balcony where the guard is standing. Knock out the guard, although you don’t have to. There is a first aid kit in the toilet nearby, but I think you don’t really need it yet.
Go down the corridor to the stairs leading down. Go downstairs and shoot all the lamps that you can reach. There are three guards in the hall in front of you, two of whom are playing cards. First, remove the one that stands alone. Now take care of the gamblers. Get their attention by whistling or throwing a bottle. Put on a night vision device and strangle the guys one by one. If you are a humanist by nature, before the guys leave to check what’s wrong, go to the wall on the right, behind the columns there is some kind of corridor that will help you sneak out of the room unnoticed.
When you find yourself in the hallway, exit through the large doors. Here you are in the yard. Listen to Lambert, he advises you to stay in the spotlight, as there is a sniper with night vision in the tower opposite. Observe the spotlights in the courtyard and, having chosen the one you like, follow it, staying in the light all the time. If you find yourself in the dark, you will immediately get a bullet. Once you’re on the other side of the courtyard, run quickly to the doors leading to the tower.
Go inside and quietly climb up the tower. If you are still wounded, then on the wall you will see a first aid kit. Once at the top, sneak up on the sniper and stun him. Go into the next room and talk to the translator (she can talk until she’s blue in the face). Soon you will receive the last task — to cut down all the lights in the village.
Climb down and exit through the door on the right. Merry Christmas to you — you’ve just been given the go-ahead to use force. Hooray!
Your task is to cut down two generators located on the towers. Hide in the dark and stun the first guard. Climb the tower on the left and pull the switch. Jump down and go to where the second guard is walking around. Cut it down and climb the tower on the left. Turn off the generator and go to the pier. Yes, stop bending down and looking back, no one else will attack you. At the edge of the pier, jump into the rubber boat. Mission accomplished!
Alternative ways:
You don’t have to touch the guard at the pond, for this you need to go overland to the left of the bridge, the main thing is to follow the flashlight beam.
You can get into the translator’s room through the pipe leading to the roof, then you won’t have to kill the sniper.
A window opens in the translator’s room through which you can go straight down to meet the guard in the yard.
Mission two: Solinier, Paris, cryogenic laboratory — Frostbitten penguin
Mission objective: Search for information about ()
License to kill: yes
Alarm level limit: 3
Alternative routes: several
At the beginning of the level, you will find yourself in the Paris metro. Climb down and take out the guard next to the train. Approach the back of the train and jump up to grab onto the ladder leading to the roof. Walk along the roof and jump down the hatch. When you are in the car, immediately go forward, so you can avoid meeting with the guards. Let the guard into the car and wait until his partner on the platform turns away and goes in the opposite direction. Get out of the car and run into the corridor on the left.
The corridor will end in a wall of fire that cannot be bypassed. Raise your head up and shoot at any of the two valves on the pipes — this will put out the flames, and you can go further.
Approach the door and use the optical cable to spy on the actions of the guard. When he moves away from the door, go into the room and hide in the shadows (you can climb on top of the shelves). Shoot or choke the guard. Hide the body.
Go to the next door and shoot the lamp on the ceiling. Use the optical cable and wait for the guard to move away. Open the door and quickly sneak to the first computer on the right. Hide in the dark closer to the central computer, we’ll have some fun soon.
One of the guards will head towards the computer next to you. Wait for it to start working and then sneak up from behind and stun. Hide the body and take the parcel. Shoot the remaining guard or just sneak through the next door.
When you find yourself in a large room with a faulty lamp, do not rush to run forward, as they are already waiting for you. Look carefully at the wall to the left of the door and find the pipe. Climb up it and, pulling up your legs, crawl to the opposite part of the room, where one of the three shooters sits at the entrance. Shoot somewhere far away from you to attract the attention of the guards. When the two go to investigate, jump down and shoot the ceiling on the wall — this will attract the attention of the guard standing on the lookout. Go around it and run into the opening and to the left. Quickly open the door on the left and get your rifle ready. Now let’s shoot.
In the room on the left, two thugs start shooting at computers, Lambert wants you to stop them. Fly into the room and shoot the brats. Search the bodies and save. Approach the computer in the corner and rummage through it. The timer will start, you have only 1:30 to find and defuse the bomb.
There is plenty of time, so first shoot the guy in the corridor, and then the one that appears from the doors on the left. By the way, the bomb is in this room with the sign . Enter the room and defuse the bomb. If you were wounded, then earlier there was a room along the corridor where a first-aid kit hangs on the wall, and there is a whole arsenal of cartridges and grenades on the floor. Exit through the far door on the right.
Climb the stairs up. See the red sensor on the wall? It’s a motion sensor. So that he does not notice you, break the ceiling lighting on the site and move on.
Enter the room where the sounds of gunfire can be heard. Hide in the shadows on the left and wait for one of the three guards to leave, now let’s deal with the rest. Knock out the one roaming the neighborhood and search his pockets. Hide the body and move on, just be careful, there is a motion sensor on one of the walls, but you know what to do — while it is dark, he does not see you. Go through the double doors and deal with the guards. Turn off the lights to hide traces
Enter the next room, which will be a server room. There are a lot of cameras here, so don’t yawn around. You need a computer, which is in the lower right corner, that is, to the right of the entrance. To get by with little blood, break a few shades and climb into the computer. When you break the ceiling, a guard will jump out of the door opposite, you can either kill him or wait until he leaves.
Go out into the corridor and enter the code to open the lock — 2457. Come in and take two Ring Airfoils from the table next to the bright spotlight. Behind the glass in the next room you will see a guard; to attract him, just turn off the spotlight (switch on the back). When the guard enters, either execute or pardon. There is also a first aid kit in the room, so don’t miss your chance.
Go out into the corridor and break the plafonds in the area of the motion sensor. Climb the stairs and, before reaching the platform of several steps, shoot the mine on the wall. The blast wave will destroy the security camera, and you can go further. Run upstairs and turn off the light, go into the large hall. There are two guards waiting for you here. Dealing with them is pretty easy. Carefully make your way into the corridor on the left and hide at the very end, one of the guards will soon come up there. Knock it out, now there’s only one left. Shoot or choke the guard and use the computer to find the code for the door at the end of the corridor. Enter the code — 7562 and go to the vault … brains!
Listen to Lambert chatter and put on your thermal cameras. Enter the freezer and carefully sneak up to the turret. Play around with the settings. I advise you to turn it off and kill the guard yourself, but you can shift this task to the machine (Disable IFF option), just be prepared for the alarm level to rise by one point. Don’t forget to disable the turret and search the body. Enter the door on the right. Take off your glasses and save.
An interesting puzzle, two guards on a narrow bridge. Of course, why not bang them, but I offer you an alternative way. Right after you entered the bridge, look to your left. You see, there is no railing in one place — this is no accident. Hang on your hands under the bridge and crawl to the left, BUT beware of the white steam coming out of the holes in the left wall just behind you. The steam appears to be liquid nitrogen, and Sam doesn’t like it very much, as the health bar is melting right before our eyes.
