Sharkoon TG4 RGB review | Techtesters
Recent heeft Sharkoon het kleine broertje van de TG5 aangekondigd, oftewel de Sharkoon TG4. Deze nieuwe behuizing komt in drie varianten, alle met respectievelijk 4 fans in de kleuren rood, blauw of aRGB. De rode en blauwe varianten gaan voor €50 over de toonbank, de aRGB versie komt voor €60 thuis gezonden.
Echte budget behuizingen zien we hier relatief weinig, toch houden we de verwachtingen hoog omdat we weten dat Sharkoon erg goede behuizingen kan maken zonder hiervoor de hoofdprijs te vragen, ik refereer hier naar de Pure Steel en de Night Shark. Beiden behuizingen wisten voor middenklasse bedragen (€80 en €90) premium indrukken te geven, en ik hoopte op een positief vervolg.
Specificaties
Specs en features vanuit Sharkoon:
De buitenkant
Het begint ondertussen een hele stapel te worden, de TG4 is namelijk al de vierde (toeval?) behuizing van Sharkoon die hier langs is geweest, wat een hele mooie stapel aan dozen geeft. De doos van de TG4 RGB past mooi in het rijtje, hij ziet er namelijk vrijwel hetzelfde uit als zijn voorgangers: wit, met de belangrijkste onderdelen in het zwart gedrukt.
Het uiterlijk? Netjes over het algemeen, en veel overeenkomsten met de TG5: zo heeft hij een licht getint glazen voorpaneel, een groot zijpaneel met vier schroeven en plastic intakes aan beiden kanten van het voorpaneel.
Aan de andere zijkant zien we een deel van het paneel wat deels uitsteekt, dit is waarschijnlijk om genoeg kabelruimte te creëren waarbij de voorkant gewoon smal gehouden wordt. Hier valt ook op hoe laag de behuizing eigenlijk is, ruimte boven of onder het moederbord is er ook niet.
De behuizing is degelijk, maar niet bijzonder voor het geld, zo kan je bijvoorbeeld de bovenkant deels indrukken waarbij hij mee zal veren, wat ook gebeurd bij het metalen zijpaneel. Ook heeft hij ten opzichte van de Pure Steel geen echt fanfilter aan de onderkant zitten maar een dun metalen plaatje wat eigenlijk niet heel veel doet.
De binnenkant
Op naar de binnenkant, na de vier schroeven los gedraaid te hebben dien je met enige voorzichtigheid het paneel los te halen, waarna de compacte maar degelijke binnenkant tevoorschijn komt.
We zien een aantal plaatsen voor 2 HDD’s onderin en 3 SSD’s tegen de achterkant, maar ook een aantal kabeldoorvoeren. Ik mis hier eigenlijk wel een PSU shroud die eigenlijk elke moderne behuizing wel heeft.
Aan de achterkant bevindt zich de aRGB-controller die plaats heeft voor de 4 standaard ingebouwde fans. Hier merk je wel dat Sharkoon iets te enthousiast was met het compact maken van de behuizing, met als gevolg dat je kabels hier maar lastig kwijt kan omdat er erg weinig ruimte is tussen de backplate en het zijpaneel.
Inbouwen
Deze ronde gaan we weer voor mijn nieuwste set-up, bestaande uit het volgende:
– Asus ROG Strix B450-F Gaming moederbord
– AMD Ryzen 7 1700X CPU
– Crucial Ballistix Tactical Tracer RGB geheugen
– Cooler Master MasterLiquid ML120L RGB
– MSI Radeon R9 270X GAMING 2G
– Samsung 850 EVO 250GB
– Seagate 1TB HDD
– be quiet! Straight Power 11 850W
Zoals gewoonlijk begon ik weer enthousiast met het installeren van alle onderdelen op de juiste plek, maar al gauw merkte ik een paar dingen die beter konden en die door een paar aanpassingen in het ontwerp eenvoudig verholpen kunnen worden. Met een ATX bord heb je bijvoorbeeld geen kabeldoorvoeren onder en boven het moederbord en kabels zullen hier door altijd in het zicht blijven, en het meest vreemde was dat er geen plek is voor een waterkoelingssysteem met een radiator, achterin is de ruimte gewoon te smal. Voorin kan het eigenlijk wel, maar de behuizing is er duidelijk niet voor ontworpen en ik moest andere extra lange schroeven zoeken om het te doen passen.
Wegens het ontbreken van een PSU-shroud (waar je normaliter lekker makkelijk kabels kan dumpen) moet je wel al je kabels in de achterkant zien op te bergen want anders ziet dit er gewoon niet uit. Het gevolg is heel veel kabels in een relatief kleine ruimte. Het sluiten van de achterkant is daarna dan ook een flink karwei. Ook dien je er rekening mee te houden dat de aansluitingen van de aRGB controller fragiel zijn en bij een beetje kracht zullen deze afbreken, als je dus met kabels bezig bent moet je tegelijkertijd voorzichtig zijn om niets kapot te maken maar ook iets kracht uitoefenen om de kast te sluiten met alle kabels in een klein stukje ruimte gestopt. Na de installatie kostte het mij overigens caeen kwartier om het achter/zijpaneel weer vast te krijgen met alle kabels op hun plek. Momenten waarop ik zou denken ‘had ik maar een tientje of twee meer uitgegeven’.
Qua temperaturen houdt de TG4 de boel voldoende geventileerd, met laag gebruik blijft het moederbord netjes rond de 33 graden Celsius wat nét iets boven de 29 graden van de Pure Steel zit, maar groot is het verschil niet. Waar het echter de verkeerde kant op gaat is met de geluidsproductie, als de fans op 100% staan produceren deze op 50cm afstand zo’n 41 dB wat 8 dB hoger is dan de Pure Steel, en dat hoor je. Zorg dus dat je de fans flink terugschroeft.
Showcase
Het resultaat is een redelijk nette build, ondanks een aantal kabels in het zicht:
#selfietime!
Conclusie
We beginnen gewoon met het positieve gedeelte, wat is er allemaal goed aan deze behuizing? Hij is met zijn inhoud van 39 liter relatief klein en weegt met 5,3 kg gewoon weinig, wat plaatsen en verplaatsen erg eenvoudig maakt. De uitstraling heeft hij ook mee, aRGB fans zien er naar mijn mening namelijk gaaf uit en brengen je build wel naar een hoger niveau. Ook de tempered glass panelen aan voor- en zijkant geven een strakke en degelijke impressie, voor relatief weinig geld krijg je dus eigenlijk een prachtige case, en accessoires die het geld bijna alleen al waard zijn. Overall bouwkwaliteit is ook gewoon echt dik in orde. Zou je deze case reviewen zonder hem te bouwen, dan ben je damn impressed!
Toch zitten er flink wat haken en ogen aan deze behuizing van Sharkoon, en tijdens het bouwen begint er dan toch wat te knagen. Zo komt hij als een van de weinige moderne behuizingen zónder een PSU-shroud, waardoor een hele warboel aan kabels geheid zichtbaar door je behuizing lopen. Ook komt de TG4 standaard zonder makkelijke plaats voor radiatoren, zijn de kabelgaten niet op logische plekken geplaatst en is er weinig kabelruimte aan de achterkant. Daarbij zijn de USB3.0 poorten aan de bovenkant te krap gemaakt zodat USB-apparaten blijven klemmen en met veel kracht verwijderd moeten worden. Daarbovenop komt ook nog dat de ventilatoren relatief veel geluid maken zonder agressieve fan controle (en dan nog) en dat de aRGB-controller bij elke reboot zijn instellingen vergeet is ook een stevig irritatiepuntje. Elke keer als je je pc opstart zal hij terugspringen naar zijn standaardkleur rood en dat voelt erg naar.
De TG4 komt in 3 varianten: met rode, blauwe of RGB fans. De eerste 2 kosten €50 en de RGB variant €60, die laatste lijkt dan ook direct de beste deal, aRGB betaal je tenslotte normaliter stevig voor. Maar maakt dat de TG4 een aanrader? Nee, eigenlijk niet. Prima materiaal, veel features, en veel voor je geld, maar ook met een duidelijk ‘goedkoop is duurkoop’ nasmaakje. Wil je echt spotgoedkope aRGB prima, want spotgoedkoop is hij en daarmee krijgt hij ook onze ‘approved’ award. Maar wil je een beetje kwaliteit en heb je een klein beetje budget over? Doe jezelf gewoon een plezier en geef dan €10-€20 meer uit voor bijvoorbeeld de Pure Steel RGB of TG5 RGB. Daar bespaar jezelf flink wat inbouw en kabelmanagement frustraties en krijg je niet het gevoel dat je hebt lopen beknibbelen.
Enkele hogere res fotos voor de liefhebber, klikken voor de volledige versie:
Sharkoon TG4 — Reviews — Tweakers
Schrijf review
Scoreverdeling
Gemiddelde
gebruikers score Score: 3.5
Score: 5
Score: 4
9
Score: 3
2
Score: 2
2
Score: 1
1
sorteer op:
14 reviews — Pagina 1 van 1
+3
De reviewer heeft het product gekregen in ruil voor het schrijven van deze review.
Sharkoon TG4 (RGB leds)
De TG4 RGB zal een interessante budgetkeuze zijn, lekker compact en de 4(!) aRGB fans en glazen panelen geven een mooi effect. Helaas zijn er wat nadelen: geen PSU shroud, geen plaats voor radiatoren, ruimte voor kabelwegwerking is beperkt; het is en blijft gewoon een budget case.
Pluspunten
- Hij is met zijn inhoud van 39 liter relatief klein en weegt met 5,3 kg gewoon weinig
- De 4 meegeleverde aRGB fans hebben een fantastische uitstraling voornamelijk door het gebruik van veel glas aan voor- en zijkant
- Overall bouwkwaliteit is ook gewoon echt dik in orde.

- Waar je normaal al €60 voor 4 aRGB fans + controller betaald krijg je ze hier voor het bedrag + een behuizing in principe
Minpunten
- Geen PSU-shroud aanwezig, oftewel veel losse kabels
- Kabelgaten niet op logische plaatsen, onder en boven een ATX moederbord is er geen ruimte
- Geen plaatsen voor radiatoren
- USB3.0 poorten aan de bovenkant klemmen enorm en USB’s verwijderen en inpluggen kost erg veel kracht
- Produceert relatief veel geluid indien de fans niet lager ingesteld worden
- aRGB-controller ‘vergeet’ bij elke reboot zijn instellingen
Eindoordeel
Score: 3
Sharkoon TG4 (RGB leds)
Koop deze case niet hij mag er mooi uitzien maar houd je pc verre van cool. en de cable management is ook moeilijk door gebrek aan ruimte achter in.
Pluspunten
- uiterlijk
- prijs
Minpunten
- airflow
- cable management
Eindoordeel
Score: 2
Sharkoon TG4 (RGB leds)
Goede budget case met 4 RGB fans. De airflow is wat minder door de kleine inkepingen aan de voorkant. Er is niet super veel plaats voor cable management.
Pluspunten
- Goedkoop
- 4 fans meegeleverd
- Genoeg ruimte voor je onderdelen
Minpunten
- Airflow
- Minder plaats voor cable management
- Geen PSU shroud
Eindoordeel
Score: 4
Sharkoon TG4 (RGB leds)
Prima budget case. Je hoort veel over slechte airflow, die is ook niet al te best, maar er zijn genoeg cases die opgehemeld zijn door de prijs die nog slechter zijn.
Pluspunten
- RGB
- Tempered glass zijpaneel
Minpunten
- Weinig cable management mogelijkheden
- Wordt gekoppeld met Aorus moederborden, dus je kan geen trippy rgb selecteren
Eindoordeel
Score: 4
Sharkoon TG4 (RGB leds)
Een prima behuizing voor beginners. Zeker omdat het een ruimte behuizing is, ook de prijs. De behuizing ziet er ook goed uit, met z’n RGB verlichting die je via je moederbord, of resetknop kunt bedienen. Via de resetknop heb je 14 profielen, dus veel keus.
Pluspunten
- Goede kwaliteit
- Gehard glas
- Eenvoudig
- Aanslutingen bovenkant
- RGB verlichting
- Prima airflow
Minpunten
- Niet geschikt voor 240mm radiator
- Voeding zichtbaar
- Bekabeling HDD onhandig
- CPU 4 pin onhandig plek
Eindoordeel
Score: 4
Sharkoon TG4 (RGB leds)
Ik heb een Game PC gebouwd en deze case daarvoor gebruikt. De case is erg slechte kwaliteit (zie minpunten). Niet kopen dus!
Pluspunten
- RGB
- Ruimte
Minpunten
- Slechte ventilatoren meegeleverd die snel kapot gaan.
- geen afgesloten deel voor de voeding.
- lage kwaliteit
Eindoordeel
Score: 2Per criterium
Sharkoon TG4 (RGB leds)
Prima budget behuizing met mooie LEDs en voldoende ruimte om componenten kwijt te kunnen. Heeft wel het nadeel dat er geen plek is voor een intern optisch station. Ook is er weinig plek voor goede cablemanagement. De RGB controller is eenvoudig.
Pluspunten
- Airflow is niet verkeerd
- RGB fans
- Ruim plek voor waterkooling
- Als je handig bent met een Arduino kan jij je eigen RGB controller maken. Dus de kast is «mod»-baar.
Minpunten
- RGB controller onthoud je laatste instellingen niet.
- Matige cablemanagement
Eindoordeel
Score: 4
Sharkoon TG4 (RGB leds)
mooie kast voor game/workstation pc, overig niet al te praktisch heeft geen radiator support voor eventuele toekomstige upgrades, geen kabelmanagement gat boven de Mobo, geen Psu Shroud en scherpe kabel management gaten. overige wil oké kast voor 55 euro en RGB, maar ik had achter af toch de tg5 gewild.
Pluspunten
- Goedkoop
- RGB
- 4 fans megeleverd
Minpunten
- Geen Radiator support
- Geen Psu Shroud
- Geen Kabelmanagement gaten boven Mobo
- Scherpe Kabelmanagement gaten
Eindoordeel
Score: 3
Sharkoon TG4 (RGB leds)
Dit is een prima product voor een lage prijs. Had alleen een paar probleempjes met de fans die een apart wind geluid maakte (Harder — zachter — etc). Dit probleem ging weg toen ik de middelste fan ontkoppelde. Er is mee te leven en het gebeurd bij meerdere mensen.
Pluspunten
- Mooi design
- Prijs
- 4 RGB fans
Minpunten
- cable management
- Luidruchtig
Eindoordeel
Score: 4
Sharkoon TG4 (RGB leds)
Leuke kast voor een degelijke prijs. Meerdere builds in gehad, all-in-all tevreden. Fans zijn aan beide zijdes RGB, wel redelijk luid. Cable management laat zeker aan zijn wensen over. Ondanks de prijs ziet het er redelijk mid-range uit. Tip: Neem een (Semi) Modulaire PSU.
Pluspunten
- Glazen voor en zijkant.
- Meegeleverde RGB fans x4
- Prijskaartje
Minpunten
- Luidruchtige fans
- Cable management (gaten niet handig)
Eindoordeel
Score: 4
Sharkoon TG4 (RGB leds)
Prima budget case ziet er mooi uit en heeft een goeie airflow beetje onhandig met de kabelmanagment omdat de achterkant niet heel groot is ook een beetje onhandig met waterkoeling omdat je de radiator alleen aan de achterkant kan plaatsen. Verder een hele goeie case voor de prijs.👍🏻👌🏻
Pluspunten
- Ziet er mooi uit
- Goeie airflow
- Goeie kwaliteit voor de prijs
Minpunten
- Onhandige kabelmanagment
- Geen radiator mounts
Eindoordeel
Score: 4
Sharkoon TG4 (RGB leds)
word tw warm
Pluspunten
- ziet er mooi uit
Minpunten
- geen airflow
- weinig ruimte voor kabels
Eindoordeel
Score: 1
Sharkoon TG4 (RGB leds)
Als je bekend bent met de VG4/VS4 serie van Sharkoon dan weet je wat je kunt verwachten. Degelijke bouwkwaliteit, niet vreselijk, niet fantastisch. Een prima optie voor de budgetgeorienteerde koper die Tempered Glass en RGB wil, maar voor het zelfde geld heeft de Phanteks P300 betere bouwkwaliteit.
Pluspunten
- Prijs
- RGB verlichting is mooi en geeft genoeg licht
- RGB Controller werkt goed en heeft aansluitmogelijkheid voor aan Moederbord
- Genoeg ruimte voor HDD’s en SSD’s
- Genoeg ruimte om tijdens het bouwen in te werken.

- Dubbel Tempered Glass is erg mooi
- Airflow is prima maar niet fantastisch
Minpunten
- Materiaalkwaliteit: makkelijk buigbaar Aluminium en kunsstof
- Phanteks P300 heeft voor de zelfde prijs betere bouwkwaliteit.
- Maar 1 normale PCI-Bracket meegeleverd, de rest moet je zelf losmaken en kunnen niet worden teruggeplaatst.
- Bekabeling van onderste HDD en SSD is wat onhandig
- Frontpanel USB 3.0 Headers sluiten te strak aan, USB erin en eruit steken is daardoor onhandig.
Eindoordeel
Score: 4
Sharkoon TG4 (RGB leds)
+Echt een prachtige kast en de verlichting is heel goed en duidelijk. Mooie RGB kleuren en het is een sterkte kast met echt glas wat zeer mooi is. -Jammer dat de kabel ruimte niet groter is ook bij het moederbord boven weinig ruimte om processor voeding aan te sluiten
Pluspunten
- Fantastische RGB fan’s
- Voor de prijs een hele mooie kast!
- Goede luchtdoorvoer.

- Stof filters
- Genoeg ruimte voor SSD & HHD’s
- Ruime kast.
Minpunten
- Persoonlijk moeilijke RGB installatie op moederbord.
- Stroeve 3.0 USB ingang.
- Soms wat luidruchtig
Eindoordeel
Score: 4
Resultaten per pagina: 25 | 50 | 100
Airflow
07/17/2021
Usually, PC case airflow refers to the air circulation inside the case, which significantly affects the temperature of all internal components of the system.
Therefore, to ensure maximum performance and minimum system noise, great attention must be paid to airflow efficiency.
Airflow Efficiency
Efficient airflow depends on circulation of the air drawn in by the chassis fans through the air intakes on the outside of the chassis, the component fans inside, and the chassis fans that blow air out of the system. Inefficient airflow leads to higher component temperatures inside the PC case. nine0003
In addition to degrading overall performance, the consequences can also be a high temperature shutdown and, in the worst case, even equipment damage. In addition, some fans may spin too fast, resulting in increased volume. On the other hand, thoughtful airflow results in a quieter system through more precise use of fans and at lower fan speeds.
Creating Efficient Airflow
Typically, a PC case is ventilated from front to back and bottom to top. Chassis fans are the primary tools for controlling airflow. Because warm air always tends to rise, and therefore the air below the case is colder than above the case, fanless vents work on the same principle. Most cases are designed for this airflow, so it is considered a universal solution, almost always allowing you to achieve certain results. nine0003
After checking the system temperature, the position of the fans should be adjusted if individual system components generate particularly high heat. For lower CPU temperatures, the front fans are installed so that the airflow from them is directed to the CPU cooler, and the warm air is removed directly through the rear fan. On the other hand, to reduce the temperature of the video card, it is worth directing the airflow from the fans exactly to the area under the video card, providing its own cooling system with the maximum amount of fresh air. nine0003
If your case has a closed front, the front fans will be much less efficient. And in this case, the use of top or bottom fans will be an effective addition to their work. The power supply should be placed in such a way that it is supplied with colder outside air, rather than warm air from inside the case.
Additional tip
In order for the air to flow as freely as possible, a neat layout of the interior of the case is a very important factor. Therefore, the use of a modular cable system with a minimum of free-hanging cables is highly recommended, and not only for aesthetic reasons. It is also worth making sure that the hard drives do not block the airflow. nine0003
Regular cleaning of the inside of the case ensures better cooling, as dust settles on the fan blades, cooling fins and case filters over time.
Many PC cases offer a very large variety of different features and features that make it impossible to create any simple solution, especially considering such an important factor as loudness.
Thus, despite the different design of PC cases, following the basic rules will help to significantly improve the airflow inside the case, and at the same time reduce the temperatures of the components, so it is always worth paying attention to the configuration and characteristics of the fans. nine0003
- Back
- Review
-
Further
Airflow in the housing. What do you need to know? — i2HARD
In today’s material, we will analyze the important topic of airflow in the case. Let’s compare fans of different types and, most importantly, determine how best to place the liquid cooling radiator: in front or on top. The classic way to improve cooling will also be measured — removing the side wall. nine0003
Contents:
- Test stand and test procedure
- Checking stock values
- Installation of additional fans
- Compare F- and P-series fans
- Where to put AIO?
- Installing the RTX 3090 graphics card
- Making the front wall «blind»
Test stand and test method
Naturally, we must start with the case. Unfortunately, it is not possible to cover all their diversity, but we will take a sort of collection of the most popular ideas in designing a case for reasonable money — Deepcool Matrexx 55 Mesh with a mesh in front. In addition, it has four fans in the kit and it is possible to install AIO or additional fans on top. The ideal candidate. nine0003
In addition, we stocked up with AIO 240mm, a budget air cooler and two packs of Arctic fans of various types, beloved by many — F12 and P12.
So, let’s place a test assembly with a Ryzen 9 5950X processor in the case. Calm down — we are not going to overclock it or somehow substitute a modest cooling tower. But we will not leave the processor in stock either, changing frequencies and voltages will ruin the entire test. Therefore, we fix the frequency value at 4500 MHz for all cores, and set the voltage so that it is slightly less than 1.2 V in the load. We get a heat dissipation level close to the stock level of about 150 W in the Aida64 stress test with only the CPU ticked. In general, it doesn’t matter how to create a load for today’s measurements, the main thing is repeatability. nine0003
There will be two video cards: the Radeon RX6800 with a stock power consumption of 250 W for the entire card and the GeForce RTX 3090 with the ability to heat the air much more efficiently — the limit can be expanded to 480 W if desired.
We also fix the parameters of video cards and the rotation speed of their coolers as far as possible, and for the 3090 we will choose the option with sparing 380-390 W in the Heaven benchmark. It is he who will warm up the video cards, the uniformity of the process will be ensured by a pause in the same scene.
nine0002 Almost done. We will inform you that the memory works in xmp without additional settings, the voltage is 1.45 V. All fans, except for video cards, will be fixed at around 1000 rpm. A special controller will help us with this, it will impartially monitor the rotation speed and temperatures.
Full parts list
- CPU: AMD Ryzen 9 5950X
- Motherboard: ASUS ROG Crosshair VIII Formula
- RAM: G.SKILL F4-3600C14D-32GTESA 2x16GB
- Power supply: Cooler Master V850
The controlled parameters in comparison will be: processor temperature by TCtl / Tdie sensor, temperature of the video card cores (excluding hotspot and memory, this is still more likely for specific performances, but the theoretical component is important for us) . For RAM, we take the first bar from the list in monitoring into account, the second will almost always be a little hotter, but all the important monitoring data will be available to the curious.
This carnival of figures is completed by two thermal sensors, which are secured by special means at strategic points on the case. The first one is in the upper corner above the motherboard, it will indirectly show the state of the air near the power circuits and hint at the efficiency of blowing out of the system unit. We place the second sensor under the video card in order to have some approximate data on the temperature of the air entering the video accelerator cooling system. nine0003
The hardest part is controlling the room temperature during this turbulent spring time, the target is 22 degrees and it has almost always been accurate according to the Chinese thermometer.
Checking the stock values
Phew, it looks like they didn’t forget to tell anything in the introduction, let’s start taking the initial data. The fans in the case are complete, on the Gammax 400 EX processor, it also has a fixed speed — 1000. Video card — RX 6800.
We run tests, the processor temperature cheerfully exceeds 70 degrees, the video card does not lag behind. nine0003
But the starting spurt is not the most interesting, we continue to observe. After 15 minutes, the temperatures almost stabilized, we are waiting for the same amount. A half-hour test shows values very close to the final ones, let’s stop there, otherwise everything that was planned simply cannot be implemented in a reasonable time.
To be honest, the results are not very inspiring. The total power consumption of the system during the test is about 470 watts. No, the temperatures of the processor and video card are quite normal, but on the memory, the sensor outside the chip is already almost 50, i.e. under such conditions, you can forget about serious overclocking and high performance of the memory subsystem, it is better to lower the voltage to 1.35-1.4 and try your luck like that. nine0003
Well, we have tools in our hands to improve cooling. First of all, this is a proven method for years of removing the side wall, in this case — glass. The temperature immediately begins to respond with positive dynamics. After fifteen minutes, all the values, one might say, have stabilized, but for the experiment we will let the system work for another 15 minutes. It can be seen that it was possible not to wait so long, the difference is insignificant, the data is more accurate, but even 15 minutes is enough for some conclusions.
nine0002 So, this upgrade of the cooling system had the best effect on the processor. Its cores have become colder by almost 9 degrees, the video card has lost 3 degrees, the memory — 4. I would like more, but we will consider this a success. It is quite logical that the temperature in the upper corner of the case also dropped significantly.
Installing additional fans
The next experiment: add two Arctic F12 fans to the top of the exhaust case and close the lid. We will turn on in turn, first one and in the next measurement — the second. nine0003
With one additional fan, we can notice a significant decrease in air temperature in the upper part of the case, which is very logical — almost 6 degrees of gain. As for the rest of the components, the changes are within the limits of fluctuations in the microclimate of the room, but the processor cores deviated in the other direction, which means we can hope that the symbolic improvement is not an accident.
We continue the experiment by turning on the second fan, and now we do not register any significant changes. Temperatures rose a little on everything, but this was due to the duration of the test, there was no pause between sessions with the top fans. We can conclude that the second fan on top does not make a significant contribution with this configuration of the cooling system and with a dust filter on top. nine0003
It’s time to move on to the next step. We change all the complete fans to Arctic F12, leaving only one on top. In total, we get 5 case turntables. We fix all speeds again at 1000 rpm and measure the indicators after half an hour of the test.
Compare with a similar configuration of stock fans and one extra on top. F, as they say for Flow, and in the name of the fans it is not in vain. The decrease in temperatures affected all measured values, primarily due to the improvement in the flow of fresh air through the front panel. That is why the RAM won the most, the decrease in its temperature exceeded 4 degrees, while for the processor the change was about three. nine0003
We do not go far from the stand, remove the glass and measure the difference with stock fans. As expected, there is almost none of it, the processor cooler and the video card cooling system mainly get air from the side opening, and memory without direct airflow can only rely on front wall fans. And here there are improvements, more than 2 degrees, the final 42 degrees already leave hope for some kind of RAM setting.
Comparing F- and P-series fans
Naturally, it would be very interesting to know the differences between the F-series of fans, which are designed for airflow, and the P-series, which, on the contrary, are designed for increased static pressure and are good for blowing radiators.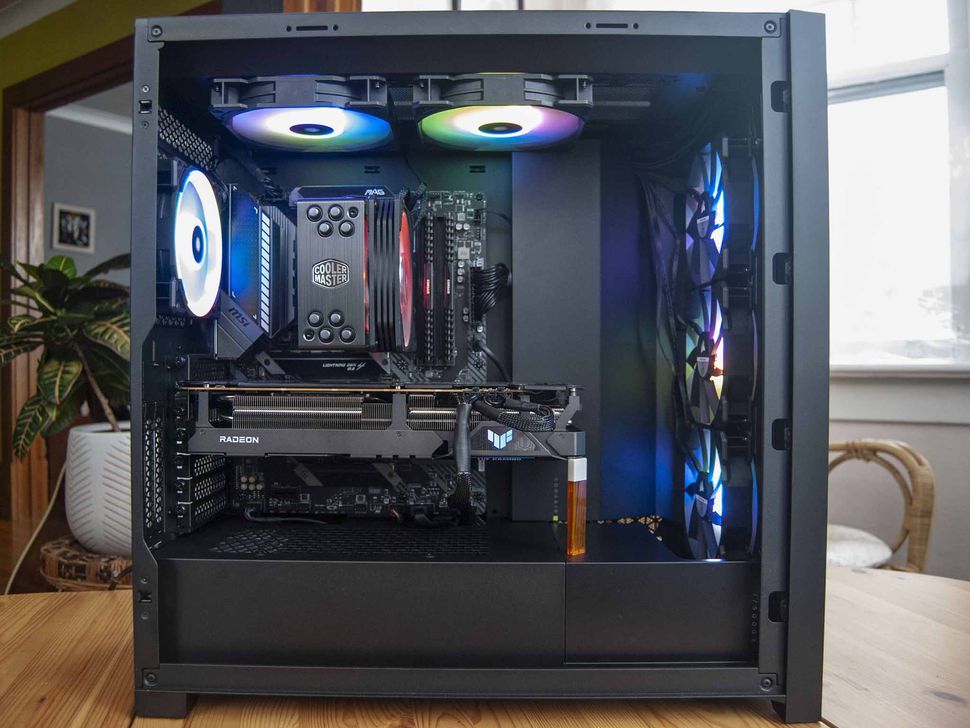 We change, run tests, we are convinced of the importance of dividing fans by task. P12 are great fans, but not like case fans. The loss in all values is significant, the temperatures are even worse than those pre-installed in the case initially. nine0003
The saddest thing is to see memory temperatures above 50 degrees Celsius again.
With the case open, the temperatures of the processor and video card come to the same values as with any fans before. The memory is hotter than with F turntables by 3 degrees.
We can draw an intermediate conclusion: you should choose fans not only according to the backlighting capabilities, but also based on their application, for radiators look at the values of the pressure developed, for the case — at the generated air flow. Many manufacturers make it easy and create specialized lines of fans, such as the aforementioned Arctic. F — for the case, P — for radiators. nine0003
Where to put AIO?
AIO time has come. Common sense says that installing it in front, or rather on blowing, will greatly help the processor, but will dramatically worsen the position of the memory and video card. At the same time, the radiator will be heated from above (or blown out) by the warm air of the case, which increases the temperature of the processor. Both of these options are not ideal. It’s time to figure out which chair is worse.
We install the radiator in front for blowing in, fix its fans at 1000 rpm, place the released case fan on top, because we can. Compare with an air cooler and a case equipped with dedicated F12 fans. Yes, the Gammax 400ex is certainly good and really surprises with its performance, but now we immediately get a 10-degree gain in terms of the processor. The video card and the upper corner also lose, but only by a degree. but the memory receives a sensitive blow to the sensor. Again about 50 degrees — it’s hard to put up with it. nine0003
Continuing the open wall experiment. The difference with air cooling in the same conditions for the processor is reduced to 6 degrees. But worst of all is the RAM. The case has lost structured flows and now a heat bag is created around the slats, hence the temperatures are 9 degrees worse than with air. The video card also catches a little warm air from the radiator. But it’s too early to draw conclusions, in front of the upper radiator.
What do we have after half an hour of tests? But nothing good: the processor temperature, as expected, crept up — more than seven degrees difference with the front radiator and only three degrees with the cooler. At the same time, the gain in temperatures for the video card and, what is most offensive, for the RAM, is minimal (1-2 degrees). It’s kind of a shame. nine0003
The situation is slightly better with the open case, the main achievement is the reduction of the memory temperature compared to the front heatsink.
It turns out that those who said that dropsy must be placed in front were right? Yes and no! Yes, in the sense that if your case is exactly like this and equipped with the same type of dust filters, then the result will be similar. Attentive readers must have noticed that when the heatsink was placed on the top, the temperature rise of the processor was somehow disproportionately large. This is due to a dust filter with a small cell, it severely cuts the air flow and literally stifles the possibilities of everything that tries to exchange air through the filter. nine0003
We bring the experiment to a level that does not depend on the size of the holes in the dust filters and the degree of perforation of the front panel. We remove both of these unknowns and get the following data.
The processor cores have become colder by almost 8 degrees. This is when compared with the same location of the radiator, but with dust filters installed. The temperature of the RAM dropped by 6 degrees, the changes in the video card are not so significant.
But these numbers cannot be directly compared with the values obtained earlier for the front radiator, there were also filters. We rebuild the stand, the radiator is forward. Compare with the top AIO also without filters. We get the processor temperature lower, but only by 3 degrees, but the RAM feels much worse — plus 6 degrees. The zone in the upper corner also suffers — also plus 6 degrees, which means that the load on the VRM of the motherboard increases, and the saddest thing is that the chances of a good RAM setting decrease noticeably. nine0003
And now we can draw the following conclusion: if you do not intentionally interfere with blowing through the upper part of the case with non-optimal dust filters, then installing AIO with a top-mounted blower will be preferable. The temperature of the video card in these two configurations does not differ much, but the climate inside the case, and hence the temperature of the memory and power circuits of the motherboard, will be much worse with the front blowing radiator. Yes, with a front-facing heatsink, the processor will cool a little more efficiently, but it’s not worth it. nine0003
If the issue of memory settings is not an issue, and the motherboard is selected with a power reserve, which is not uncommon today, then the placement of the heatsink is absolutely not important. However, like the type of radiators, the main thing is that the appearance or the backlighting capabilities suit you.
Installing the RTX 3090 graphics card
This could be done, but we have a hotter graphics card. How are things going there if you have such a jewel installed in your case?
Let’s start, as before with Radeon, with air cooling, but from the point when all case fans were replaced with F12. nine0003
The total consumption of the system unit from the socket exceeded 620 W, the video card itself confidently consumes more than 380 W, but the chip temperature is lower than that of the Radeon. Why did we call the 3090 hot? Yes, the temperature also depends on the higher fan speed, but in general, calling a video card hot or not is based on the amount of heat given off to it in the case. Look at the temperature of the processor, the heating from the 3090 added 17 degrees to it compared to the RX 6800 (all other things being equal). The RAM is also warmed up — the difference is almost 8 degrees. It is safe to say that in order to draw more than 600 watts from an air-cooled case, it is worth considering a very efficient air exchange with the outside world. nine0003
Let’s not lose courage and use the old-fashioned method — remove the glass. Access to cool outside air affects the processor strictly positively — immediately minus 15 degrees. It’s still 8 degrees hotter than the same configuration, but with only 250 watts of graphics card. But here you should not forget about blowing hot air directly to the fans of our Gammax and as a keepsake. The slats of the operational became colder by almost 6 degrees due to the opening of the wall. Yes, all measured temperatures have become much better. nine0003
We leave the dust filters in their original places, do not touch the front wall, we take measurements with the front and top location of the AIO radiator. The result is absolutely predictable and similar to the one obtained earlier on the RX6800, the difference in processor temperatures even increased due to the hotter video card. With filters and difficult blowing upwards, the front radiator placement is again the most preferable option. Memory in all variants has a temperature close to 52 degrees, which is absolutely terrible.
nine0002 Now a cleaner experiment: remove the front panel and the dust filter on top. We carry out measurements with two options for placing the radiator, compare. The processor gets about 6 degrees of temperature gain with the front AIO, but at the same time, in this configuration, the memory is 5 degrees hotter, the zone in the upper corner also warms up by 5 degrees more. At the same time, under the video card, the difference is again small — about two degrees.
Comparing all the pros and cons, we can recommend getting rid of unnecessary resistance in the form of blow filters and, if you are interested in overclocking the memory, place the AIO heatsink on top. nine0003
Although there is another option — put a special fan in front of the memory and cool it forcibly, then the conclusions will no longer be so obvious.
And according to all the results of this long-term study, we can say that for top-end hardware, the possibilities of air cooling and even factory AIO liquid cooling kits are limited and very much depend on case ventilation. Confident air exchange with the outside world and not very high room temperatures are almost the only way to avoid custom liquid cooling. Another option would be to leave everything without overclocking and use the components, as they say, “out of the box”. As practice shows, there will be no overheating. Or not? nine0003
Making the front wall «blind»
The test used a case with a mesh front panel, but there are narrow slots on the sides for air intake. As well as in models with blank front walls. Let’s try to imitate such a case: we glue the mesh, now the fans in the front have only one, or rather two ways to draw air into the case — on the left and on the right.
AIO heatsink on top, dust filter also in place. To endure half an hour was not allowed by natural pity for the helpless.
