How To Overclock Your GeForce GTX 1070 — Overclocking Guide Applicable to GTX 1080 and 1060 As Well
ThePCEnthusiast is supported by its readers. Some posts may contain affiliate links. If you purchase products via our link(s),
we may earn an affiliate commission. See our site disclosure here.
Home » PC Components » Graphics Card » How To Overclock Your GeForce GTX 1070 – Overclocking Guide Applicable to GTX 1080 and 1060 As Well
by Peter Paul
Along with the new GeForce GTX 10 series graphics cards, NVIDIA introduced GPU Boost 3.0 which gives the user a more refined and precise control of the overclock. We now have the “curve” where we can fine adjust the voltage per core clock individually. It may seem a little bit complicated at first, and many GeForce GTX 1070 (or 1080) users encountered difficulty in overclocking their graphics card. Traditional overclocking, were you just adjust (increase) the core voltage, power limit, core clock, memory clock etc, doesn’t seem to work well anymore with the new GeForce GTX 1070, 1080 or 1060 graphics cards. You can still do the old fashion way, but some users are saying that they can’t even reach or break the 2GHz barrier. In this article, I’ll show you how you can (easily) overclock your GeForce GTX 1070 graphics card using the new way or using the “curve”. I was able to overclock the Zotac GeForce GTX 1070 AMP Extreme up to 2151MHz boost clock speed. Check out below on how you can also overclock your GeForce GTX 1070. This overclocking guide can also be applied to GeForce GTX 1080 and GTX 1060 since they feature GPU Boost 3.0 as well.
WARNING: Overclocking is dangerous and could potentially damage your graphics card and/or your system. This site is NOT responsible for any damage that the information on this guide may cause to your system. Overclock your graphics card at your own risk!
Before you begin, you will need to download and install some tools (if you don’t have them yet). You will need to download the following:
1. GPU-Z Videocard Utility Information from TechPowerUp here.
2. Unigine Valley and/or Heaven Benchmark tools here and here respectively.
3. MSI Afterburner 4.3.0 (or up) here.
Unfortunately, Zotac’s FireStorm utility doesn’t support the curve adjustments yet. The only overclocking utility (I know) that supports curve adjustments are MSI Afterburner 4.3 Beta 4 and EVGA’s latest version of PrecisionX. I’m not sure with Asus’ GPU Tweak though, and unfortunately EVGA’s PrecisionX works only with EVGA graphics cards.
In this guide I won’t be showing how to overclock your GeForce GTX 1070 the default or old fashion way. But if you want to, you can try increasing the core voltage from 75% to 100%, power limit to around 110%-112%, add +200 or +300 to the core clock and around +500 to your memory clock. I tried the old fashion way, but I wasn’t able to get it running at 2.1GHz (just like what NVIDIA demoed with their GTX 1080). I only got it running at around 923MHz and it would crash.
A few instructions on how to use the MSI Afterburner 4.3.0′ curve function. By default, the Voltage/Frequency curve editor will not pop out or show when you run the Afterburner. You will need to press “Ctrl + F” to open the window. Once the editor shows up, you will the curve with several dots along its line. You can adjust each point individually or tilt the curve (left or right), or move the whole curve line upwards (or downwards).
- To adjust each point on the line curve, simply click the points and drag it up or down.
- To adjust or tilt the curve press and hold “Ctrl” and click a certain point and grad it.
- To adjust the entire curve line press and hold “Shift” and click at any point and drag the whole curve line up or down
- To reset the curve to default state, press “Ctrl + D“
Now to overclock your GeForce GTX 1070 (1080 or 1060):
1. Open the GPU-Z, Afterburner, and run the Unigine Valley or Heaven on window mode. Make sure that the Valley/Heaven is running on the background together with the Afterburner and GPU-Z.
2. Depending on your graphics card’s cooling capabilities, you need to adjust the fan speed accordingly. The Zotac GeForce GTX 1070 AMP Extreme has a massive cooler with triple fan. Running it at auto was just fine, but for precaution I set the fan speed to 60% which is still very silent.
3. Adjust the core voltage to +100% and power limit to 112% or 115%. Adjust the temp limit to 89° or 92° Celsius. (depending on how comfortable you are with your GPU’s temp).
4. You may adjust the memory clock by adding around +300 or up to +600 at this point in time, but I would suggest you do it after you have adjusted the curve.
5. Adjust the voltage/frequency curve (using the commands mentioned above) and increase the curve little by little. Then hit apply (or the check button) on the Afterburner to make the overclock in effect. If you didn’t encounter any problems with the increase on the line curve, the Valley/Heaven benchmark would still be running at the background. Do this again and again until you get the desired results.
6. You will know if your overclock fails when the Valley/Heaven benchmark freezes or crashes and a “Nvidia display driver has stopped responding” message will pop out. When this happens or when artifacts starts to shows up, try adjusting the curve or lowering the memory clock speed (if you have increased it).
Take note that on your GPU-Z, it will not show the boost clock speed of 2.1GHz, instead it will show only around 900MHz++ clock speed. This is probably because of the dynamic nature of the GPU Boost clock.
I was able to get my Zotac GeForce GTX 1070 AMP Extreme running at a maximum clock speed of 2152MHz, memory clock of 4455MHz (2227.5MHz) with a maximum temperature of only 58° Celsius (thanks to its massive cooler). Here are the results of overclocking further the already overclock Zotac GTX 1070 AMP Extreme.
Now if you still don’t get what I mean by adjusting the curve, here’s a video from Guru3D demonstrating how to overclock a GeForce GTX 1070 easily by adjusting the voltage/frequency curve.
There you have it guys, I hope this GeForce GTX 1070 overclocking guide helped you one way or another. Don’t forget to share this article if you find it helpful, and follow us on Facebook. Also tell us how far you have overclocked your GeForce GTX 1070, or GTX 1080/1060 graphics card on the comment section below.
Save
Save
Advertisements
GTX 1070 Mining Settings
GTX 1070 Mining Settings for all the popular and most profitable Cryptocurrencies to mine, you’re one-stop page for everything related to your GPU
Last updated:
N/A
Overview
Settings
4
Offers
7
Live Price
$162.72
Daily Profit
soon…
ROI
soon…
GTX 1070 Specs
Vendor
NVIDIA
Series
GeForce 10
Release Date
10 Jun 2016
Memory
8GB GDDR5
Chip
GP104-200
Interface
PCI-E 3. 0 X16
0 X16
TDP
150W
MSRP
$379
⚠️DISCLAIMER⚠️
The GTX 1070 Mining Settings will generally work for all models, but most of the time you will have some tweaking to do due to your GPU Silicon. Never mine with Stock settings as they will overheat your GPU! You can learn more in our Overclocking For Miners Guide.
GTX 1070 Mining Overclocks
Absolute Values are most commonly used in Linux-based Mining OS and they usually give more effeciency, while Offset is more common for Windows. N/A or 0 = leave blank.
ETChash
25 MH/s, 130 Watts
ZelHash
33 Sol/s, 115 Watts
KawPow
16 MH/s, 120 Watts
FiroPow
16 MH/s, 120 Watts
GTX 1070 ETChash Mining Overclocks
Expected Results
25 MH/s, 130 Watts
Core Voltage (VDD)
N/A
Power Limit
Watts: 140 or Percentage: 70%
Core Clock (CClock)
Absolute: 0 or Offset: ++100
Memory Clock (MClock)
Absolute: 2000 or Offset: +1000
Memory Voltage
N/A
Fan Speed (%)
70% ± based on your temps
Provided by @Mining Chamber
ETH Enlargement Pill
You must use the ETH Enlargement Pill for your GTX 1070 Mining Settings to achieve 40% more hashrate on memory intensive algorithms. This applies to all GDDR5x memory GPUs.
Frequently Asked Questions
How to overclock my GPU for mining?
Overclocking for mining can be tedious, a lot of trial and error. You can use our mining settings as a base and if they crash then you can start slowly decrementing Clock values and slowly increment your Power Limit/Watt Limit until your GPU is stable.
Is mining harmful to my GPU?
Yes and No. The number one reason for Hardware failure is heat. If you can maintain good temperatures and take care of your GPU properly then your GPU will live with you longer than you can ask for. Your fans might break on you but that is always an easy fix.
How to reduce my GPU Temperature for mining?
There are a few things you can do to maintain healthy GPU Temps such as regularly dusting (Recommended Duster) and replacing Thermal Paste throughout the year, but what really stands out for me is using Heatsink Mods. It works especially well for the 3000 Series by bringing down temperatures by up to 20 degrees!
How much power does my GPU use while mining?
Your GPU power draw varies based on the algorithm you are mining, The best way to accurately know is through measuring your Rig/PC off the wall using Power Meters.
Where To Buy
Subscribe to our Miners Newsletter!
Hot headlines
•
PoW Cryptocurrencies
•
Mining Chamber Updates
They say if you sign up, your rig will never crash 🤷🏽♂️
Instructions for overclocking the GeForce GTX 1070 GreenTech_Reviews
in Graphics cards / Tutorials / Overclocking (overclocking) / Useful tips tagged GeForce GTX 1070 how to overclock / GeForce GTX 1070 overclocking / GeForce GTX1 / GeForce GTX 1070 overclocking instructions / GeForce GTX 1070 overclocking potential / instructions for overclocking GeForce GTX 1070 — admin
Instructions for overclocking video card GeForce GTX 1070
Standard Warning: This instruction cannot guarantee 100% system uptime. Each processor may have different settings. You make all changes at your own risk. GreenTech Reviews is not responsible for your actions.
This guide is based on the ASUS ROG STRIX GeForce GTX 1070 graphics card.
Use GPU Tweak II to manage settings. The latest version can be downloaded here: https://www.asus.com/en/Graphics-Cards/ROG-STRIX-GTX1070-O8G-GAMING/HelpDesk_Download/. nine0016 The Unigine Valley benchmark is used to test stability, you can download it from the link: http://unigine.com/products/benchmarks/valley/
The first thing to do is go to the settings (click the gear icon in the upper right corner) and check the box next to Overclocking range enhancement . For convenience, you can also note Apply settings each time GPU Tweak starts .
Apply the settings with the button Apply .
Now we return to the main menu and increase the voltage on the GPU — move the slider GPU Voltage to the right to the maximum.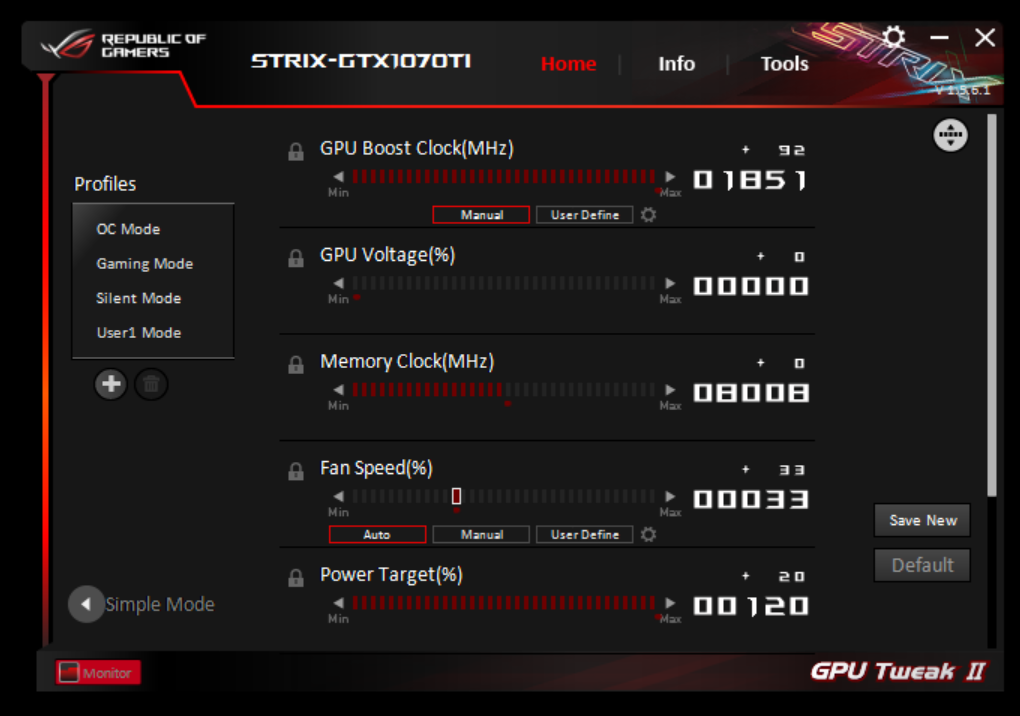
With the slider Power Target do the same.
Parameter GPU Boost Clock will be increased by 33 MHz. But Memory Clock will be increased by 1334. And apply the settings by pressing the button Apply .
Now let’s set up the cooling system. Under Fan Speed press User Define and set the settings as in the screenshot:
Now run Unigine Valley and set the maximum settings and resolution. We start the test by pressing the button Benchmark . If you see the message «The driver has stopped responding and has been stopped» (or similar), then you need to return to the GPU Tweak II program and reduce the value of GPU Boost . If during testing we noticed artifacts (triangles, flickering dots), then we need to reduce the value of Memory Clock until there are no such artifacts.
The final value of GPU Boost Clock will never be fixed. But, as practice shows, all graphics processors must overcome the 2000 MHz threshold.
The difference in performance without overclocking and with overclocking is approximately the same.
Without overclocking:
Overclocked:
The difference in the minimum number of frames per second is especially noticeable.
This manual is a translation of an article from the ASUS ROG website:
http://rog.asus.com/articles/gaming-graphics-cards/overclocking-guide-rog-strix-gtx-1070/
NVIDIA GTX 1070 video card in mining
To read 3 min Published by
NVIDIA GTX 1070 graphics card is great for mining. Next, we will select the optimal overclocking parameters for mining on the NVIDIA GTX 1070. We will find out which drivers to use the most correctly and efficiently. Let’s look at the main characteristics and measure the hash rate for popular algorithms.
Specifications
The NVIDIA GTX 1070 was released on June 10, 2016. The average power consumption is 110.0W.
NVIDIA GTX 1070 Yield
The current market price and profitability of the NVIDIA GTX 1070 video card in mining fluctuates depending on the value of the cryptocurrency. The information in the plate is updated once a day.
View the complete video card profitability table sorted by price, revenue and payback.
| Price | ETH | ETC | EXP | UBQ | RVN | BEAM | Profit | Payback |
|---|---|---|---|---|---|---|---|---|
NVIDIA GTX 1070 Hashrate
We have compiled the NVIDIA GTX 1070 hashrate table for popular algorithms. If you are just choosing a video card for mining, and you already know which coin you will be mining, then you can estimate the approximate performance from the table. And we also have an article about what a hashrate is.
| Coin | Algorithm | Hashrate |
|---|---|---|
| Ethereum (ETH) | DaggerHashimoto ETH |
28.2 MH/S |
| Expanse (EXP) | DaggerHashimoto EXP | 30.0 MH/S |
| Ubiq (UBQ) | Ubqhash | 30.0 MH/S |
| Monero (XMR) | RandomX | 600.0 H/S |
| Grin (GRIN) | Cuckarooz29 | 2. 7 H/S 7 H/S |
| Ravencoin (RVN) | KawPow | 14.5 MH/S |
| Beam (BEAM) | BeamHashIII | 15.5 H/S |
NVIDIA GTX 1070 Driver
When installing NVIDIA GTX 1070 drivers, it is always recommended to uninstall the current drivers first. This way you can be sure that DCH drivers will not be installed by Windows 10.
You can download drivers NVIDIA GTX 1070 here. We recommend trying different driver versions. Some driver versions can cause problems during mining. Installing an older version may fix the issue.
Overclock NVIDIA GTX 1070 for Mining
Overclock NVIDIA GTX 1070 for mining using MSI Afterburner. You can find it in Yandex. The interface of the program is very simple, albeit a little colorful) To overclock the video card, we need two sliders:
- Core Clock — overclocking the core, increases the frequency of the core; nine0225
- Memory Clock — memory overclocking, increases the frequency of the memory.

