MSI GE60 0ND BIOS | MSI
MSI GE60 0ND BIOS | MSI
MSI GE60 0ND BIOS
Download
(0)
Track this file
-
Choose platform
-
Choose version
10E
- License Freeware
-
Developer
Micro-Star International Co.,Ltd.
MSI GE60 0ND BIOS Download
MSI GE60 0ND BIOS.
Changes in each version of BIOS :
Version 10E
1. Change marketing name to «GE60 0NC/GE60 0ND».
2. Fix Daylight Savings feature.
3. Fix ODD eject caused system hangs under BIOS setup screen.
Recently searched for
porline notebook drives nvidia geforce
acer crystal eye webcam 2. 0.0.14 download
msi system control manager
msi notebook drivers download
GE60 0NC\0ND bios update download
download source
gt70-10m-unlocked. rom download
software drivers source
GT60 0NC/GT60 0NC bios update download
drownload notebook driver
system control manager msi download
drivers pci msi ge60
msi ge60 onc default apps
nvidia geforce gt675m graphic card msi gt60 0nd drivers for windows 7 32bit download
In order to follow the file, you have to Log in
Articles:
Software:
Articles:
Software:
Articles:
Software:
-
PC
-
Android / iOS
-
Social media
[OFFER] MSI GP60 & GE60 Notebook bios version E16GHIMS.
 10I modded — Offers: Already modded special BIOSes
Maison1
#1
MSI GP60 Notebook bios version file E16GHIMS.10I modded
Before flashing compare the file name above with the file name on the MSI website for your GP60 or GE60 notebook. Tested on GP60 2PE with Nvidia 840M & GE60 2PL which has a Nvidia GTX 850M.
Highlights:
-Advanced Bios Options unlocked (Advanced, Power tabs and additional options in the existing tabs)
-Nvidia 840M VBios replaced with adapted 940MX VBios, unlocked Boost Table and some OC (1306,5MHz GPU/1070MHz Memory) with the help of mclarke2355
-Nvidia 740M VBios untouched
-Haswell microcode for CPUID 306C3 to version 28 and CPUID 40661 to 1C
-Intel GOP Driver updated to 5.5.1034
-Intel VGA Bios updated to 1044
-Intel RST OROMs updated to 15.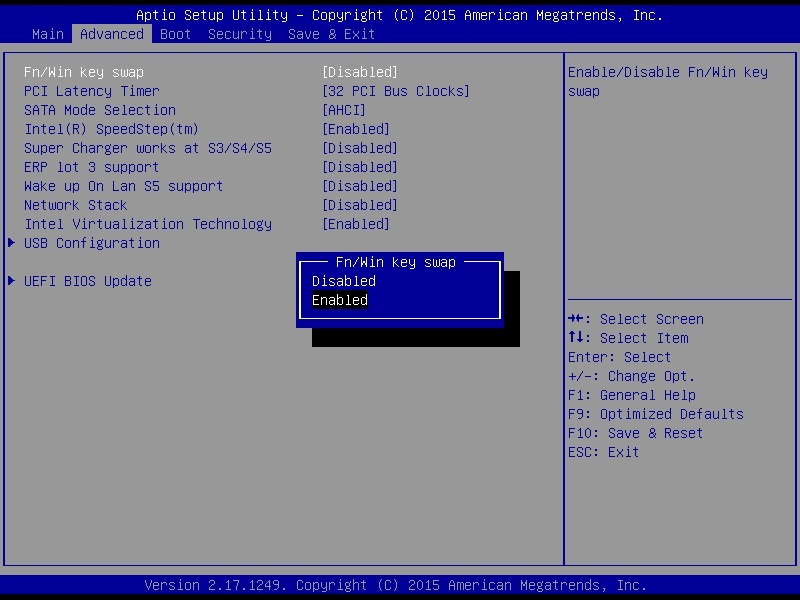 1.0.2545
-Intel Lan OROMs updated to 1.5.62/6.6.04
Possibility to enable ACPI 5.0 CPPC Support and to unlock in BIOS menu several locks
Update 24.03.2017: Added SDD NVMe support to boot a m.2 SDD via m.2 to mSATA converter
Update 16.06.2018: Updated Intel VGA bios to 1044
Update 13.02.2020: Updated Haswell microcode for CPUID 306C3 to version 28 and CPUID 40661 to 1C
Credits:
-Andy P whose PhoenixTool was used to replace the 840M VBios
-SoniX for his UEFI BIOS Updater (UBU), Intel VGA Bios update guide and the OROM, Microcode and Intel VGA Bios database he maintains
-Pacman for sharing the latest Intel RST 15.1.0.2545 OROMs
-The author of the Maxwell II BIOS Tweaker which was used for editing the Nvidia VBios
-All the other people who shared the used OROMs/Microcodes/Firmwares/Useful Information etc.
E16GHNVM 13022020.rar (3.16 MB)
needmorejuice
#2
Does the vbios have power target unlocked? What are the flashing procedures for the vbios and bios? I just extracted my own vbios and found you.
Edit: I also found the vga bios in your bios is the same as my stock bios. Is there a dormant 740m bios in here that MSI just didn’t bother to take out?
Maison1
#3
No power target was unlocked, you can set it youself in the bios when it is flashed due to all settings are unlocked. Intel and nVidia vga bios for CSM usage are not stock and were updated. The GP60 is as well with Haswell Quadcore and Nvidia 740m available so the bios covers both. The bios name should be the same as from the MSI website so please compare before using due to as well GP60s with illuminated keyboards are available and need different bios.
needmorejuice
#4
What are the flashing procedures?
Maison1
#5
Boot into DOS and write on the command prompt: AFUDOS E16GNVM. 10I
10I
Original Bios name of the unmodded file was: E16GHIMS.10I
needmorejuice
#6
Works great, except for two things: 1. the vbios needs a power limit uplift as it runs into the power limit very easily and cannot take even a 50+ mem oc without hitting the powerlimit. 2. microcode 24 seems to be unstable and was rolled back. Request a powerlimit increase and a microcode rollback. Do you use this bios or just like to mod them?
Maison1
#7
Please find the bios with microcode 27 above. The mem OC will not work without graphical glitches due to the memory chips are not cooled with a heatsink. It is a bios in one of my computers.
Euphoria
#8
Thank you for sharing this bios and update!
Could you share a recommended configuration?
Right now I have it by default and I have only changed the boot uefi and activated acpi 5. I do not know if you should also deactivate the raid options?
Thank you.
Maison1
#9
What options do you want to set? Why to disable RAID and not leave it as it is? Don’t have a recommended configuration.
Pinao212
#10
@Maison1 — This is awesome! Needed the exposed thermal settings.
I do have a feature request, if this is still being developed. On more recent MSI laptops, there’s an additional option to swap the functions of the Fn and Windows keys on the keyboard to support a more traditional layout. Would this technically be possible? I assume it depends on the specific model of keyboard.
Possible or not, this is already a great upgrade over the official BIOS. Thanks for providing it!
DonJP
#11
Hello! First of all thank you for your amazing work and dedication.
Would it be possible for you to do the same mods on another version of the GE60 (more especifically, GE60 20E with bios: E16GCIMS.520). The BIOS settings are so limited that I can’t even disable Hyper Threading.
Thanks in advance!
Maison1
#12
Yes it is. Could update the RAID uefi and RAID orom when time is to version 15.9.3/15.9.1. But this is minor due to RAID not used.
Swpping FN and Windows key needs some code change in the BIOS setup module. The BIOS and an BIOS with this code would need to be disasembled and the the code of the BIOS having it integrated into the BIOS having it not. This takes some time and I have no experience with it. Perhaps start to do it you yourself when its important for you. You will learn something. It is standardized UEFI code. Start finding in the newer bios with UEFI tool the module and dissamble it. It is possible regardless of the keyboard to implement.
insector
#13
Good afternoon!
I installed your version of the bios, but I can’t find the correct information on how to disable the integrated video chip now
I want to install an external egpu video card, can you help me?)
thx)
Dornbuscher
#14
Hello,
thank you for this great BIOS Update.
Seems, that SCM don´t work with your version. I tried MSI SCM x86 15.016.01221 and MSI SCM x64 13.016.07276 without sucess.
Is there any solution to get it run with your BIOS update?
Thank´s for your reply!
MSI Russia
Your score has been sent, thank you. Please let us know how we can make the answer even more useful to you.
I couldn’t find information to solve my problem
I found information but couldn’t solve my problem
Content is providing incorrect information
Content is out of date
Images are not clear
Steps are not clear
There were technical difficulties with the site, such as broken links
Answer too long to read
Other suggestions: :
Please do not include personal information in your comment.
Thank you for your feedback.
back
October 28,2022
To install a Windows operating system from scratch (as opposed to pre-installed), follow the steps below.
Note: If the new version of Windows differs from the version of the operating system preinstalled on the MSI device, you will need to enter a license key.
Please follow the instructions below.
First make sure you have all of the following:
- MSI Notebook
- Power supply
- Windows installation disc or USB stick
Follow the steps below to install Windows.
(Note: it is recommended to back up all data before installing the OS.)
- Power up the laptop.
- Insert the installation disc into the optical drive or connect a Windows USB drive.
- Press the power button to turn on the notebook.

- After the MSI logo screen appears, keep pressing the Delete key until the BIOS interface loads.
- In the BIOS interface, navigate to the Boot tab using the arrow keys.
- In the “Boot mode select” section, select UEFI (this mode is supported by the Windows 10 operating system.
- Press the F10 key to save changes and exit the BIOS interface. After that, the computer will automatically restart.
- Press the F10 key to save the changes and restart the computer.
- After the MSI logo screen appears, start pressing the F11 key to display the boot menu.
- Select the previously connected USB stick from the menu and press the Enter key. (The illustration shows an example with a USB drive. If you want to boot from the installation disk, select the optical drive from this menu).
- Specify your preferred language and keyboard layout. If you’re happy with the defaults, just click the Next button.
- Click the Install Now button.

- Enter the license key and click the Next button. If you don’t have one, click on the «I don’t have a product key» button and then on the Next button. You can enter the license key later when Windows installation is complete.
- Select Windows 10 Home and click the Next button. The illustration shows an example of the corresponding Windows Installer menu.
- Accept the terms of the license agreement and click the Next button.
- Select the “Custom: Install Windows only (advanced)” option.
This step is related to the partitions available on the drive. First, select the partition on which you want to install the operating system. If none of the existing partitions suits your requirements, then they should be deleted in order to then allocate disk space in accordance with your preferences.
- If you are satisfied with the current drive partitioning, select the desired partition. It will be formatted, then the operating system will be installed on it.
 The data on the remaining partitions will be preserved. To continue, select the desired drive in the Name column and click the Next button.
 - If you are not satisfied with the current drive partitioning, you should delete the existing partitions and create new ones. (In this case, all data on the partitions being deleted will be lost.) To continue, select the partition you want to delete and click the Delete button.
- After deleting all partitions, select Unallocated Space and click the New button.
- Specify the size of the new partition in the Size field and click the Apply button. The size is specified in megabytes, so if you need, for example, 50 GB, you should enter «50000».
- After allocating disk space as needed, select the desired partition and click the Next button.
- The Windows Installer will automatically start and install the operating system.
- The computer will then restart automatically. Follow the instructions that appear on the screen to complete the installation.
 Then you can enter the OS.
- After entering Windows for the first time after installation, download and install the latest drivers from MSI official website — MSI official website.
Was this Answer helpful to you?
-
Chat
MSI GE60 2PL Apache BIOS setup in Nizhny Novgorod — REMONT CENTER
In most cases, the need to flash the BIOS is caused by a mechanical impact on the MSI GE60 2PL Apache. A malfunction is possible as a result of a manufacturing defect, which is detected immediately after the warranty period has passed or as a result of natural wear and tear of the device. MSI GE60 2PL Apache is often brought to the REMONT CENTER for service with this problem — leave a request, we will fix everything!
- MSI GE60 2QD Apache
- MSI GE60 2QE Apache …
- MSI GE62 2QC Apache
- MSI GE62 2QD Apache .
 ..
.. - MSI GE62 2QE Apache
- MSI GE62 2QE Apache …
- MSI GE62 2QF Apache …
- MSI GE62 2QL Apache
- MSI GE62 6QC Apache
- MSI GE62 6QD Apache …
- MSI GE60 2PG Apache
- MSI GE60 2PFGE04 Apache …
- MSI GE60 2PFGE05 Apache …
- MSI GE60 2PC Apache
- MSI GE60 2OD
- MSI GE40 2PC Dragon …
- MSI GE40 2L
- MSI GX70 3CC Destroy …
- MSI60 3BE 900 DRIMON 900 3BE 900 3BE 3BE 900 3BEA 900MON repairs, free consultations, guarantees for any repairs, professional equipment, original components, free urgent diagnostics. Call:
8 (831) 217-06-86
Why you can safely contact the workshop Remont Center
Urgent repair
Repair of MSI GE60 2PL Apache equipment with standard breakdowns — within one day
Express diagnostics
Free detection of software faults using branded equipment — in 15 minutes
Fixed prices
Prices for all work of the center employees MSI are determined by the price list
Departure and delivery
Free courier visit to your office / home — within 30 minutes
Sign up for repairs
and we will contact you within 3 minutesExcellent!
Please try again later
Congratulations!
indicate phone number
example: +7 (926) 123-45-67
example: Sidorov Ivan Petrovich
laptop
indicate device type
tablet
indicate device type
monoblock
indicate device type
monitor
Headphones
Specify device type
Router
Specify device type
computer
specify the type of device
indicate the type of device
example: monitor
example: MSI GL72 6QC stopped charging the battery after a fall
You have already sent an application or received a promo code.

