Optane 900P with AHCI or Intel RST in BIOS?
I’m using the PCIe slot card version of the Optane 900P as the OS and boot drive and two conventional hard drives for storage (not in RAID config), with a 8700k and an Asus Rog Maximus X Hero motherboard.
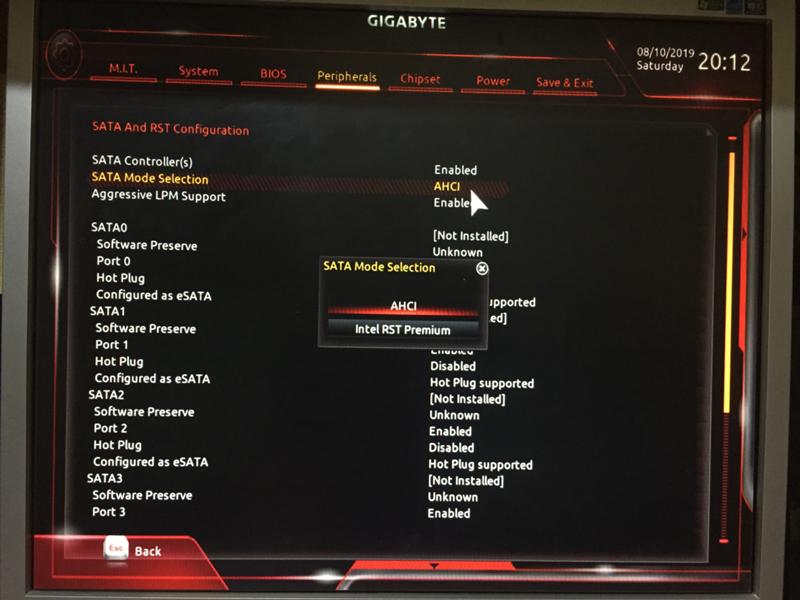
In the bios, I have two options for SATA Mode selection :
— AHCI
— Intel RST Premium With Intel Optane System Acceleration (RAID)
Is there any performance difference between the two? When I installed the OS (Win 10) it was set up on default setting AHCI, could I still switch to RST if that offers tangible performance benefits, or would I have to wipe the Optane and install Windows anew?
I’ve noticed that the https://www.computerbase.de/2017-11/intel-optane-ssd-900p-test/2/# diagramm-as-ssd-benchmark-4k-64thrd Computerbase Benchmark with AS SSD produces a vastly better performance for 4k-64Thrd read score:
This is how my Optane does in comparison:
Strangely, the write score is better on my Optane, but overall score is still significantly lower. Of course the Computerbase benchmark did bench the Optane as a secondary drive, not as the OS drive, so that might figure in.
The other benchmark graphic of the AS SSD benchmark mentions «Ram Caching!», so I assume that has something to do with the vastly improved read performance? How do I enable that — or should I? What are the benefits?
Another AS SSD benchmark on http://www.thessdreview.com/our-reviews/intel-optane-ssd-900p-review-480gb-understanding-disruptive-… SSD Reviews shows a benchmark very similar to mine, just a tad bit faster in every score though:
Finally, the Computerbase CrystalDiskMark score on the empty Optane
performs better in every category, but way worse than mine in 4KiB Q8T8.
————————————————————————
CrystalDiskMark 6.0.0 x64 (C) 2007-2017 hiyohiyo
Crystal Dew World : https://crystalmark.info/
————————————————————————
* MB/s = 1,000,000 bytes/s [SATA/600 = 600,000,000 bytes/s]
* KB = 1000 bytes, KiB = 1024 bytes
Sequential Read (Q= 32,T= 1) : 2684. 577 MB/s
Sequential Write (Q= 32,T= 1) : 2258.161 MB/s
Random Read 4KiB (Q= 8,T= 8) : 2347.825 MB/s [ 573199.5 IOPS]
Random Write 4KiB (Q= 8,T= 8) : 2214.870 MB/s [ 540739.7 IOPS]
Random Read 4KiB (Q= 32,T= 1) : 682.370 MB/s [ 166594.2 IOPS]
Random Write 4KiB (Q= 32,T= 1) : 616.936 MB/s [ 150619.1 IOPS]
Random Read 4KiB (Q= 1,T= 1) : 277.560 MB/s [ 67763.7 IOPS]
Random Write 4KiB (Q= 1,T= 1) : 241.043 MB/s [ 58848.4 IOPS]
Test : 1024 MiB [C: 8.8% (39.1/446.5 GiB)] (x3) [Interval=5 sec]
Date : 2018/01/04 2:16:25
OS : Windows 10 Professional [10.0 Build 16299] (x64)
Bottom line: Did I miss a setting to improve performance in either BIOS or Win10? Can — and should I switch from AHCI to RST in the Bios, given that I use the 900P as a systems drive and two hdds not in raid as storage?
Intel RST
Overview
Intel Rapid Storage Technology (RST) is a solution built into a range of Intel chipsets. On platforms that have RST support built and enabled in the computer’s BIOS, it allows users to group and manage multiple hard disks as single volumes. This functionality is known as the Redundant Array of Independent Disks (RAID).
In some usage scenarios, RAID offers various advantages over the use of several disks independently. RAID offers multiple configurations — levels — which focus on performance and redundancy.
A complete user guide is available through the official Intel documentation.
RST & Ubuntu installation
If you intend to install Ubuntu on a computer that supports RST functionality, you may need to make operational adjustments to your setup before you can proceed.
By default, the Ubuntu installer can detect certain RAID configurations, but it may not necessarily be able to access and use the hard disks grouped in them.
If the Ubuntu installer cannot detect the hard disks you need, then before you can install Ubuntu, you will need to turn RST in the computer’s BIOS. The exact terminology and steps required to access and manage RST in BIOS often depend on the specific implementation by the platform vendor. For instance, Dell computers may have different settings from Lenovo or HP computers.
Furthermore, you may already have Windows installed on the computer that uses RST. If you disable RST in the BIOS or change the RST configuration, Windows may become unbootable, as it may no longer be able to find and use the hard disks.
Possible installation scenarios
Broadly, there are two main configurations you may encounter when you try to install Ubuntu on a computer that supports and uses RST:
-
RST used and enabled, no operating system installed.
-
RST used and enabled, Windows installed.
-
RST enabled, no operating system installed.
Again, there are two possible scenarios here:
-
The Ubuntu installer correctly detects the hard disks and can use them. In this case, you can proceed normally.
-
The Ubuntu installer detects a conflict with RST and will notify the user that RST configuration is required.
The latter scenario can be resolved by either one of the two changes:
AHCI is a relatively new specification that describes how computer storage is accessed and managed, and it supersedes several older specifications. It is primarily designed to utilize advanced features of hard drives connected via the Serial ATA (SATA) bus. Typically, these will be 2.5-in and 3.5-in hard disks, including both mechanical and SSD devices. The change from RST to AHCI may result in the loss of some of the advanced functionality that the RST module offers (for instance TRIM for SSD).
The exact terminology and steps required to access and manage controller type in BIOS often depend on the specific implementation by the platform vendor.
RST enabled, Windows installed
Similarly, there are two possible scenarios available:
-
The Ubuntu installer correctly detects the hard disks and can use them.
 In this case, you can proceed normally. You will need to create a side-by-side configuration for Windows and Ubuntu.
 -
The Ubuntu installer detects a conflict with RST and will notify the user that RST configuration change is required. In this case, the change will affect the installed Windows operating system.
Caution: Please note that changes to storage configuration can be destructible and lead to irrecoverable loss of data. If you break a RAID setup, your data may no longer be accessible. Likewise, if you change the controller type from RST to AHCI, Windows may no longer be able to boot.
How to safely re-configure Windows to use AHCI
If the Ubuntu installer detects RST, and you have Windows installed on your system, there are several steps you need to do to allow Ubuntu to install side by side with Windows, without any loss of data and functionality.
-
Back your data up — any hard drive structure or configuration change, or installation of new operating systems on a hard drive that already contains data can potentially lead to a data loss.
 You need to make sure your personal data is safe. Even simply copying the important files to an external drive can minimize the risk of data loss.
 -
Verify which controller mode is in use in Windows. You can do this through the Device Manager. If the controller mode is set to anything other than “Standard SATA AHCI Controller”, then you will need to make a change that allows Windows to boot safely in AHCI mode. This can be done using the Registry Editor.
-
Start Registry Editor, and navigate to:
HKEY_LOCAL_MACHINE\SYSTEM\CurrentControlSet\Services\iaStorV\
-
Here, in the right column, double-click on the Start key, and change its value to 0.
-
Next, double-click on the iaStorV entry in the left column to expand it, select the StartOverride entry, and then in the right column, change the value of the key 0 to 0.
-
Repeat this set of changes for the following path in the Registry Editor:
HKEY_LOCAL_MACHINE\SYSTEM\CurrentControlSet\Services\storahci\
Once this step is complete, reboot Windows and start your computer’s BIOS. Normally, BIOS is accessed by hitting the F2 or Del key during the early boot sequence. In the BIOS menu, change the hard disk controller type to AHCI. The exact terminology and steps required to access and manage controller type in BIOS often depend on the specific implementation by the platform vendor.
Exit BIOS, and let the system boot. Windows should load normally, and you can check the controller mode in the Device Manager. It should read: Standard SATA AHCI Controller.
Possible boot problems
After making the necessary changes to allow Ubuntu to install side by side with Windows, you may encounter a situation where Windows no longer boots. For instance, this could happen if you made the BIOS change without making the registry changes in Windows. In this case, you will need to recover your Windows.
You will most likely see a blue screen with a Stop code: INACCESSIBLE BOOT DEVICE.
Windows will attempt to restart and automatically diagnose and repair the boot-related problems, but it will most likely not be able to complete the task itself, and you will need to manually launch the command prompt from the recovery screen, and fix the issue.
On the screen that gives you the result of the Automatic Repair, click on Advanced Options. Under Choose an option, select Troubleshoot. Next, selected Advanced Options again. Finally, select Command Prompt.
Command prompt, diskpart and bcdedit
This will launch the Windows command prompt, where you can run commands to diagnose and repair problems, including boot-related issues. The first step is to run the disk partition tool to see and understand the disk layout.
On the command line, type diskpart. Next, you will need to display the list of volumes, make sure the volume that contains Windows is correctly assigned the letter C: (if it’s not, you will need to change this), make this volume active, and then run the boot repair command.
The full sequence of commands is as follows:
diskpart
list volume
select volume [number]
assign letter=[letter]
For example, a “wrong” volume may be assigned the letter C:, so you will need to select it first, assign it a different letter (e. g.: F: or H:), select the volume that contains Windows, and then assign it the letter C:.
Finally, activate the C: volume, and exit the diskpart utility.
activate
exit
Now, run the bcdedit repair command:
bcdedit /deletevalue {default} safeboot
If the above does not work, alternative commands you can run are:
bcdedit /deletevalue {current} safeboot
bcdedit /deletevalue safeboot
If this command completes successfully, exit the command prompt, the Windows recovery console will restart, and Windows should load normally, with the controller mode set to AHCI.
If Windows does not start correctly, you can then manually recreate the bootloader file.
Bcdboot
To this end, you will need to access either the System partition or the EFI partition on your computer. The Windows disk layout will typically include one of these two configurations:
A volume that contains Windows (C:) and a small hidden partition, usually 100MB in size called System partition, formatted as NTFS. It contains the files needed to start (boot) Windows, as well as recovery tools to help you diagnose and repair your system when it does not start correctly.
On UEFI-powered computers, a volume that contains Windows (C:) and a boot partition (also called EFI), typically 256-512MB in size, formatted as FAT32. This partition will contain the files needed to start (boot) Windows.
You will need to access the partition to make the necessary changes. If you have already run the diskpart utility, you do not need to do anything at this point, you only need to check the letter that is assigned to this partition (e.g.: letter F:).
Switch to the boot partition, move the existing boot file aside, and then create a new one. The sequence of commands to do this is as follows (assuming letter F: for the boot partition):
F:
cd boot
ren BCD BCD.bak
bcdboot c:\windows /l en-us /s f: /f ALL
The bcdboot command will initialize the system partition by using BCD files from the C:\Windows folder, use the en-us locale (/l en-us), target the system partition assigned letter F: (/s option), and create boot files both for UEFI and BIOS (/f ALL option).
Once this command completes, reboot. Windows should start normally. You can now re-launch the Ubuntu installer and finish the side-by-side setup of the two operating systems.
ASUS P5WD2 Premium on Intel 955X / Motherboards
🇬🇺🇰🇿
Today February 20, 2023
About this site
Advertising
Newsletter
Contacts
|
3DNews Motherboards Motherboards ASUS ASUS P5WD2 Premium on Intel 955X The most interesting news
⇣ Contents BIOSThe Asus P5WD2 BIOS is based on the AMI BIOS version.
In the memory settings section, only a standard set of timings («CAS Latency», «Precharge to Active»(Trp), «Active to precharge» (Tras) and «Active to CMD»(Trcd)).
The next parameter that affects performance is setting the memory frequency.
So, the user has access to all possible memory frequency dividers 1:2(DDR2-400), 2:3(DDR2-533), 3:4(DDR2-600), 5:6(DDR2-667) and 1: 1(DDR2-800).
A at FSB = 266MHz (1066QPB) the dividers are as follows: 3:8(DDR2-400), 1:2 (DDR2-533), 9:16(DDR2-600), 5:8(DDR2-667), 2:3(DDR2-711), 3:4(DDR2-800) and 5:6(DDR2-889). As I said, the user can specify the number of PCI Express bus lanes allocated to the second PCI-E x16 slot (2 or 4).
The board has a couple of features in the BIOS that theoretically affect performance. This is «HyperPath4»
and «Performance Mode»
However, in practice, we did not notice a change in the speed of work. Now let’s look at the section on system monitoring.
The board displays the current CPU and system temperatures, all four fan speeds, and voltage levels. In addition, Q-Fan technology is available for the CPU cooler, as well as for CHA_FAN1, which allows you to adjust the rotation speed depending on the temperature of the processor. In addition, you can follow system monitoring readings in Windows. The Asus PCProbe system monitoring utility is designed for this. Moreover, Asus programmers have released the second version of this utility, which is still somewhat damp. The board also works with the Asus LiveUpdate utility, which is designed to update drivers, flash BIOS and change the POST screen (MyLogo2 function). Finally, the board supports the function
Next page →← Previous page
⇣ Contents If you notice an error, select it with the mouse and press CTRL+ENTER. Related materials Permanent URL: https://3dnews.ru/121182/page-1.html ⇣ Comments |

[Motherboard] How to create RAID in BIOS settings | Official Support
RAID:Redundant Arrays of Independent Disks
RAID definition
RAID 0 : (Data Striping) Optimizes two identical hard drives for reading and writing data in parallel striped stacks.
RAID 1 : (Data Mirroring) copies and maintains an identical image of data from one drive to another.
RAID 5 : Shares data and parity across three or more hard drives.
RAID 10 combines data striping and data mirroring without the need to calculate and write parity data (redundancy data).
|
RAID level |
Min. disks |
Safety |
Pluses |
Cons |
|---|---|---|---|---|
|
0 |
2 |
Low |
High Speed |
No data mirroring |
|
1 |
2 |
High |
High security |
Low disk capacity usage |
|
5 |
3 |
Medium |
High Speed |
Slow write to one disc |
|
10 |
4 |
High |
Data interleave Data mirroring |
Need more disk |
※ Note: Be careful when creating or deleting a RAID set. You will lose all data on the hard drives when you remove the RAID set.
Follow the instructions below to create RAID in the BIOS :
settings Intel Creates RAID
AMD Creates RAID
9000 9000 9000 9000 9000 9000 9000 9000 9000 9000 9000 9000 9000 -PLUS as an example)
1. Power on the system and press «Del» button to enter the BIOS [EZ Mode],check the connected drive in «Storage Information».
2. Press the F7 key and enter the [Advanced Mode] as shown in the figure below.
(If you press the «Delete» key, enter the [Advanced Mode] directly, and then you do not need to press the F7 key)
3. Click the [PCH Storage Configuration] item on the «Advanced» page.
4. [SATA mode selection] and set it to [Intel RST Premium with Intel Optane System Acceleration (RAID)],as shown in the figure below, red icon 1
If you only create SATA RAID, just follow the following setting
If you want to create M. 2 Storage RAID for [Enabled],as shown in the figure below, check red 2
As shown below, click [M.2_1 PCIE Storage RAID Support] and set [RST Controlled].
Click [M.2_2 PCIE Storage RAID Support] and set it to [RST Controlled].
5. Click the [Boot] page and set [Launch CSM] to [Disabled].
6. Press the F10 key and press OK, then the system will reboot automatically.
7. Click the «delete» button after the system reboots and enter the BIOS [EZ Mode].
8. Press the F7 key and enter the [Advanced Mode] as shown in the figure below.
(If you press the «Delete» key, enter the [Advanced Mode] directly, and then you do not need to press the F7 key)
9. Click the [Advanced] page and click the [Intel (R) Rapid Storage Technology] item.
10. Click [Create a RAID volume].
11. Set the RAID name, for example: SATAHDDRAID0, as shown in the figure below, marked in red 1
Select the RAID level, for example: RAID0 (Stripe), as shown below, marked in red 2
Select the disks that you want to create, and set them to [X] as shown in the figure below, marked in red 3
12. Set the RAID capacity and click [Create Volume] to create the RAID.
The maximum RAID capacity is shown below.
※ Note: Be careful when creating or deleting a RAID set. You will lose all data on the hard drives when you remove the RAID set.
AMD motherboard create RAID
(ROG STRIX X570-E GAMING as an example)
1. Turn on the system and press «DEL» key to enter BIOS [Advanced Mode].
(If you press the del key and enter the BIOS [EZ Mode], press the F7 key again to enter the BIOS [Advanced Mode])
2. Click the [Advanced] page and click the [SATA Configuration] item.
3. Click the [SATA Mode] item and set the value of [RAID], as shown in the figure below, marked in red 1
If you create only SATA RAID, just follow the setting.
If you want to create M.2 Storage RAID, set [Enable] as shown in the figure below, marked in red 2
4. Click the [Boot] page and set [Launch CSM] to [Disabled].
5. Press the F10 key and press OK, then the system will reboot automatically.
6. Press the «DEL» button to enter the [Advanced Mode] BIOS when the system reboots, click the [Advanced] page, and select [RAIDXpert2 Configuration Utility].
7. Click [Array Management].
8. Click the [Create Array] item
9. Click the [Select RAID Level] item and set the RAID level, below is [RAID 0] as an example.
10. Click [Select Physical Disks].
11. Select the discs you want to create and set to [On], Click [Apply Changes].
(Choose Disk0 and Disk3 as an example)
12. Set the array size and click [Create Array].
Below is the maximum array size
※Note : Be careful when creating or deleting a RAID set. You will lose all data on the hard drives when you remove the RAID set.
Q & A:
Q: How to install the RAID controller driver during the installation of Windows® 10?
A :
Intel :
Please follow the settings for installing the RAID-controlling driver in Windows® 10 installation time :
1. Boot your computer from the Windows® 10 installation disc. Follow the onscreen instructions to start installing Windows® 10.
2. When prompted to select an installation type, click Custom: Install Windows only (Advanced) ).
3. Click [Download driver].
4. A message will appear prompting you to insert the installation media containing the RAID controller driver. Click the Browse button to continue.
a. If your system only has one optical drive, remove the Windows installation disc and replace it with the Motherboard Support DVD.
b. If you don’t have an optical drive, copy the RAID driver to a USB stick.
5. Locate the driver in the appropriate folder on the Support DVD and click OK to continue.
AMD motherboard :
Please follow the setup to install the RAID controller driver during Windows® 10 installation:
installing Windows® 10.
2. When prompted to select an installation type, click Custom: Install Windows only (advanced).
3. Click [Download driver].
4. A message will appear prompting you to insert the installation media containing the RAID controller driver. Click the Browse button to continue.
a. If your system only has one optical drive, remove the Windows OS installation disc and replace it with the Motherboard Support DVD in the optical drive.
b. If you don’t have an optical drive, copy the RAID driver to a USB stick.
5. Locate the driver in the appropriate folder on the Support DVD.
5. Select the rcbottom folder and click OK to load the driver.
6. Repeat installation from 3 to 5, select the rcraid folder and click OK to load the driver.
7. Repeat installation from 3 to 5, select the rccfg folder and click OK to load the driver.
Q: How to remove the RAID set?
A:
Intel 9 platform0003
1. From the Intel® Rapid Storage Technology menu, select the RAID volume you want to remove and press
