The FX 8320….my journey into under-volting an 8 core CPU
«
Newer Post
Older Post
»
I have had my FX-8320 for a little over a month, but I couldn’t help but
notice how hot in general these things run. Even though I am using the
stock cooler, and the chip has never surpassed the 61c core temp danger
zone, it has came close a few times. I couldn’t for the life of me
believe that the stock cooler for this chip was «that bad».
I
just thought these chips ran a little on the hotside in general, and as
long as you don’t exceed 61c on the core and 70c on the socket temp,
then everything was ok. That is true, but I had an idea to try a little experiment. I thought, lets see what
the stock voltage is on these things, and see if we can lower that in
any significant way and see what we get.
According to CPU World, the FX 8320 has the following Boosted Pstates (Voltage at Turbo Core Clocks)
#1: 4000 MHz, 1.425V
#2: 3700 MHz, 1.4125V
The
Stock Voltage at 3. 5 GHz is anywhere between 1.3375 to 1.3875v
depending on the motherboard and manufacturer. On my Biostar TA 970 v5 the default Vcore was set at
1.3375 volts.
Now with this information in mind, I set out on my under-volting journey.
After digging around the BIOS, I found Custom Pstates under the
Performance tab. I had to Disable CPB(Core Performance Boost Mode/Turbo
Core) before I was able to adjust custom Pstates (Makes sense because
we are changing the voltages). I tried a few settings dropping it down
in increments. It just kept booting into Windows, and just kept being
Prime95 Stable after an hour.
(This is what I used for this test
so far due to time constraints, as I have found undervolts will usually
either fail to boot Windows with a BSOD or it will fail Prime within 15
minutes if it doesn’t have enough juice, where as an Overclock can go
for hours before it fails prime.)
After some more tinkering I found my FX 8320’s undervolting
limit.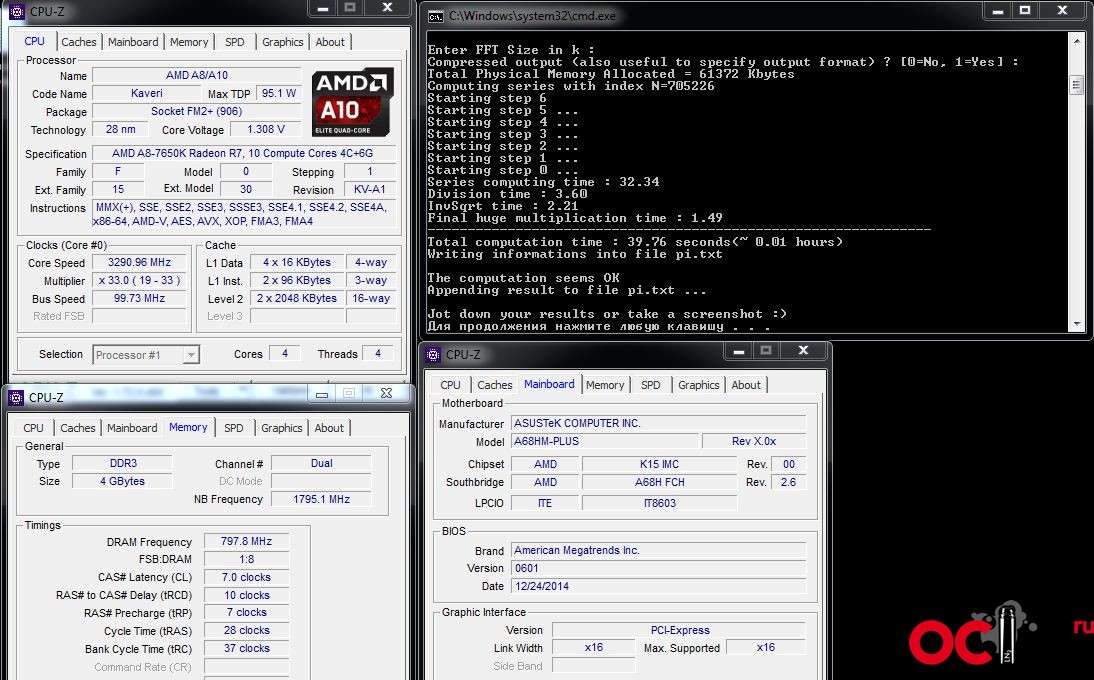 I was able to drop the CPU Vcore to 1.1875 volts. I tried
1.1750v, but the system would not boot into windows at that low of a
voltage, so 1.1875 was the best i could do. The system was completely
stable after 1 Prime 95 Blend test and 1 Prime 95 Small FTT test each
ran for 1 hour.
CPU Core temp — never exceeded 45c on stock cooler with all 8 cores maxed to 100%
CPU Socket Temp
— dropped 7 Degrees C and maxed out at 65 C (Socket Temp is safe up to
70c on this board according to documentation and BIOS Shutdown Temp is
defaulted to 70c) and is located on the bottom of the motherboard under
the CPU Socket…not to be confused with the Core Temp sensor located
inside the CPU)
I am not even sure the Socket temps being read
by HWMonitor are even accurate because its saying the these temps are
that high on the socket, but EVERYTHING in the motherboard is cool to
the touch while running (my laser thermometer is broke
…..) North Bridge heatsink is slightly warm.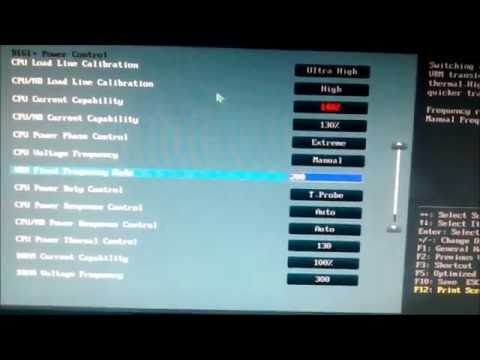 .like lukewarm…im
chalking that up to HWmonitor/board glitch temp sensors….I can tell
they are no where near 65 c You would feel heat somewhere on the board
if something was 150F so im about 99% certain that is wrong. I base this
on the fact the BIOS shows Socket Temps to be 10C warmer then Core
Temps shown by Windows monitoring programs. As I have learned in the
past, HWMonitor is not always perfect.
Overall, heat has been reduced significantly. Under full Prime95 load,
my Antec Power Supply no longer expels tons of hot air…in fact, My
power supply fan didn’t even need to spin up to full speeds anymore to
handle the 100% load on the CPU now at these reduced voltages. Considering I went from 1.33V (1.4125 and 1.425v Turbo) down to 1.1875
volts, I expected as much. I was also able to drop the NorthBridge
Voltage from the stock 1.200V to 1.1750 volts Saving even more power.
Going a bit farther, I used a KillaWatt to test power consumption before and after the undervolt at the wall plug, and the results were interesting!
Results Undervolted
Idle — 87 watts
Full Load 193 watts
Results at Stock volts and Bios settings
Idle 114 watts
Full load 238 watts
Results from Top to Bottom: Idle Undervolted, Idle Full Load, Stock Idle, and Stock Full load.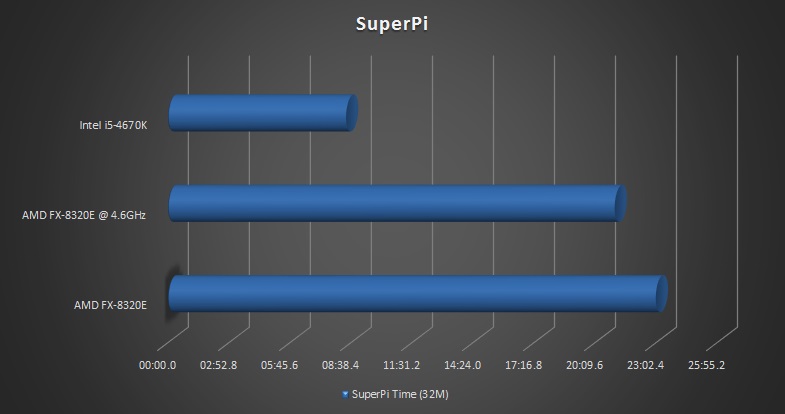
As you can see, undervolted, we were able to keep the total power draw under 200 watts at full load which is very impressive. At stock however, is a whole other ball game. At full load the system almost breaks the 240 watt number, and this is just at stock. Imagine if this sucker was overclocked….however, some serious speeds can be achieved when overclocking if you have the cooling to cope with it. The world record overclock is on an AMD CPU.
If you have an AMD FX series CPU, undervolting is a serious option, even more so perhaps then overclocking. Depending on the chip, it seems AMD threw a lot of voltages at these chips to ensure successful yields, which means you may have a lot of room to undervolt for energy savings instead of overclocking.
It looks like the FX chips are just as good undervolters as they are overclockers! I hope you had as much fun on this journey as i did! Till next time! 🙂
Disclaimer: I am not responsible for anything
that may happen to your PC when changing settings or changing registry
values.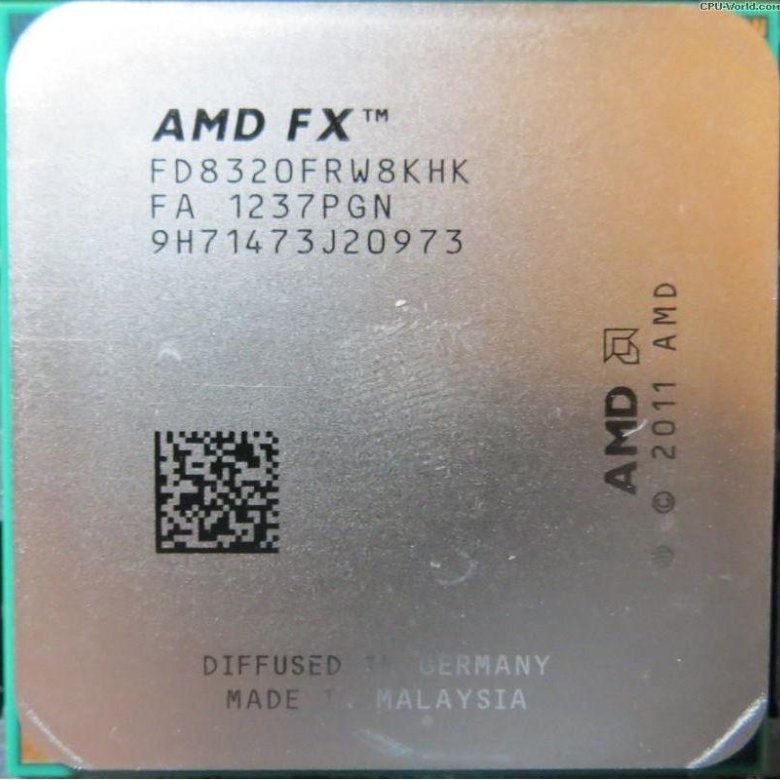 If you choose to make changes, you do so at your own risk.. You
are solely responsible for
any damage to your computer , data, or other hardware due to user error,
inadequate
cooling, too high of voltages, incorrect software settings, and any
other factors. Please remember to
back up your computer before attempting
this. If overclocking, Do not Overclock on the stock AMD or Intel CPU
Heatsink and fans.
Use Aftermarket cooling heat sinks of sufficient TDP or water cooling to
ensure best chance of not having premature hardware failure. As always,
remember to backup your data before attempting any change. I am not
responsible for data loss or damage of any kind.
In
amd,
application power management,
cpu,
under-volting
by
Ron Woods,
Saturday, August 10, 2013
| NH-C14S | |||
| NH-D12L |
Optional mounting-kit required (free of charge). |
||
| NH-D15 |
AM3+ mounting-kit included until 09/2022 For coolers bought after this date: Optional mounting-kit required (free of charge). Please contact our support team. |
||
| NH-D15 SE-AM4 |
Optional mounting-kit required (free of charge). Please contact our support team. |
||
| NH-D15 chromax.black |
AM3+ mounting-kit included until 08/2022 For coolers bought after this date: Optional mounting-kit required (free of charge). Please contact our support team. |
||
| NH-D15S | |||
| NH-D15S chromax.black |
AM3+ mounting-kit included until 08/2022 For coolers bought after this date: Optional mounting-kit required (free of charge). Please contact our support team. |
||
| NH-D9 DX-3647 4U |
Mechanically incompatible |
||
| NH-D9 DX-4189 4U |
Mechanically incompatible |
||
| NH-D9DX i4 3U |
Optional mounting-kit required (free of charge). |
||
| NH-D9L |
AM3+ mounting-kit included until 08/2022 For coolers bought after this date: Optional mounting-kit required (free of charge). Please contact our support team. |
||
| NH-L12 Ghost S1 Edition |
Cooler cannot handle base clock |
||
| NH-L12S |
AM3+ mounting-kit included until 08/2022 For coolers bought after this date: Optional mounting-kit required (free of charge). Please contact our support team. |
||
| NH-L9a-AM4 |
|
||
| NH-L9a-AM4 chromax.black |
|
||
| NH-L9i |
|
||
| NH-L9i chromax.black |
|
||
| NH-L9i-17xx |
Mechanically incompatible |
||
| NH-L9i-17xx chromax.black |
Mechanically incompatible |
||
| NH-L9x65 |
For coolers bought after this date: Optional mounting-kit required (free of charge). Please contact our support team. |
||
| NH-L9x65 SE-AM4 |
|
||
| NH-P1 with NF-A12x25 LS-PWM fan |
Cooler cannot handle base clock |
||
| NH-P1 fanless |
Cooler cannot handle base clock |
||
| NH-U12A | |||
NH-U12A chromax.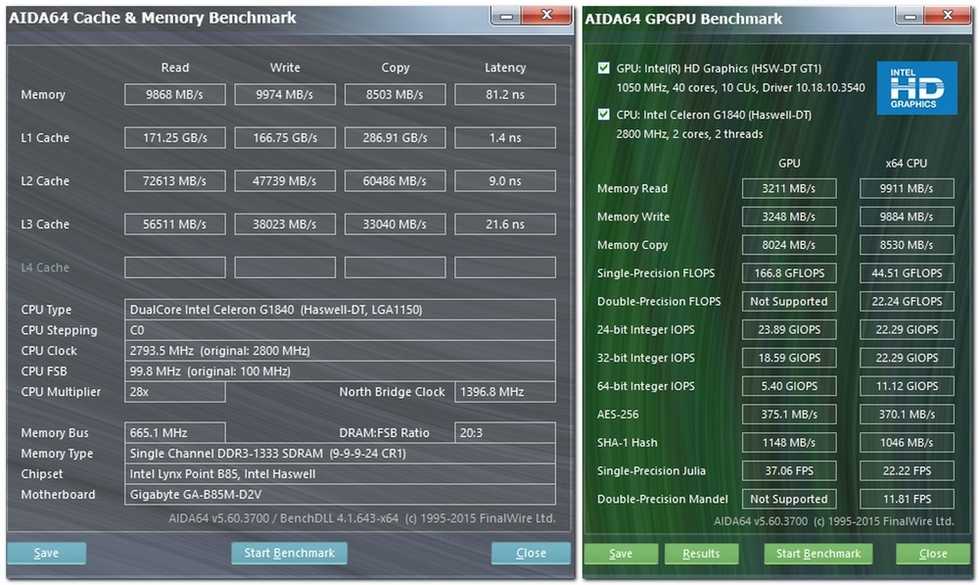 black black |
|||
| NH-U12DX i4 |
Optional mounting-kit required (free of charge). Please contact our support team. |
||
| NH-U12S | |||
| NH-U12S DX-3647 |
Mechanically incompatible |
||
| NH-U12S DX-4189 |
Mechanically incompatible |
||
| NH-U12S SE-AM4 |
Optional mounting-kit required (free of charge). Please contact our support team. |
||
| NH-U12S TR4-SP3 |
Mechanically incompatible |
||
| NH-U12S chromax.black |
AM3+ mounting-kit included until 08/2022 For coolers bought after this date: Optional mounting-kit required (free of charge). Please contact our support team. |
||
| NH-U12S redux |
Optional mounting-kit required (free of charge). Please contact our support team. |
||
| NH-U14S | |||
| NH-U14S DX-3647 |
Mechanically incompatible |
||
| NH-U14S DX-4189 |
Mechanically incompatible |
||
| NH-U14S TR4-SP3 |
Mechanically incompatible |
||
| NH-U9 DX-4189 |
Mechanically incompatible |
||
| NH-U9 TR4-SP3 |
Mechanically incompatible |
||
| NH-U9DX i4 |
Optional mounting-kit required (free of charge). |
||
| NH-U9S |
AM3+ mounting-kit included until 08/2022 For coolers bought after this date: Optional mounting-kit required (free of charge). Please contact our support team. |
||
| NH-U9S chromax.black | |||
 Please contact our support team.
 Please contact our support team.
 Please contact our support team.
 Please contact our support team.
Review and test of the AMD FX-8320E Vishera — i2HARD processor
Ruslan
February 9, 2015
The AM3+ platform for high-performance AMD processors, despite its relative longevity, is not going to go into oblivion yet. In the fall of 2014, AMD again updated …
The AM3+ platform for high-performance processors AMD , despite its relative longevity, is not going to go into oblivion yet. In the fall of 2014, AMD again updated its line of processors for socket AM3 +, releasing three new processors FX-8370, FX-8370E and FX-8320E .
All released processors, in addition to good technical characteristics and high power consumption, were also endowed with attractive price tags that could attract the attention of thrifty buyers. Especially attractive among them, in terms of price and performance, looks like the youngest 8-core processor FX-8320E. Sold for just $146.99, this processor runs at 4 GHz using TurboCore technology and has a relatively modest TDP of 95 W. Let’s take a closer look at the FX-8320E processor, which was a guest of our editors.
Specifications
- Socket — AM3+;
- Core — Vishera;
- Number of cores — 8;
- Process technology — 32 nm;
- Clock speed — 3200 MHz / 4000 MHz in Turbo Core On mode;
- System bus — HT;
- Built-in memory controller — yes;
- L1 cache size — 48 KB;
- L2 cache size — 8192 KB;
- L3 cache size — 8192 KB;
- Instructions — MMX, SSE, SSE2, SSE3, SSE4;
- AMD64/EM64T support — yes;
- NX Bit support — yes;
- Support for Virtualization Technology — yes;
- Typical heat dissipation — 95 W.
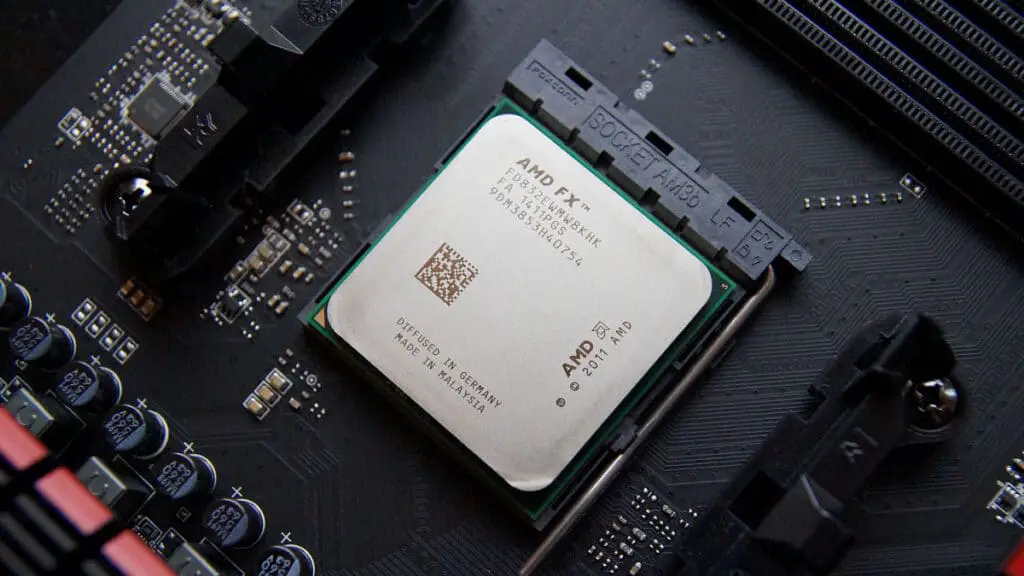
AMD FX-8320E
The AMD FX-8320E processor itself is not a new development, but there are still some changes in it compared to the AMD FX-8320.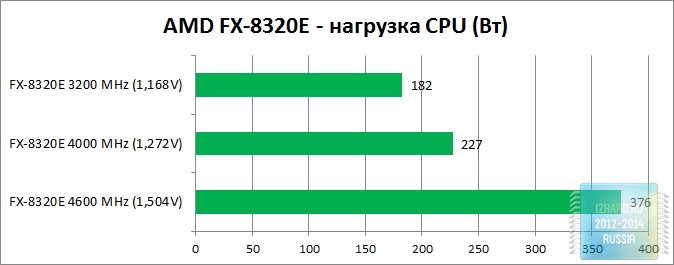 The first thing that you can notice after examining the technical characteristics of the novelty is the reduced TDP of the processor to 95W, while the older AMD FX-8320 has a TDP of 125W. The decrease in this indicator became possible by lowering the base frequency of the processor, from 3500 to 3200 MHz. However, with AMD Turbo Core 3.0 technology running, the AMD FX-8320E processor clocks under load to the same 4.0 GHz as the AMD FX-8320 processor.
The copy that came to us for testing was made in Malaysia on the 11th week of 2014. The AMD FX-8320E processor also belongs to the «Black Edition» series, so the multiplier in it is not locked up. And this, in turn, allows us to lay good hopes on the successful overclocking of the novelty.
Since the AMD FX-8320E processor has a TDP of 95W, any motherboard with an AM3+ socket will work. In some cases, you only need to update the BIOS of the motherboard.
To test the AMD FX-8320E processor, we used the MSI 970 Gaming motherboard, which we talked about earlier. This motherboard left behind the most pleasant impressions, so it is not surprising that we decided to use it now.
Bios of the MSI 970 Gaming motherboard version v22.2 recognized the new AMD FX-8320E processor without any problems and correctly set its operating frequency and power parameters.
The latest version of the CPU-Z program confidently recognizes the processor and displays information about it very accurately. With the default settings of the BIOS of the motherboard, the operating voltage of the processor during load was 1.224 V ..
Default, MSI 9 motherboard70 Gaming sets the RAM to 1333MHz despite the FX-8320E supporting 1866MHz memory. However, this does not negate the ability to set the frequency of RAM through the BIOS settings manually.
Test bench configuration
|
Motherboard |
MSI 970 Gaming AM3+ |
|
Cooling system |
Thermalright Silver Arrow IB-E |
|
RAM |
Corsair VengeancePro DDR3-2133 8Gb*2 |
|
video card |
MSI GeForce GTX 970 Gaming 4G |
|
Power Supply |
Thermaltake ToughPower XT 775W |
|
Drives |
HDD SATA-3 1Tb Seagate 7200 Barracuda (ST1000DM003) SSD SATA-3 120Gb Kingston HyperX 3K |
|
Monitor |
ASUS PB298Q 29″ (2560×1080) |
|
Frame |
open stand |
|
Thermal interface |
Gelid GC-Extreme |
|
Operating system |
Windows 7 x64 SP1 |
|
Other software |
CPU-Z ROG 1. |
 71.1, Prime95, Aida64, LinX 0.64
Overclocking, temperature and power consumption
The AMD FX-8320E processor is known to run at 3200 MHz, and with the help of AMD Turbo Core 3.0 technology, its frequency increases to 4000 MHz under load. We also tested the AMD FX-8320E for overclocking, which the processor is very good at. The clock frequency of the AMD FX-8320E processor was increased by increasing its multiplier to 4600 MHz. RAM in all cases worked at a frequency of 1866 MHz with 9 timings-10-9-27-2T. Thus, for practical testing, we chose the following three modes:
1) Processor AMD FX-8320E — frequency 3200 MHz (voltage — 1.168 V), RAM 1866 MHz;
2) Processor AMD FX-8320E — frequency 4000 MHz (voltage — 1.272 V), RAM 1866 MHz;
3) Processor AMD FX-8320E — frequency 4600 MHz (voltage — 1.504 V), RAM 1866 MHz;
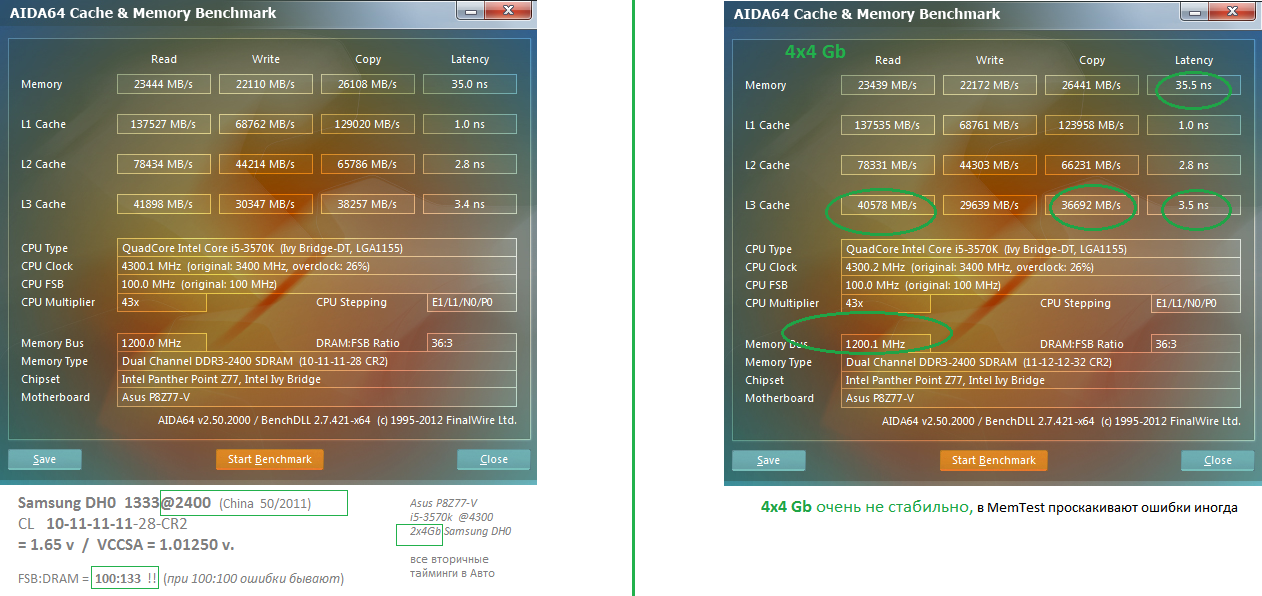
Based on the results of the Aida64 Cache&Memory benchmark, we can conclude that the processor frequency has almost no effect on the memory bandwidth. With an increase in the clock frequency of the AMD FX-8320E, only memory delays decreased.
As for the temperature indicators, the AMD FX-8320E processor does not heat up surprisingly much, including during overclocking. With one of the top Thermalright Silver Arrow IB-E air coolers, the processor temperature did not exceed reasonable values.
Power consumption measurements were carried out in two stages: first with a 100% load on the processor only, and then with a 100% load on the processor and video card. The graphs show the total power consumption collected by the system along with the AMD FX-8320E. According to the results obtained, it can be seen that a sharp increase in power consumption is observed after overclocking the processor with an increase in the supply voltage. And if in the nominal mode of operation, even with activated AMD Turbo Core 3.0 technology, you can get by with a 400-450 W power supply, then in the case of serious overclocking, the AMD FX-8320E processor already makes higher demands on the power supply unit.
Synthetic and gaming tests
Performance in synthetic benchmarks such as CineBench, SVPmark, FritzBenchmark and the WinRar archiver increases almost in proportion to the increase in processor frequency. This, in turn, allows us to say that overclocking the AMD FX-8320E processor is expedient and even useful, since the effect of overclocking is confirmed in practice.
As for graphical tests, overclocking of the AMD FX-8320E processor is beneficial, though not everywhere proportionally. So, for example, 3D Mark13, SniperElite V2 and Sleeping Dogs quite cheerfully responded to the increase in the processor clock frequency, while in the graphically overloaded test Ungine Heaven 4.0 there were practically no changes depending on the increase in the frequency of AMD FX-8320E.
Conclusion
More recently, it would have been hard to recommend AMD FX-8320E for purchase, but due to the harsh realities of Russian retail, this processor now looks like a truly anti-crisis solution.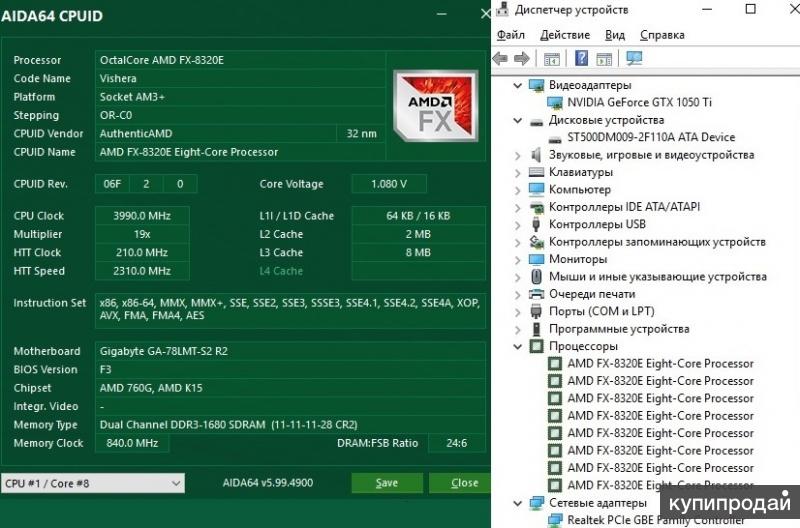 By opting for the AMD FX-8320E, the user gets, first of all, an inexpensive 8-core processor, the performance of which is enough for any home tasks, including the latest generation games. AMD FX-8320E, in addition to its low cost, also does not require an expensive motherboard, so this processor is worth paying attention to, first of all, to those who love and know how to count money, especially during a crisis. Low processor heat and good overclocking capabilities leave the ground for a further increase in performance without significant costs, and the overall power consumption of the system, even coupled with overclocking, will allow you to assemble a powerful computer based on AMD FX-8320E with a power supply unit up to 550-600W.
Pros:
- reasonable cost;
- reduced TDP to 95W;
- low heat;
- good overclocking potential;
- low requirements for the motherboard;
- acceptable performance.
Cons:
- increased requirements for the power supply when the processor is seriously overclocked.
Evaluating all the pros and cons of the AMD FX-8320E processor, the editors award this device an award of i2HARD — silver.
Instructions for overclocking the FX-8350 processor to 4.8 GHz on the ASUS ROG Crosshair V Formula-Z motherboard GreenTech_Reviews
in Tutorials / Overclocking (overclocking) tagged Crosshair V Formula-Z / FX-8350 / FX instructions -8350 / how to overclock FX-8350 / overclock FX-8350 — admin
Translation of official instructions from ASUS ROG.
As you know, overclocking your instance of the processor may differ from the results of this article. The final result can also be affected by cooling and the motherboard (if you are using an unspecified board).
If you have additional questions, you can ask them on the official forum (English) or in the official community on the social network Vkontakte.
Well, let’s get started!
Installing the processor in the socket is quite simple and you can not use force, otherwise you can damage the legs, and, accordingly, kill it:
— raise the clamp
— install the processor, aligning the golden triangle with the triangle mark on the socket
— lower the clamp
Apply a thin layer of thermal paste.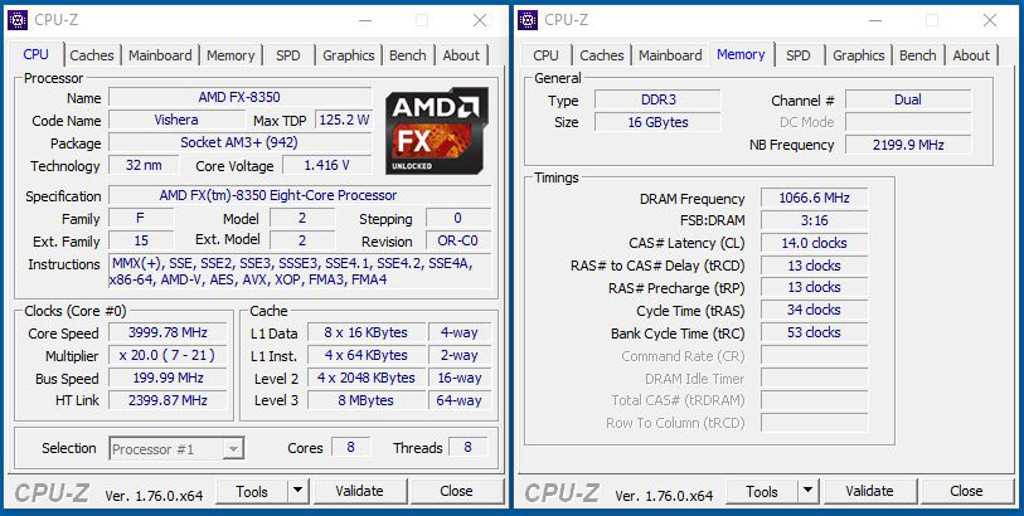 It is very convenient to use something like a credit card if there was no special spatula in the kit.
Install cooling. Remember that overclocking the FX-8350 requires very good cooling! In our instructions, we use the Corsair H80i, but analogues are also quite suitable. It is best to use two-section CBOs.
Installing RAM.
A little about the system power supply.
As you may have noticed, the ASUS ROG Crosshair V Formula-Z board is equipped with an additional 4-pin CPU power connector. Connecting both cables (8-pin and 4-pin) can improve overclocking stability. But if your power supply has only one 8-pin cable, then don’t be discouraged — connecting a second one is not at all necessary.
Before we get straight into overclocking, download the latest BIOS for your board and extract it to a flash drive so you can update the board via EZ Flash.
You also need to download (or take on a disk from the kit) and install the ASUS AI Suite II utility, since not all utilities can correctly monitor the temperatures of the FX-8350.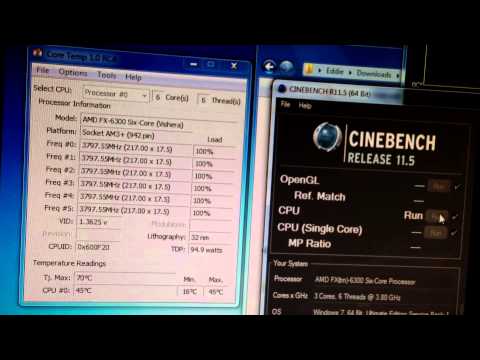 We will be using AI Suite II for temperature and voltage monitoring, CPU-z for CPU frequency monitoring, and Prime95 to check system stability.
Check that everything is working properly.
Enter the BIOS and press the F5 key to apply the optimal settings.
Save settings with F10 and reboot into Windows.
Open CPU-Z and AI Suite II.
Launch Prime95 and run the Small FFT test. The processor frequency should be approximately 4 GHz.
In our case, the processor temperature reached 49 degrees. The room temperature was 25 degrees.
If everything is in order, then let’s proceed directly to overclocking!
Once again we note that there can be quite a difference between processors, but most should be overclocked to 4.8 GHz with good cooling. If your system is unstable, then try lowering the multiplier by one step at the same voltage and test it again.
We will be using UEFI BIOS Advanced Mode (ROG boards run this mode natively).
Go to the Extreme Tweaker tab.
Set the CPU Ratio parameter to 24. Thus, we should get 4.8 GHz (you can see the Target CPU Speed value a little higher).
Set the memory mode to your preference (according to your memory specification). In our case, 1600 MHz.
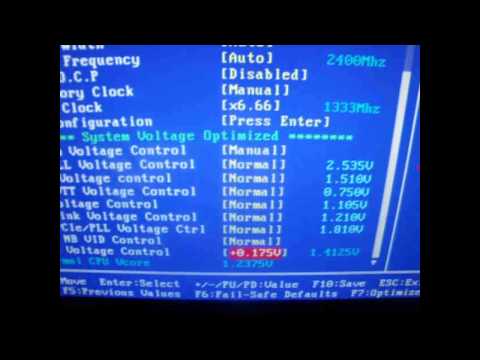
In the same tab below, look for CPU & NB Voltage and set it to Manual mode.
Set the CPU Manual Voltage — 1.5 V. Do not pay attention to the red backlight of the numbers, everything is in order.
We go up the menu a little higher and go to DIGI + Power Control.
Set CPU Load Line Calibration to Ultra High.
Now we need the Advanced tab. In it, go to the CPU Configuration menu.
Cool ‘n’ Quiet must be set to Always Disabled and C1E to Disabled.
You can also disable (Disabled) Core C6 State.
You can save a settings profile (so you don’t have to set everything again every time) in the Tool tab.
Now press the F10 key to save the settings and reboot.