the Device \Device\Harddisk0\DR0 has a Bad Block
A number of users encountered the error message “the Device \Device\Harddisk0\DR0 has a Bad Block” when opening the Event Viewer. This annoying problem is found to occur on multiple Windows versions. In today’s article, MiniTool solution will assist you with a few accessible methods to fix the issue.
About “Device \Device\Harddisk0\DR0 has a Bad Block” Error
Here is what a user described his issue on a forum:
Ok so recently, I was checking my event viewer and found out a lot of errors showing «The device, \Device\Harddisk0\DR0, is a bad block. I downloaded seatools from the seagate website and ran it and it failed short DST test but it passed S.M.A.R.T. Currently, I am making a backup of all the data on the hard disk to my external hard drive. Does deleting all partitions and re-creating them solve the bad blocks issue?https://forums.tomshardware.com/threads/getting-the-device-device-harddisk0-dr0-has-a-bad-block-in-event-viewer.
2777128/
The device harddisk0 dr0 has a bad block indicates that there may be a bad block on your hard disk. Once a data block goes bad, there is no way to make it recover health status. Fortunately, you can force your operating system to avoid using the block as being bad. This will prevent any data loss.
If you receive the error message “The Device \Device\Harddisk0\DR0 has a bad block”, it’s highly recommended that you back up all your data as soon as possible since this error is one of the first signs that your hard drive is going bad.
Possible Causes for the Device Has a Bad Block Issue
You may be curious about the possible causes of this problem. According to the reports we have explored, here are possible causes for the Device \Device\Harddisk0\DR0 has a Bad Block issue:
- There are bad sectors on the hard drive. Or any corrupted file system appears in the health sector.
- There may be physical bad tracks or sectors on your hard disk that cause the hard drive cannot work properly.

Well, you may also be struggling to resolve the bad hard disk block issue. Some users are wondering whether I should format the hard disk or delete all partitions like the user on TenForums. To this point, this post will provide you with a few accessible troubleshooting methods.
Note:
The first three methods will be only helpful as long as there are still some healthy unused sectors on the hard drive, which can be used to replace the bad sectors.
In order to get rid of the device harddisk0 dr0 has a bad block error smoothly and gain some other useful tips, here we recommend that you perform each method we have presented one by one.
Solution 1. Running a CHKDSK Scan to Fix Hard Disk Errors
CHKDSK is a built-in utility in Windows that can be used to scan and fix your hard drive error caused by bad sectors, improper or sudden shutdowns, corrupted software, and Meta data corruption. CHKDSK scan is the most common way to fix “the Device \Device\Harddisk0\DR0 has a Bad Block” issue.
Here is a full guide on using this built-in utility to fix bad hard disk block error.
Step 1. Press Win + R key to call out a Run dialog box. Then type “cmd” in the box and press Ctrl + Shift + Enter to open up an elevated Command Prompt. Click Yes to run as administrator when prompted by the UAC (User Account Control).
Step 2. Inside the elevated Command Prompt, type the following command and hit Enter to run the CHKDSK scan command: chkdsk /f /r (Note that there is a space in front of the slash).
Step 3. As is shown, you will be asked whether you would like to schedule this operation to be checked the next time, type the letter Y and then hit Enter to schedule it.
Step 4. Reboot your computer, then this built-in utility will check and fix the hard drive errors automatically at the next system startup.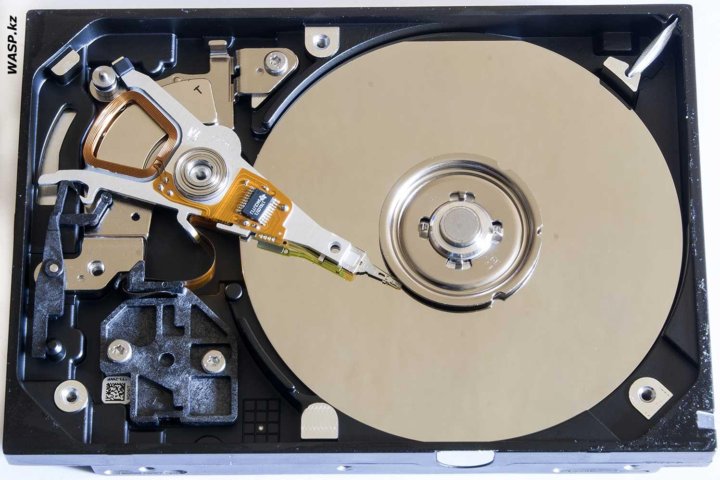
Note: Please make sure your computer keeps running while performing the CHKDSK scan. If your computer is shut down or out of power accidentally during this process, the HDD or SSD might suffer irreversible damage and make your Windows installation unusable.
Step 5. Open the Event Viewer to see if ‘’the Device \Device\Harddisk0\DR0 has a Bad Block” still can be seen in new events.
In addition to run a CHKDSK scan, here is a professional third-party software MiniTool Partition Wizard you can use to check and fix the logical errors of your hard drive freely. It is very easy to use and only requires two simple steps.
Solution 2. Running a System File Checker Scan Command
It is not impossible that the CHKDSK scan fails to find any bad sectors on your hard disk. So, you can try to run a system file checker scan to solve the “the device has a bad block” problem.
System File Checker (SFC) is a kind of Windows built-in utility that enables users to scan and restore corrupted system files. /p>
/p>
There are two simple ways to run a System File Checker scan. The first one is to run sfc /scannow in an elevated Command Prompt. The second choice is to run an SFC scan inside the Windows Powershell (Admin).
Note: Before you perform this scan, please make sure you have updated your Windows 10 to the latest version.
Here is a quick guide on running a system file checker scan in an elevated Command Prompt:
Step 1. Press Win + R key to call out a Run dialog box. Then type “cmd” in the box and press Ctrl + Shift + Enter to open up an elevated Command Prompt. Then you will run an SFC scan with admin privilege.
Step 2. Inside the elevated Command Prompt, type the following command and press Enter to start running an SFC scan: sfc /scannow (Note that there is a space in front of the slash).
Step 3. This process will take some time. Once this verification is 100% completed, restart your computer and check if the “The Device \Device\Harddisk0\DR0 has a bad block” error is no longer appearing inside the Event Viewer.
Besides, you can also run an SFC scan. Here are detailed steps as follow:
Step 1. Right-click the Start menu at the bottom left and select Powershell (Admin). Then you will get an admin privilege to run a sfc /scannow command.
Step 2. Inside the command prompt, type in sfc /scannow command and hit Enter.
Step 3. Then the errors of your hard drive will be fixed automatically in this process. This process will take some time, please wait for the process to complete.
If the above two methods failed to fix bad hard disk block error, try the next method below.
Solution 3. Run DISM Scan Inside Poweshell (Admin)
DISM (Deployment Image Service and Management) scan is another built-in utility in Windows that might get rid of this vexing error. A DISM offers the files that can be used to fix the corrupted instances in Windows Update. In order to run a DISM scan smoothly, here you need a stable internet connection status. /p>
Step 1. Right-click the Start menu at the bottom left and select Powershell (Admin).
Step 2. In the pop-up window, type the following command: dism /online /cleanup-image /restorehealth and hit Enter.
Step 3. Wait for the process of repairing errors to complete. After that, check if the device has a bad block.
Solution 4. Check If There Are Any Physical Bad Sectors on Your Hard Disk
If all the above methods failed to find and fix the error, then perhaps you need to consider making a disk surface test to check if there are any physical bad sectors in your hard drive..jpg)
Here, it is highly recommended that you try to use a free third-party tool MiniTool Partition Wizard. This marvelous software breaks some limitations and offers flexible solutions to optimize your hard drive, such as rebuild MBR, wipe disk, disk surface test and so forth.
It is very easy to make a disk surface test with MiniTool Partition Wizard. Here is a full guide as follow:
Step 1. Download this tool and install it. Then launch this tool to enter the main interface.
Free Download
Step 2. Select the hard disk with the device harddisk0 dr0 has a bad block error and select the Surface Test feature from the left action panel.
Step 3. Inside the disk surface test window, click on the Start Now button.
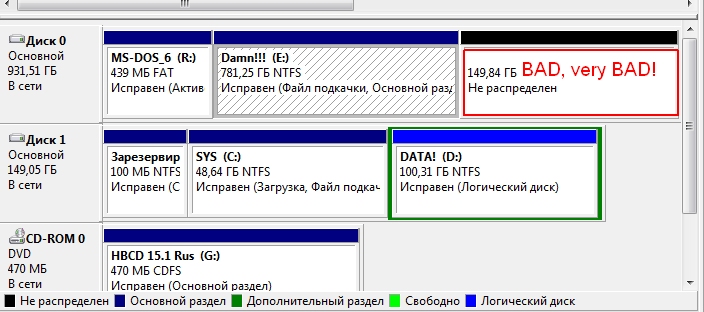
Step 4. After that, this program will automatically test the hard disk and show the test result. If there is a bad sector on this disk, the disk block will be marked with a red color. On the contrary, the disk block without bad sectors will be marked as green color.
If there is a large size of the red area, it is an indicator that you should consider using a new trusted hard disk to replace it.
As we mentioned above, some users want to delete all partitions on a hard disk (except the system partition) to solve this problem. Of course, you can, but this method is not beneficial for optimizing your hard disk and causes data loss. Furthermore, you may see “the Device \Device\Harddisk0\DR0 has a Bad Block‘’ error later. So, it would be better to purchase a new trusted hard disk.
Solution 5. Use a New Trusted Hard Drive
After all the above methods failed to solve your problem, you have to consider buying a new hard disk. As you know, the first step you need to do is to back up all data of the undesired hard disk.
Here you can use MiniTool Partition Wizard to back up the entire disk to a new hard drive.
Tip: Make sure the target disk has enough space to save all data.
Here it is recommended that you purchase a reliable hard drive since we found some users reported that they encounter device harddisk0 dr0 has a bad block after using the hard drive 2 years.
Click to Tweet
Final Words
In today’s article, we explored several methods to troubleshoot the device harddisk0 dr0 has a bad block issue. Hope this post can really solve your problem.
Well, you are welcome to leave your ideas about this problem or send us an email to [email protected]. Much appreciated.
The Device \Device\Harddisk0\DR0 Has a Bad Block
By Kevin ArrowsMarch 23, 2020
4 minutes read
Kevin is a certified Network Engineer
Several users have been reaching us with questions after opening the Event Viewer and noticing a lot of Disk errors with the message “The Device \Device\Harddisk0\DR0 has a bad block” error. This particular issue is reported to occur on multiple Windows version. Most affected users report that they also started to notice performance drops once the Event Viewer error has started to occur consistently.
The Device \Device\Harddisk0\DR0 has a bad block
What is causing the “Device \Device\Harddisk0\DR0 Has a Bad Block” error?
We investigated this particular issue by looking at various user reports and the repair strategies that they used to get the issue resolved.
From what we gathered, this particular error is indicative that a bad block was found on the first partition of your drive. Keep in mind that one a data block goes bad, there’s no way to make it healthy again. But you can force your operating system to make the block as being bad and avoid using it in the future. This will avoid any data loss scenarios where you’ll need to use a data recovery program.
Unfortunately, the “The Device \Device\Harddisk0\DR0 has a bad block” error is one of the first signs that your drive is going bad. If you’re seeing this message, we advise you to start by making sure all your data is backed up so you’re protected in case things the symptoms escalate.
If you’re struggling to resolve this particular error message, this article will provide you with several troubleshooting steps. Down below, you’ll find a collection of methods that other users in a similar situation have successfully used to deal with the Event Viewer errors.
Important: Keep in mind that the methods below will only work for as long as the drive still has some healthy unused sectors that can be used to replace the bad ones or the errors are actually false positives. Otherwise, you’ll have little choice but to purchase a new drive and migrate your data there.
Method 1: Running a CHKDSK scan
The most convenable way of resolving the “The Device \Device\Harddisk0\DR0 has a bad block” error is to perform a CHKDSK scan. This built-in utility will scan through your entire hard drive for bad sectors and replace any corrupted occurrences with a healthy sector.
Here’s a quick guide on running a CHKDSK scan to resolve the error:
- Press Windows key + R to open up a Run dialog box. Then, type “cmd” and press Ctrl + Shift + Enter to open up an elevated Command Prompt. When prompted by the UAC (User Account Control), click Yes to grant administrative privileges.Running CMD as an admin
- Inside the elevated Command Prompt, type the following command and press Enter to initiate CHKDSK scan:
chkdsk /f /r
- If you’re asked whether you want to schedule the operation at the next reboot, type the letter Y and then Enter to schedule it.
- Restart your computer and let the CHKDSK operation to complete at the next system startup.
Note: Do not shut down your computer while the CHKDSK operation is occurring. Doing this might cause irreversible damage to your HDD/SSD and render your Windows installation unusable.
- Open the Event Viewer and see if you’re still seeing new events with the “The Device \Device\Harddisk0\DR0 has a bad block” error.
Method 2: Running a System File Checker scan
If CHKDSK scan didn’t manage to find any bad sectors, let’s see if a System File Checker scan manages to resolve the “The Device \Device\Harddisk0\DR0 has a bad block” error. an SFC scan will scan all protected system files and replace corrupted occurrences with healthy copies located in a compressed folder that is stored locally.
Several affected users have reported that this procedure was successful in finding and resolving some corrupted files that ultimately stopped any other similar Event Viewer errors from appearing. This seems to suggest that in some cases, the error is actually a false-positive caused by corruption instead of a genuine bad block.
Here’s a quick guide on running an SFC scan:
- Press Windows key + R to open un a Run dialog box.
 Then, type “cmd” and press Ctrl + Shift + Enter to open up an elevated Command Prompt. When prompted by the UAC (User Account Control) prompt, click Yes to grant admin privileges.Opening an elevated Command Prompt from a Run dialog box
 - Inside the elevated Command Prompt, type the following command and press Enter to initiate an SFC scan:
sfc /scannow
- Once the process is complete, restart your computer and see if the “The Device \Device\Harddisk0\DR0 has a bad block” error is no longer occurring inside the Event Viewer.
If you’re still seeing new events popping up with the same error message, move down to the next method below.
Method 3: Running a DISM scan
Another utility that might end up resolving this particular issue is a DISM scan. A DISM (Deployment Image Service and Management) uses Windows Update to provide the files that are required to fix the corrupted instances.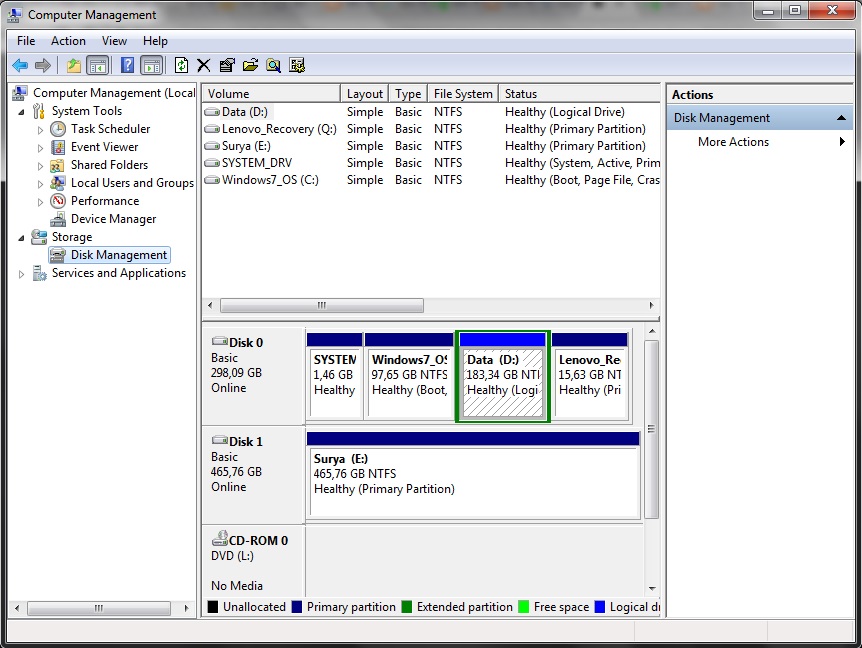 This obviously means that you’ll need a stable internet connection in order to complete the scan.
Here’s a quick guide on running a DISM scan:
- Press Windows key + R to open up a run dialog box. Then, type “cmd” and press Ctrl + Shift + Enter to open up an elevated Command Prompt. If you’re prompted by the UAC (User Account Control), click Yes to grant administrative privileges.Run dialog: cmd, then press Ctrl + Shift + Enter
- Inside the elevated Command Prompt, type the following command and press Enter to initiate a DISM scan:
DISM.exe /Online /Cleanup-image /Restorehealth
- Once the process is complete, restart your computer and see if new “The Device \Device\Harddisk0\DR0 has a bad block” errors are still appearing inside the Event Viewer.
ABOUT THE AUTHOR
What to do if the computer does not see the internal hard drive
January 13, 2021
Likbez
Devices
Tips for those who do not boot the device or do not see an additional disk in the system.
Do the following in order. If the first fails, move on to the second, and so on.
What to do if the Windows computer does not see the hard disk
The disk is not displayed in the BIOS
1. If you just connected the hard drive, check if you did it correctly. Find the official instructions for your motherboard and hard drive on the manufacturer’s websites and follow all the recommendations.
2. If you are trying to install Windows XP or an older version and the system reports that there is no hard drive, make sure that the hard drive mode compatible with this OS is enabled in the BIOS — IDE. To do this, find the SATA operation setting in the BIOS (SATA Mode, SATA Configuration or with a similar name). Set the value to IDE, save changes and restart your computer.
3. If possible, test the hard disk drive by connecting it to another PC. It will work — look for malfunctions in the motherboard or other components of your computer. If not, you can take the hard drive to a service center.
The drive is not visible in Windows
1. Make sure the hard drive is enabled in the BIOS settings. To do this, restart the computer and, as soon as the machine starts to turn on, press the F2 or Del key (the desired key is usually displayed on the screen) until you get into the BIOS.
Then find the disk management section (Storage Configuration, Drive or something similar) and make sure that the desired hard drive is activated. Opposite it should be the inscription Active, On or something similar. Save changes and restart your PC.
2. Check if Windows has properly prepared the disk for use. First, open a command prompt window (Windows key + R), then enter diskmgmt.msc in it and press Enter. Read all system warnings carefully so that you do not accidentally format the drive or change the data written to it.
If you see a disk without a volume label in the Disk Management menu, this may be the cause of the conflict. Then right-click on the disk and assign a letter to it using the appropriate option in the context menu. Then restart your computer.
If in the same menu you see a new disk labeled «Not initialized», right-click on it, select «Initialize Disk» and follow the prompts of Windows. After initialization, click on the disk again to open the context menu, select «Create a simple volume» and follow the instructions of the system. Restart your PC when finished.
3. Download the latest SATA drive drivers from the motherboard or laptop manufacturer’s website and install them.
4. Check your computer for malware using an antivirus.
5. Try reinstalling Windows after saving all important data.
If none of the above help, contact the service center for assistance.
What to do if the Mac does not see the hard drive
The Mac does not boot
Image: Apple
If you have a more or less modern Mac, then it will most likely have one disk. And it is obvious that if there are problems with it, the computer simply will not boot. In this case, you need to diagnose using the Apple Diagnostics application.
Turn off your Mac and disconnect all external devices except your monitor, keyboard, mouse or trackpad, Ethernet cable (if applicable), and AC power cord or adapter. Make sure the computer is placed on a level, stable, and rigid surface for good ventilation.
Check if your Mac uses an Apple processor — look for your model in this list. Then proceed depending on the installed chip:
- If you have an Apple 9 processor0055 : Turn on your Mac and keep holding the power button until a window appears with a gear icon and says Options. Then press the Command + D keys on your keyboard.
- If you have an Intel processor: Turn on your Mac and immediately press and hold the D key on your keyboard until you see a progress bar or a prompt to select a language.
This will start the component diagnostic process. It takes several minutes. When finished, the test results will appear on the screen, including reference error codes, if any.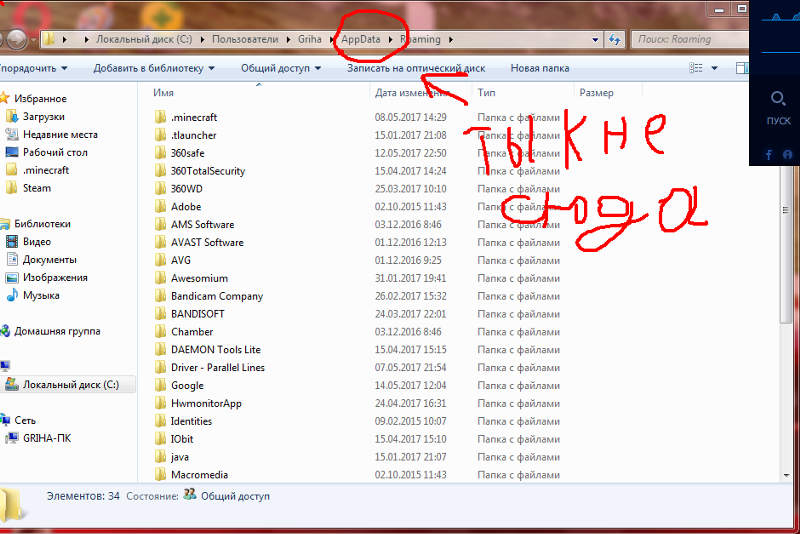
If a disk problem is detected during testing, you will have to contact the service. It is possible to carry out repairs on your own only on older models with HDD, and even then by replacing the disk with a new one.
The drive does not show up in the Finder
1. If your Mac has multiple drives and the problem is not with the boot drive but with the secondary one, the computer will boot but the drive will not be available. In this case, you need to check if it is displayed in the «Disk Utility».
To do this, open the application from the Applications folder → Utilities or via Spotlight and check if the drive is visible. If yes, then you can try to format it (keep in mind that this will delete all data).
2. If the drive is not listed in Disk Utility, check if your Mac recognizes it. To do this, you need to make sure that it is displayed in the «System Information».
Click on the Apple logo in the upper left corner of the screen, select About This Mac.
Then click the System Report button.
Go to Storage or SATA / SATA Express. Check if the desired disk is available there.
If the drive does not appear, you can test using the Apple Diagnostics utility as described above, and if errors are found with the drive, contact a service provider for repair.
The material was updated on January 12, 2021.
Read also 🖥
- How to choose a hard drive
- What to do if the computer turns on and immediately turns off
- What to do if the computer freezes?
The hard drive does not appear on my computer
Question from user
Hello.
Not so long ago I bought a new computer (ordered immediately with 2 hard drives). In order not to pay for the installation of Windows — I decided to do it myself, everything seems to work. But I go to «My Computer» — and I see only one drive («C:\»), on which the system itself is installed, and the second one is not.
Is it not working or am I misconfiguring something?
By the way, when installing the system, I saw two disks that could be selected under Windows. Strange somehow…
Mikhail (note: contacts are erased)
Good afternoon!
If you were able to select both disks under Windows when installing it, then for sure now the disk is invisible in Explorer due to the fact that it is not formatted (this is very common with new PCs / disks). As a rule, it is enough to open the special. utility in Windows disk management «(or third-party equivalents) and format it.
Below in the article I will show how to do this step by step, and also give a number of reasons.
And so …
*
- 1 Causes of Disk Invisibility
- 1.1 Drive Not Formatted
- 1.2 Drive Letter Conflict
- 1.3 Is Hard Drive Visible in BIOS/UEFI
- 1.4 What to Check First
- 1.
 4.1 Outgoing contacts
 - 1.4.2 Power failure
- 1.4.3 Try connecting the drive to a USB/other PC
- 1.4.4 Drive hardware failure
- 1.
→ Ask a question | add
The drive is not formatted
The most common cause: Explorer simply does not display an unformatted drive that it cannot recognize (and to which you, in principle, cannot write anything yet) .
To view all «visible» and «invisible» drives connected to the computer by Explorer, you need to run the « Disk Management » utility.
To open it:
- press the button combination Win+R ;
- enter the command diskmgmt.msc in line «Open» ;
- click OK (screenshot below 👇).
diskmgmt.msc — start disk management
Next, you will see a list of drives: usually new drives are marked «black» (as an unallocated area, see the screenshot below 👇).
To bring them into «working» fashion: click on the unallocated area with the right mouse button and select «Create a simple volume» from the menu .
Next, a step-by-step wizard will start, in which you can specify the drive letter, size, etc. In general, you can leave everything by default and agree to create a volume.
Create 1 more volume on unallocated space
Note!
If your drive is not displayed in Disk Management, then I recommend that you go into the BIOS and see if the PC could detect it at all. More on this in the article below.
*
By the way, the created volume needs to be formatted (when formatting, most often, the NTFS file system is chosen. You can see the difference in file systems here).
Important! Formatting will delete all data on the drive.
Disk management — format the drive
I note that after formatting the disk becomes visible in «My Computer» («This Computer»).
After formatting — the disk becomes visible in my computer
👉 ADDITION!
In addition to the standard utility «disk management» in Windows, you can use special programs for working with hard drives. For example, AOMEI Partition Assistant, Acronis Disk Director, MiniTool Partition Wizard, etc. They are also able to «display» all drives connected to the PC and format them.
Link to similar software (with pros/cons of each program): Programs for formatting hard drives
*
Drive letter conflict
By default, Windows automatically assigns a certain letter to all connected drives, say » Drive D:\» or «Drive E:\», etc.
But it sometimes happens that «overlapping» occurs and the letters match (for example, the hard drive letter can match some virtual drive) . Because of this, it is possible that your drive will not be displayed (even if it is formatted).
To fix this, simply manually change the assigned drive letter. To do this, open «Disk Management» (a little higher in the article describes how to do this) and right-click on the disk name, for example, «Local D» (see the example below 👇) — in the menu select «Change drive letter or path…» .
Change the drive letter
Next, change one letter to another (you need to select the one that you have not yet used).
Specify a different letter
After the changes, restart the PC.
*
Is the hard drive visible in BIOS/UEFI
specialist. programs for formatting drives.
In this case, you must first make sure that the drive is visible in the BIOS / UEFI. Simply, if it is not displayed in the BIOS, then you will not see it in any Windows program…
*
👉 Help!
If you do not know how to enter the BIOS / UEFI, then here is a small instruction on this topic.

In addition, usually, when buying a laptop / PC, it comes with tech. documentation (it also shows how to enter the BIOS and configure it).
*
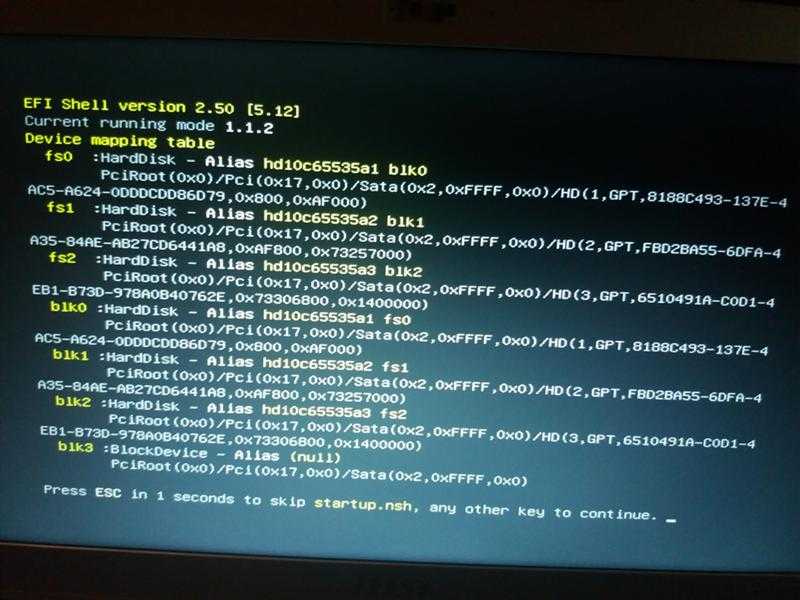
In most cases, in modern BIOS versions, information on drives is immediately visible (even no partitions need to be opened). See if the disk model, size, serial number is displayed.
Is the disk visible in UEFI (its model, size, etc.). On the screenshot, the arrow shows the hard disk (Storage) — its model has been determined, i.e. the disk is «detected» (clickable)
*
What to check first
If the disk model is not defined in the BIOS (or it is not visible at all that the disk is connected), then going to Windows and trying to configure is pointless. Most often, the problem lies in the hardware.
Outgoing contacts
First, turn off the computer and check all cables and disk contacts. The most common cause of «invisibility»: poor contact between the contact tracks of the disk and the cable.
By the way, if you have a disc that is already in use, take a closer look at these «tracks» to see if they are covered with dust or acidified. It is advisable to carefully clean them with an eraser (eraser, see the screen below 👇).
Cleaning contacts with an eraser
If you have a PC (and not a laptop, where there is no «choice»), try connecting the drive to other cables (often when one of the cables «plays» and does not provide a reliable connection).
*
Lack of power
Another very common problem when connecting a second/third drive to the system is a lack of power. This affects typical office system units more, in which, for the sake of economy, they put inexpensive low-power power supplies. As a result, when an additional drive is connected to the system, it may simply not have enough power.
*
How to recognize/determine this?
- monitor the operation of the disk (a characteristic feature of the work in this case): if there is a lack of power, the disk can be detected normally, but as soon as data begins to be written to it, an error occurs and it «disappears», becomes invisible (after a while it may again » to appear»).

- , you can try running the HWMonitor utility and look at power surges under load: if there are «dips» of 5% -7% (or more) — the power supply is clearly not coping;
- the easiest way: use a special device to connect the disk to the USB port (they are simply called BOX for HDD) . Moreover, BOX can be of different configurations (with and without a power supply): you need one that has its own power supply! If a disk with a power supply works fine, but without it it constantly «disappears» — the problem with power is «on the face».
*
Try connecting the drive to a USB/other PC
BOX . With it, you can connect the disk to a regular USB and see how it works.
Pay attention to the BOX design: there is nothing complicated about it. As a rule, it is enough to insert a disk into a box with a compartment, close it, connect the disk to the USB and power adapter with cables, and turn it on.
👉 Where can I buy such a thing?
Any computer store.
If you are not in a hurry, you can order for «penny» in Chinese online stores
BOX for connecting the drive to a laptop/PC
You can also use another PC/laptop to check the drive.
👉 Help!
How to connect a hard drive from a laptop to a computer — see step-by-step instructions
*
Hardware failure of the drive
If no tricks allow you to «see» the drive, it is possible that it has simply become unusable. By the way, there are statistics that 0.1% -0.3% of disks are damaged and become unusable during «long» transportation (especially in our country, where boxes with drives are often thrown and thrown during unloading) . Add to this a possible factory defect …
Therefore, even a relatively new drive can fail, and there is nothing so surprising in this…
If there is a warranty on the drive, just replace it. By the way, if you are dealing with an external HDD, then do not rush to throw it away.