Walkthrough — Call of Duty 3 Wiki Guide
By Andrew Eisen, IGN-Cheats, Matt Triplett, +273 more
updated
Select a chapter from the list below.
- Chapter One: Saint Lo
- Chapter Two: The Island
- Chapter Three: Night Drop
- Chapter Four: Mayenne Bridge
- Chapter Five: Falaise Road
- Chapter Six: Fuel Plant
- Chapter Seven: The Black Baron
- Chapter Eight: The Forest
- Chapter Nine: Laison River
- Chapter Ten: The Crossroads
- Chapter Eleven: Hostage
- Chapter Twelve: The Corridor of Death
- Chapter Thirteen: The Mace
- Chapter Fourteen: Chambois
advertisement
Up Next: Chapter One: Saint Lo
Previous
Weapons
Next
Chapter One: Saint Lo
Was this guide helpful?
In This Wiki Guide
Call of Duty 3 [Past-Gen]
EXAKT Entertainment
Rating
ESRB: Teen
Platforms
WiiPlayStation 2Xbox
The Flash — Official Big Game Teaser Trailer
On June 16, worlds collide. Watch the full trailer now for The Flash. Worlds collide in “The Flash” when Barry uses his superpowers to travel back in time in order to change the events of the past. But when his attempt to save his family inadvertently alters the future, Barry becomes trapped in a reality in which General Zod has returned, threatening annihilation, and there are no Super Heroes to turn to. That is, unless Barry can coax a very different Batman out of retirement and rescue an imprisoned Kryptonian… albeit not the one he’s looking for. Ultimately, to save the world that he is in and return to the future that he knows, Barry’s only hope is to race for his life. But will making the ultimate sacrifice be enough to reset the universe?
Tomb Raider: Reloaded — Official Launch Trailer
Tomb Raider: Reloaded is available now on iOS and Android mobile devices via the Apple App Store and the Google Play Store. Check out the launch trailer for another look at Lara Croft in action. Tomb Raider Reloaded allows players to jump back into the boots of groundbreaking adventurer Lara Croft in an action-filled quest to obtain the ancient Scion artifact, clearing ever-changing rooms filled with new and familiar enemies as well as hazardous traps and puzzles. Along the way, they’ll acquire run-specific abilities alongside permanent rewards like new gear, collect resources to help improve Lara’s stats and unlock new outfits, such as her fan-favorite bomber jacket. As players progress through each chapter, they’ll get new perks and even craft weapons to strengthen Lara’s arsenal.
Loading
How to Build a Display in Minecraft (Ft. WildEngineering)
Children of the Corn (2023) — Official Red Band Trailer
Possessed by a spirit in a dying cornfield, a twelve-year-old girl in Nebraska recruits the other children in her small town to go on a bloody rampage and kill all the adults and anyone else who opposes her. A bright high schooler who won’t go along with the plan is the town’s only hope of survival. Check out the creepy trailer for Children of the Corn, an upcoming movie starring Elena Kampouris, Kate Moyer, Callan Mulvey, and Bruce Spence. Based on the short story by Stephen King, Children of the Corn is a chilling new re-telling for a whole new generation. Children of the Corn, written and directed by Kurt Wimmer, opens in theaters on March 3, 2023, and will be available on Demand and digital on March 21, 2023.
Call of Duty: Black Ops 3 collectibles guide
Skip to main content
When you purchase through links on our site, we may earn an affiliate commission. Here’s how it works.
The Call of Duty wheel of bullet-ridden fortune has spun yet again and it’s time for Treyarch’s Black Ops series to step back into the limelight. Black Ops 3 ’s robo-tastic campaign has a total of 56 collectibles to add to your virtual swag bag, but don’t be put off by that gargantuan number — we’ve got you covered with a detailed guide to every last one of them.
The collectibles aren’t all the same this year either — each one is a unique item, so don’t expect a bunch of conveniently flashing laptops. Grab all the collectibles in any one level to earn the Walking Encyclopedia trophy or achievement. Swipe them all and you’ll be deemed a Curator and have another satisfying ping for your troubles.
Warning: This guide will contain spoilers, so if you want to avoid them you should play the campaign through normally before collecting each item.
Mission 1 — Black Ops
Collectible #1 — NRC Comms Earpiece
As soon you blast your way out of the air control room, head left down the stairs, crouch under the burning landing gear and turn right. You’ll see a flashing computer terminal with an NRC Comms Earpiece in front of it.
Collectible #2 — Dud RPG
After Hendricks stabs the guard and opens the gates, follow him through the compound to another door. Hendricks will take out the two guards sitting down and motion for you take control of the cameras. The Dud RPG you’re looking for is opposite the terminal, on the floor to the right of the big window.
Collectible #3 — Egyptian Army Cap
After your first proper gunfight in the service tunnel, follow Hendricks upstairs and breach the door to the right. Immediately to the left, you’ll find an Egyptian Army Cap in a pigeon hole (if you’re looking at the cap, the interrogation room will be to your right).
Collectible #4 — Replica Nano Drone
When you reach the hangar with the APC (the one trying to rip you to shreds, you can’t miss it), head inside and turn left — there’s a room adjacent to the stairs with a forklift truck inside. Head around the other side of it to find a Replica Nano Drone.
Collectible #5 — VTOL Panel
During the first section of the mission, and after your first encounter with the robot soldiers, head inside the garage. Once you’re in, run over to the other side of the room and you’ll see a VTOL Panel on a table to the right of another parked APC. Be quick though as you only have a short window before you’re attacked again.
Mission 2 — New World
Collectible #6 — Defective Robot Hand
After the destroying the generator, head through the same route you followed as a drone (through the big room with the girders and turn left into the refinery). You’ll see a wall of fire where you shot one of the hot metal containers. On the other side, in front of another spilled container, is a Defective Robot Hand.
Collectible #7 — Bomb Detonation Cap
During the third section of this mission, you’ll start off in a robot-filled train station. Take out the first few droids then head up the staircase to your left. It’ll lead to a dead end, but in front of an overturned bin you’ll see a Bomb Detonation Cap.
Collectible #8 — Model Maglev Train
When you reach a large, multi-storey room with a train carriage at the back you’ll have a big firefight with a bunch of robots and human enemies.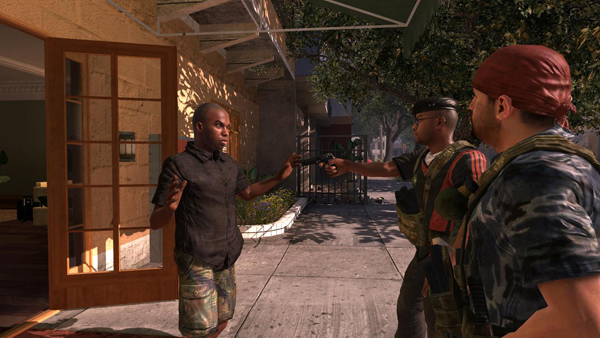 When they’re all cleared, head down the stairs to the lower floor and cross to the far end of the room. At the back you’ll find a Model Maglev Train on some shelving.
Collectible #9 — Premium Liquor
During the train section, you’ll drop through a glass roof into a carriage. Once you regain control of your avatar, head into the next carriage where you’ll see a bar. Take out the robot with your Takedown ability, then hop over the bar to collect your well-earned Premium Liquor.
Collectible #10 — Train Pass
A couple of carriages into the train section, you’ll find yourself in a carriage with stairwells on either side. Deal with the robots that drop down then make your way to the upper floor. Head to the left and you’ll see a Train Pass on the empty window seat of the front two chairs.
Mission 3 — In Darkness
Collectible #11 — Broken Respirator
After the cutscene with exploding collar you’ll have a firefight with a bunch of normal enemies and one tough Warlord. Once they’re all toast, head towards the big rubble pile then enter the the doorway on your left, On the other side of the partition you’ll find a Broken Respirator waiting for you.
Collectible #12 — Urn with Incense Sticks
After anchoring your way through the water surge section, you’ll turn right and see a large apartment building across another flooded area. Move through the water (watching out for a couple more surges), then head around the right-hand side of the building. Hop the fence and you’ll see an Urn with Incense Sticks.
Collectible #13 — Child’s Toy
After leaping from the crashing tanker, you’ll find yourself at the entrance of a submerged subway. Head down into the water and follow the path around to the right. Now keep swinging straight on into the blue seaweed and you’ll find a Child’s Toy on a bench below you.
Collectible #14 — Warlord’s Helmet
Following the underwater sequence, you’ll assault a lounge bar with a bunch of robots outside (there’s a huge ‘51’ written on the wall as soon as you enter the building). Clear the room, then head to the far end of the ground floor. Go through the double doors and turn left. You’ll find a Warlord’s Helmet in a room with candles.
Collectible #15 — Fu Dog Figurine
After speaking with Kane, you’ll head towards the compound with Hendricks. Before heading inside, turn right and follow a red staircase to the top. Turn right, take a run-up and leap over the gap to the building on the other side. Head through the room and into the next — a Fu Dog Figurine waits for you on the dresser to your immediate left.
Collectible #16 — Therapy Session Recording
Once you meet back up with Kane in the blacksite, head up the stairs that head around to the right. When you reach the top, bear left and you’ll find a Therapy Session Recording on a table. Nab it to complete the collectibles for this mission.
Mission 4 — Provocation
Collectible #17 — Gangster Bling
As soon as the mission starts, you’ll see three buildings divided by two alleyways. Jump down to the ground and head right — the blue building on the far-right is the one you’re looking for. Head into the open garage and you’ll find some Gangster Bling on top of a red generator.
Collectible #18 — Supertree Souvenir
After picking up Collectible #17, head down the far-right alley. After dispatching a Warlord, move towards a neon sign with four characters in red. Head through a small gap to the left of this stand and you’ll see a Supertree Souvenir on a table.
Collectible #19 — Dud Slave Collar
After leaping over a short gap towards a building with a flashing neon sign on one side, take an immediate left and head into the doorway. Head up one flight of stairs and you’ll a Dud Slave Collar propped up on a table to your right.
Collectible #20 — Antique Vase
When you reach a pile of broken cargo containers, Kane will ask you if you want to go left or right. Go right, climb up into the orange container, turn left, then left again before crossing a small bridge with barriers on either side. At the end of this bridge you’ll see an Antique Vase sat on the lip of a blue container.
Collectible #21 — Mineral
As soon as Kane mentions the Wraith, and how you shouldn’t engage it, head up the stairs to the upper floor (it’ll have lots of a giant stone column covered in ivy in the middle). Just before the column, you’ll see a display cabinet with a light inside. Head to the other side of it to collect a Mineral.
Collectible #22 — Bullet Shell Necklack
After crossing the bridge leading to the burning Supertree, take the left path (the ‘exterior’ path). Head up the staircase — instead of taking the Z-Trak in front of you, take the one behind you and to your left. Once on the left-hand side of the map, move up the stairs and make your way across the bridge. On the other side, take the stairs to your left that lead to the lower floor. On top of a white container you’ll find a Bullet Shell Necklace.
Mission 5 — Hypocentre
Collectible #23 — 54i Data Pad
As soon as the mission starts, follow Hendricks as his runs down the green slope to the right. As you head down, you’ll notice a tent covered in tattered yellow cloth. Sneak inside and you’ll find a 54i Data Pad waiting inside.
Collectible #24 — Contamination Test Kit
After entering the Coalescence Centre reception (the one with all the big screens that come to life). Head left and following the corridor as it curves around. At the end you’ll find a Contamination Test Kit on a table.
Collectible #25 — Coalescence Marketing Material
After descending to the bottom of the giant circular shaft, head to the right (keeping to the edge of the chamber) until you reach an open door. Go in and you’ll see some Coalescence Marketing Material on a table.
Collectible #26 — Bio-containment Canister
After you and Hendricks locate the damaged the damaged recon droid, head through the doorway with the red-lite doors. Take an immediate left into an office and you’ll see a yellow Bio-containment Canister on the floor to the your left.
Collectible #27 — E-Ink White-board
As soon as the cutscene where you and Kendricks discuss being wary of Kane concludes, head to the right-hand side of the human test trials chamber. In an alcove, you’ll find a E-Ink White-board.
Collectible #28 — Prototype DNI-Implant
After the encounter with the zombie robots in the flooded laboratory, head to the other side, exit the water and enter the doorway. Take an immediate left and on the left-hand side of the room you’ll find a Prototype DNI-Implant on a shelf.
Mission 6 — Vengeance
Collectible #29 — Damaged Optical Camo Cloak
As soon as the mission begins, turn left and head down the alleyway. Turn left and you’ll see a Damaged Optical Camo Cloak lying near a lit doorway.
Collectible #30 — Bio-Luminescent Orchid
In the large compound with the pond in the middle, take out all the guards first (ignore the drones). When the coast is clear, head into the compound from the right-hand entrance (from the direction you begin this area). Keep to the left and move through four different sections of the compound. When you reach the fourth, turn right and you’ll see a Bio-Luminescent Orchid in the shadows.
Collectible #31 — HCXD Bomb Sniffer Robot
After your dust-up with snipers, the regular 54i soldiers and the AVC robot, head through the giant rectangular hole in the wall left by the giant ‘bot. Turn left and you’ll see a HCXD Bomb Sniffer Robot on the floor.
Collectible #32 — Dragon Necklace
After entering the burning facility, head up two flights of stairs, blasting robots as you go. At the top, head through the hole in the wall to your right. There’s another hole in a wall to your left. Destroy the robots inside and head to the right-hand side of the room. You’ll find a Dragon Necklace on a table next to an armchair.
Mission 7 — Rise & Fall
Collectible #33 — NRC Helmet
As soon as you finish your tour of Ramses Station with Khalil, head over to the table to your right, In front of a set of screens you’ll see an NRC Helmet just waiting to be added to your collection.
Collectible #34 — Broken Stained Glass
As soon as the NRC assault begins, head into the main room of the station (a VTOL with crash through the ceiling as you approach). Turn left and go up the escalators. At the top, turn right and you’ll see a large, red-tinged container. In between the container and the wall is a table — on that table is a piece of Broken Stained Glass.
Collectible #35 — NRC Propaganda Poster
After boarding a truck with Hendricks and Khalil you’ll soon find your way barred by a portable wall. Once you’re off the truck and back in control, go through the small door that opens to your left. Turn left immediately and you’ll see a NRC Propaganda Poster on the wall.
Collectible #36 — Officer’s Military Sword
On your way to Abdeen Palace you’ll move through a dimly lit building before emerging onto some brightly lit rooftops. Head to the right, mopping up any NRC soldiers as you go and head into through a hole in the wall to your right. Move down the darkened staircase and out into a room with circular rug, and greenish sofa. An Officer’s Military Sword will be on a dresser to the left.
After fighting your way across a large courtyard, you’ll make your way into a burning building.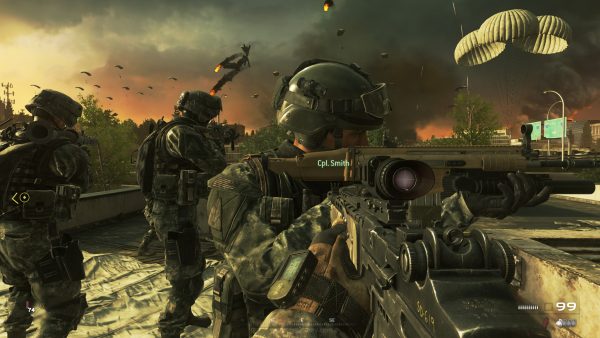 You’ll soon soon come across a crashed VTOL. Turn right before the VTOL to find a Piece of Broken Statue on a table.
Collectible #38 — Etched Glass Bottle
After you emerge from the fallen VTOL, run to the right-hand side of the area, through a blasted open entrance and up a gold-lined staircase. At the top of the staircase, turn right, then left, then left again. In front of a large vase you’ll find an Etched Glass Bottle.
Mission 8 — Demon Within
Collectible #39 — Shell Casing
After falling into the battle of Bastogne, move to the right-hand side of the area you’re in. Follow the wall along until you reach a small wooden dugout. Inside the dugout you’ll find a Shell Casing ready for collection.
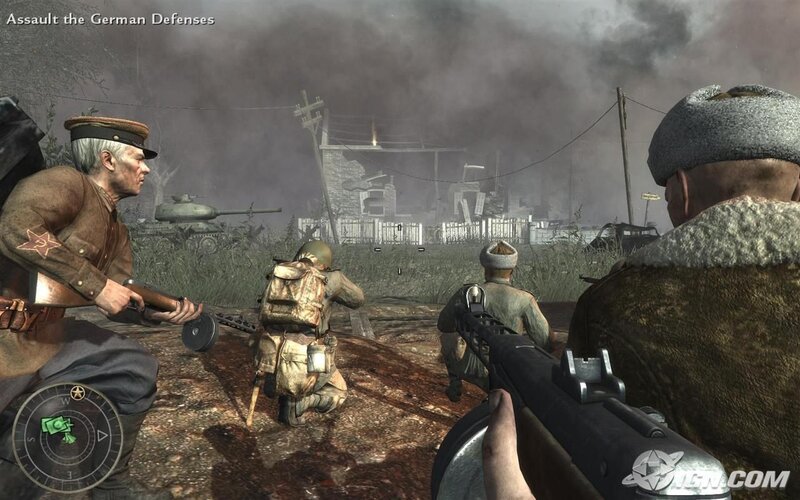
Collectible #40 — WWII US Field Radio
As you progress through the snowy battle, a pair of German armoured cars will drop into place as part of the environment. Behind the cars and to the left you’ll see a wooden platform with camouflage webbing over the top. Head onto the platform to find a WWII US Field Radio on a table.
Collectible #41 — Field Binoculars
After Sarah turns the map from day to night, you’ll face down a pack of direwolves. The wolves will keep coming so head to the left of the map and you’ll find a pair of Field Binoculars on a table.
Collectible #42 — Russian Field Compass
After the revelation regarding the ritualistic killings at the blacksite, you’ll be thrown back into the WWII battle. After leaving the house, fight your way over to the barn. Head through a hole in the wall on the left-hand side of the structure, head up the stairs and you’ll find a Russian Field Compass on a table in front of you.
Collectible #43 — Russian Hat
Once you’ve progressed to the next battle, you’ll see the battlefield in the distance has been pulled up Inception-style. Clear out a few German soldiers, then head left towards a small outhouse. Once inside you’ll find a Russian Hat (however, keep in mind it’s really dark inside so it’s easy to miss).
Collectible #44 — Wagner Gramophone Record
The final collectible for Demon Within is found near your first encounter with the Sherman tank. Run past the tank towards the half demolished house (the rubble now forms a nice ramp straight into the house. Turn left and you’ll see a Wagner Gramophone Record on the wall.
Mission 9 — Sand Castle
Collectible #45 — Postcard
After landing your VTOL for the first time, hop off your plane and head towards a multi-storey cabin directly ahead of you (it has the words ‘Pivot controls’ written on the outside). Go up one flight of stairs and enter the cabin. A Postcard can be found on the shelf to your immediate left.
Collectible #46 — Industrial Drillbit Parts
Land your VTOL a second time, leap off and move off the landing pad. Take a left and you’ll see some Industrial Drillbit Parts on the floor. Grab them to complete the collectibles for Sand Castle.
Mission 10 — Lotus Towers
Collectible #47 — Hamsa
As soon as Khalil takes you up to the upper levels of the Lotus Towers, head across to a shop with a yellow bar of lights across its top. Inside and on a wall to the left you’ll find a Hamsa.
After moving through the vents, assault the control room with the orange screens. When all of the NRC guards have been taken care of, head towards the lockers on the left-hand side of the room. You’ll find Taylor’s Insignia inside one of the lockers.
Collectible #49 — Hookah
As soon as you seen an Egyptian soldier run over by a robot ball of serrated death, turn left and head up the blue-tinted stairs to the right.Turn left at the top and you’ll find a Hookah sat on the table at the end.
Collectible #50 — Wall Hung Carpet
After crossing the half-destroyed skybridge, climb up the rubble and you’ll see a blue sign on its side. Turn 180 degrees and head across the roof of the area you just crossed. Halfway across, underneath a rail you’ll find a Wall Hung Carpet.
Collectible #51 — Decorative Lantern
After moving up a collapsed tunnel, you’ll emerge onto another burning platform. Run past the shorted-out robot charging station, turn right and rum up the short ramp. Behind a partition to your immediate left you’ll find a Decorative Lantern on the floor.
Collectible #52 — Melted Robot Part
After leaving Hendricks behind to fend off the robots, head up to the roof to confront Taylor. Once the giant ship starts attacking you, take the right-hand exit out of the room you resume control in and head for the ruins in front of you. On the floor in front of a destroyed console you’ll find a Melted Robot Part.
Mission 11 — Life
Collectible #53 — Promo Poster
As soon as the mission begins, turn around and head over to the Zurich Coffee House across the road. On the wall beside a door you’ll find a Promo Poster just waiting to be grabbed and added to your collection.
Collectible #54 — Prototype Robot Part
After leaving the lift with Kane, follow the marker until you come to an office with a large glass display directly in front of you when you enter. Turn left and you’ll find a Prototype Robot Part on a desk with monitors on it.
Collectible #55 — Fulgurite
After entering the Egyptian desert-esque dreamscape you’ll come across one of the temporary walls, with a set of buildings behind it. Deal with the enemies that materialise through the door, then head to your left. You’ll see a stone block beside the left-hand building, climb it and use it to climb the two ledges above. At the top, go right around the wall then wall to the end. Climb up one last time and you’ll see a Fulgurite in front of you.
Collectible #56 — Raven Feather
The final collectible can be found after you begin the purge of Corvus. While the screen says ‘Purge’ and a counter slowly rises to 100%, move out the door and towards the big ‘Coalescence’ sign. There’s a desk there — move to the other side of it and you’ll see a rather fitting Raven Feather waiting for you.
Congratulations, you’ve found every collectible in Call of Duty: Black Ops 3 and unlocked the Curator trophy or achievement.
Get the best gaming deals, reviews, product advice, competitions, unmissable gaming news and more!
Contact me with news and offers from other Future brandsReceive email from us on behalf of our trusted partners or sponsors
Dom has been a freelance journalist for many years, covering everything from video games to gaming peripherals. Dom has been playing games longer than he’d like to admit, but that hasn’t stopped him amassing a small ego’s worth of knowledge on all things Tekken, Yakuza and Assassin’s Creed.
GamesRadar+ is part of Future plc, an international media group and leading digital publisher. Visit our corporate site .
©
Future Publishing Limited Quay House, The Ambury,
Bath
BA1 1UA. All rights reserved. England and Wales company registration number 2008885.
Passage of Call of Duty — passage of the first part
Mission 1. The discoverer
After the fees you will be transferred to the airliner, which is heading to France, namely to Normandy. At night, you, along with Sergeant Heath, will find yourself in the small town of Saint-Eglis, in which the enemy has settled. Your main goal now is to do everything possible and send a signal so that your allies can go on the offensive in these lands covered by the Germans. In the further passage of the Call of Duty game, you will find yourself in a large area, which will enclose a high fence around the perimeter. Now look carefully around and find your partner. But you won’t be able to see it yet, so don’t be discouraged because it seems to have landed a bit different from where it was planned. Now a truck will pass near you, wait a bit and only when it is out of sight, you can head towards the house that you see on the top of the hill. Be careful, because now one of the Germans will meet you. Grab the weapon and eliminate it immediately so that it does not have time to inform others of your presence.
Once inside, look around and find the receiver, which should lie on the table and reproduce German motifs. Also next to it you can see a first aid kit. Then, in the walkthrough in Call of Duty, you need to get away from this room, moving to the western part of the location. Once in a small landing, look around and see that the body of one sergeant is hanging from a tree. There is a bag lying nearby, come and take it for yourself. Then carefully you need to listen carefully in order to understand where the conversation of the Fritz comes from. Go to the bunker and shoot the two Germans who are playing chess. Then exit the bunker to a large field. By the way, this place can be used for landing. Run and set up a beacon there, with which your accomplices will be able to determine your location. They’re about to arrive. As soon as the landing stops, quickly go with everyone to the buildings that are nearby. Be especially careful, because you will be fired from all windows. Get to the entrance to the farthest building and go there. After you deal with the opponents, go to the second exit to move to the next courtyard.
 Once in the next building, just cross it and exit, then to turn to the right side. After going a little forward, you will need to climb into the trench. And you can get to it through a passage broken in a brick fence. On this, the passage of the first mission will stop, proceed to the second one.
Mission 2. Sept. Mer. Eglis
It is through this trench that you can get to the minefield, through which it is still possible to cross. To continue the passage of this minefield in Call of Duty, you need to crawl through the very center of the field. You will see huge pits left after mines were detonated. I advise you to lie down in these craters and wait until the Germans stop firing at you. As soon as the fire subsides, move on until you can see the clear outlines of houses in front of you. Get your gun and aim at the opponents, and then shoot everyone. Only after all the buildings located near the railway tracks are cleared of enemies, you can move on and capture the station. After crossing the rails, quickly head to the almost destroyed wall, lined with bricks. Then turn to the right side and head very quickly to the entrance that is on the side. Thus, you will find yourself inside the railway station. Once you eliminate all the enemies, approach the window and take out the rifle.
Aim at the German driving the APC, shoot and kill him. Then, in the passage of the Call of Duty game, you need to take your feet out of this building and once on the street, go to the almost collapsed wall. Stop near it and examine the area. You will see that across the road there are buildings in which the opponents have settled down, setting up an ambush there. Move forward and try to destroy as many Germans as possible, and then run across the track and move to the last building. Once inside, look for an exit that will lead you to the courtyard. It is through it that you can find the path leading to the cemetery. It is worth noting that the Fritz settled in the chapel. They are waiting for your appearance, so be careful and destroy them all together with your squad. Then find a passage broken in the wall and climb through it. Now go to the right side and look around. When you see an anti-aircraft gun, then head towards it. In the further passage of this mission in Call of Duty, you need to eliminate machine gunners and other fighters walking around nearby. As soon as all opponents are destroyed, get the explosives and head with it to the body of the self-propelled gun. After it is laid in it, take your legs to the maximum distance, such that you are not hooked. After the explosion occurs, get out of hiding and join your squad. Now we need to move to the square with them.
After walking a little, you will see another anti-aircraft gun in the center, quickly run to it and repeat the same steps as the previous time with the self-propelled gun. After the Germans are killed, advance into the narrow hole located between the hotel and the almost collapsed building. After leaving it, you need to turn to the right side and run to the next house in order to cross to another street. Coming out on it, you will see that almost in the middle of the road there is a car that is slightly hooked. Be careful, because it is guarded by a fighter with a machine gun on the right side. Now in the passage of the game Call of Duty you should move across the road and lean against the wall of the house. Listen carefully and slowly move in the direction where you hear the machine-gun fire. So, you will find yourself in the rear of a machine gun ambush. As soon as you destroy the fighter, immediately deal with the natives of the self-propelled gun. Then head to the anti-aircraft gun to plant a bomb on it. Kill to the maximum safe distance and wait for the explosive to detonate. Everything, it is now considered that the second mission is completed.
Mission 3. Sept. Mer. Eglis. Day
Before the sun has risen above the horizon, the Fritz will begin to regroup. If you look into the sky, you will see how enemy planes fly over the territory of the captured town. Join your squad and with them move across the road, straight to the small building. It was once used as a bank. Once inside, carefully examine it after you hold a meeting with your comrades. As soon as you cross the threshold of the room, you will be able to see the approaching Germans from the left. And if you look at the crossroads, you will see an approaching enemy tank. While your comrades are fighting the Germans, move towards the almost collapsed church. It can be reached if, without crossing the fence made of bricks, turn to the left. Once inside the building, find and pick up a charged grenade launcher. Then you can move to the tank at such a distance that it is clearly visible in the sight of the grenade launcher. Then, in the walkthrough of Call of Duty, shoot him and return to the church. Now you can move to the wall, near which there is one of the machine guns. Approach him and look into the scope.
 So, now the old cemetery falls into your field of vision, along which the Germans calmly walk. Take a weapon and start firing at the opponents. Eventually, they will start to run away. As soon as you leave the church building, you should go to the opposite building. Once inside, you can go to the exit that will lead you to the square. You now need to move to its northern part.
Be careful, because as soon as you get around the corner of the building, you will be attacked by enemies. After you shoot them, get ready to meet the enemy tank. Now you have to try your best to get back to the church to get the grenade launcher with which you can disable the tank. It is worth noting that during these manipulations you will be under the cover of your comrades. Once the tank is destroyed, go to the crossroads and turn left. There is another enemy tank there, do the same with it as with the previous one. Then go out onto an empty street, and walk along it until you hit the barbed wire blocking the path. Now you need to focus and look around. And then come and look closely at the fence, in which huge holes gape. If you approach them and look, you will see how the Germans carried out their fortification. You can safely advance and tear them to pieces with a sniper rifle. As soon as you clear the area, you can go down. In the further passage of this mission in the game Call of Duty, you will come out to a trench, having crossed over which you will find yourself near a building with walls that are still intact. You can go around it to finish off two enemies. After that, you will see how your allies drive the car out of the garage. Go to her and sit in the front seat. As soon as a conversation with like-minded people takes place, you can move forward, the final stop of which is the headquarters of the regiment. Do your best to keep the road clear.
Mission 4. Normandy Route #13
Just to warn you and say that the whole passage of this task in Call of Duty is that the car ride will be very hot. You, along with your comrades, will pass through the territory, which is overflowing with enemy units and military equipment. Also, fighter jets will drop bombs on you from the sky. I advise while riding in transport, lean out of the window (F) and fire at opponents so that they cannot shoot through the wheels of the car. Almost in the middle of your road, you will run into a small town in which you will find yourself in a trap. As soon as the explosion thunders, get out of the transport and look for shelter in the next car. If you look back, you will see a lying stove that used to be on the house. Go to it and climb inside the building. If you go to the end of the corridor, you can find yourself on another street. Look around and notice the broken car. But do not expect that you will be able to leave on it. Just run past it and then turn the corner. So, not far from you is a building in which a garage is open. And it has a jeep. Just be careful, because in the uppermost window there is a shooter who needs to be killed first, and only then move forward to the army jeep.
 As you progress through Call of Duty, you should quickly get behind a machine gun and fire at opponents while your allies try to steal a car. As soon as this happens, jump into it with lightning speed and advance into the road. You will travel quite a bit, because you will soon stop near the headquarters of the regiment, which you had to get to.
Call of Duty navigation
- Game overview
Walkthroughs
Cheat codes
- Complete list
Call of Duty files
- Patches
- Patches
- Russifiers
- Add-ons
- Mods
- Videos
- Trailers
Personal Decorator Trophy / Medalist of the game Call of Duty: Black Ops III
All medals in order of placement on the stand:
1. Captain. Master of Arms — Earn all Campaign Weapons, Attachments, and Camos.
Everything seems to be clear with this section, you need to upgrade all guns to the maximum to open all attachments and camouflages. M3G and Annihilator also need to be upgraded, despite the fact that the choice of camouflage on these guns is impossible
2. Striving for excellence. Dedicated to Excellence — Fully upgrade all Cyber Cores
You need to purchase all Cyber Cores and upgrade them.
3. Techno-Advantage. Armament Superiority — Unlock and purchase all weapons, lethals, tacticals, and CyberCombat Abilities.
You need to get lvl 20, open all weapons and grenades
Attention! To receive a medal, it is not necessary to open the cyber abilities of Tak-Kom!.
4. Hero. Heroic Service — Complete the Campaign on the Veteran difficulty setting.
Complete the game on Veteran difficulty.
5. Legend Part. Legendary Service — Complete the Campaign on the Realistic difficulty setting.
Complete the game on Realistic difficulty.
6. Eternal Glory. Immortal Fame — Complete every mission in the game at least once on Veteran without restarting from a checkpoint.
Complete all missions on a veteran without dying.
7. Chronicler. Chronicler — Locate all of the Collectibles in the Campaign.
Collect all collectibles
8. More than expected. Above and Beyond — Complete all Accolades for all Missions.
You need to get all the rewards in each mission.
Mission rewards
9. Call of Duty. Duty Calls — Complete all Campaign Challenges.
Through the Options view of all campaign trials, the «quests», «weapons» and «career» tabs must be completely closed.
10. Good results. Tried and True — Earn a score of 35,000 in the Training Simulator.
Earn 35,000 points in combat mode.
11. Reaper. Grim Reaper — Neutralize 2000 hostiles.
Kill 2000 enemies
12. Full honors. Full Honors — Earn all Campaign Decorations.
Through the Options view of all campaign trials, the «quests», «weapons» and «career» tabs must be completely closed. Medals 1-11 must also be obtained.
In the «career» tab there is a test «pass the combat training mode on the realism difficulty level» — an example of passing without a glitch https://www.youtube.com/watch?v=jOjUfYCG_H8
Update: Glitch on the training mode on the realist, patch 1.03 — the glitch works
The essence of the glitch:
ATTENTION! Both players must complete mission #3 of the campaign before using this glitch!!!
1. The host, together with the second player, enter the shelter through the lobby;
The host must enter the hideout, it must have a realist difficulty, if not, then he chooses the difficulty confirms and re-enters the hideout;
2. The host sits in any chair and chooses nothing, waits;
3. The second player leaves the lobby and joins the host through the friends tab in the PS4 menu;
4. The second player sees the sitting host and tries to sit in his chair, the button is not highlighted. The task is to approach and hold if the animation did not go through and the second player did not sit in the host’s chair, then he must leave the lobby and repeat the actions until the animation starts and he does not sit in the chair;
5. When the host and the second player are in the same chair, both should start training at about the same time;
6. After the start of training, you will be in the same arena. In fact, opposite each other, in front of each of you there will be a ball — «start the mission»;
7. The second player starts the mission, the host also starts the mission;
Then the second player can simply die, and the first (host) will be immortal until the end of the training. Estimated time per person is 15 minutes.