Destiny 2 Izanagi’s Burden Quest: Complete Walkthrough- VeryAli Gaming
Last updated:
Table of Contents
Destiny 2 features tons of weapon and gear variety. Players can choose from a shotgun, pistol, sub-machine gun, rocket launcher, sword, and sniper rifle. Of course, the exotic weapons are the cake of Destiny 2’s armory. However, acquiring these rare yellow-labeled exotic arsenal is always tricky, and most, if not all, the times a questline completion is required. We have curated Destiny 2 Izanagi’s Burden quest guide to breaking down all the steps so that guardians can get their hands on this exotic sniper rifle in the game.
Acquiring the Izanagi’s Burden Sniper rifle requires the completion of three key steps. These steps demand a guardian to complete Forges multiple times on maximum temper, acquire four keys, and collect a rare item called Obsidian Crystal. After successfully pulling off all three steps, Ada will reward the Izanagi’s Burder Sniper rifle.
Before walking down the path of collecting four keys called Volundr, Gofannon, Izanami, and Bergusia, a guardian must play the Volundr Forge. Get the Mysterious Box once you are in a cave near to Volundr Forge located in the EDZ. Near the ravine that is followed by the rocky path, you will see the cave containing Black Armory Box. You’d receive the Mysterious Box once you interact with it.
Mysterious Box Location
Opening this box will require four keys, and here is the complete breakdown of the questline, highlighting how to complete each stage.
Collecting Four Forge Keys
After collecting the Mysterious Box, players need to run each Forge (Volundr, Gofannon, and Izanami) at maximum temper to get the named keys. Opening the Black Armory crate will reward guardian with the named key at the end of each Forge run at max temper.
How to Get Maximum Temper On A Forge
In order to make a Forge reach max temper, the guardians need to shoot two shielded robot guards. These two drones usually spawn as the second round of a Forge starts. Moreover, there is a limited time window (20 seconds max) on a shielded robot to respawn from the first time it spawned. Guardians need to take out both shielded drones before one of them respawns, so coordination is the key element here.
The shielded drones to destroy
You May Find This Interesting: Destiny 2 Master of Disguise Triumph
After taking down the shielded drones, as shown in the image above, guardians must complete the Forge run and interact with the Black Armory crate to receive the key.
Acquiring The final Key – Bergusia Forge
To proceed further the Destiny 2 Izanagi’s Burden quest, the guardian must talk to Ada, and she will give players a Black Armory Key Mold. The next step involves visiting the Leviathan Raid’s underbelly area where watcher robots spawn.
Black Armory Key Mold Quest
The guardian must collect these watcher robot lenses to proceed with Ada’s quest. Moreover, there is no telling how many watcher robot lenses need to be collected. However, a total of 24 watcher lenses are required from the Leviathan Raid underbelly to proceed further.
Finding the Leviathan Raid Underbelly
Just in case if you have forgotten how to reach the underbelly of Leviathan Raid, guardians must immediately drop down the stairs at the end of the floor. Here is an image for reference.
Leviathan Raid Lever Room Location
After climbing down the stairs, you will come across a room with six levers. To proceed ahead, guardians must interact with all six levers starting from the left end to the right end in 1, 5, 3, 2, 4, 6 order. Here is an image for reference.
Lever Room – Leviathan Raid
After successfully interacting with all the levers, a prompt will appear at the bottom left of the screen, indicating a door has opened. Instead of going into the launchers, the guardians must go one ramp higher to the control panel through pipes. The guardians must interact with the fan and go up using the air thrust. Once up, run to the end of the path and reach the Engine room, which contains at least 04 watchers.
You might find this interesting: Best Fusion Rifles Destiny 2
You must kill three out of four watchers first, then kill the remaining ads in the room, and finally kill the fourth watcher. After pulling it off in the order as mentioned, exit the room and let the door shut before doing the reset. Repeat the same process to acquire 24 watcher lenses and move on to the next steps of questline.
Collecting 200 Glittering Amethyst
The next step to proceed Destiny 2 Izanagi’s Burden quest is to collect 200 Glittering Amethyst. Unlike getting Upgrade Modules, collecting 200 Glittering Amethyst is relatively quick and easy. Heroic public events and Strike events reward 20 resources. So, the guardians must grind either of the mentioned events for at least 20 times to accumulate 200 Glittering Amethyst.
Play The Bergusia Forge
Now, the guardians must play the Bergusia Forge and complete it at the maximum temper. Before embarking on this mission, a 650 power level is recommended, so team up if you are below 645. Also, you must find and take down the two shielded drones to reach a max temper for the Forge. After completing the Forge at max temper, interact with the Black Armory chest and receive the last key. Now that you have all four keys interact with the Mysterious Box and receive its contents.
Ada’s Obsidian Crystal Quest
After opening the Mysterious Box with the four Forge keys, the guardian must visit Ada. She will task the guardian to acquire an Obsidian Crystal that is acquired from a Black Armory bounty.
Obsidian Crystal Quest Step
The chances to receive this item are not great; however, the guardian must complete these bounty challenges to get a chance of receiving the Obsidian Crystal.
A Similar Read: Best Titan Build Destiny 2
Completing Three Final Missions
After completing all the steps mentioned above, the guardian must complete the final requirement: finish three missions from the very start to end without dying in any. The guardian must complete three missions as mentioned below.
- Shattered Throne: Launch the regular version of mission and kill Dul Incaru to progress the quest.
- The Pyramidion: The mission must be launched at 640 power level with Solar Singe, heavyweight, and extinguish modifiers). Moreover, the mission must be launched through a quest on IO only. Initiating the mission through strikes will not count towards quest progression.
- EDZ Mission: The main objective at EDZ is to defeat Siviks and for that, you must launch the quest from the patrol manually.
Completing all the steps mentioned above marks the end of Izanagi’s Burden quest. To receive the sniper rifle, visit Ada, and she will reward the guardian with Izanagi’s Burden weapon, ending the questline.
Izanagi’s Burden Sniper Rifle Stats
Destiny 2 Izanagi’s Burden Quest Summary
Now that you have thoroughly read all the steps required to complete this quest and acquire an exotic sniper rifle, here is the quick rundown of the entire thing.
01: Reach the Black Armory Box from Volundr Forge.
02: Interact with the box and receive Mysterious Box.
03: The box requires four keys, each named after the Forges in the game.
04: Play all Forges on maximum temper to receive the keys.
05: Visit Ada and complete a few more steps tied to the questline.
06: Get the Obsidian Crystal and talk to Ada again to receive the exotic sniper rifle Izanagi’s Burden.
That is pretty much everything you need to know about how to get Izanagi’s Burden sniper rifle. Did you get the weapon already? How well do you think this sniper rifle is in Destiny 2? Let us know your thoughts in the comments section below.
Was this helpful? 🕹️
Good job! Please give your positive feedback 😏
How could we improve this post? Please Help us. 💡
Destiny 2: Black Armory Mysterious Box quest and Izanagi’s Burden guide
Over the last week, players have been hunting for keys to unlock an item called the Mysterious Box in Destiny 2: Black Armory. The box is a quest which leads to the Izanagi’s Burden, a sniper rifle. But getting through the quest is the only real burden. There are quite a few steps standing in the way of you and your fancy new sniper. That’s where we come in.
Heads-up: If you randomly get a rare bounty from Ada-1 — they drop from her normal, daily bounties and reward powerful gear — complete the objective and then hold onto it. You’ll need to turn one in for a quest step, so it’ll be very useful to have one banked at that point.
Table of contents
Finding the Mysterious Box
Finding the first three keys
- Volundr key locations
- Gofannon key
- Izanami key
Forging the fourth key
- Return to the Leviathan
- Public Events and Strikes
- Temper Bergusia
Completing a rare bounty
Do Shattered Throne
Do the Pyramidion quest
Take down Siviks once and for all
Finding the Mysterious Box
The easiest part of this quest is finding the Mysterious Box, the quest item that you’ll shove all your keys into.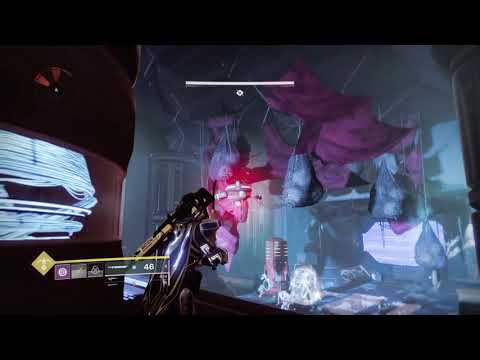
Once you start Black Armory and gain access to the Volundr forge, walk into the arena, jump over the bridge and immediately do a 180. Follow the path down the rocks to a small cave next to the ravine. Walk in and you’ll find a small Black Armory box. Open it to receive the Mysterious Box.
Bungie via Polygon
Finding the first three keys
Great job! You found the box. This is where things get a bit tougher if you’re trying to do this all by your lonesome. The Mysterious Box requires four keys to be inserted into it. The first three keys are in the first three forges. The fourth and final key is a bit more complex, so we’ll save it for its own section.
Volundr key locations
Since you’re already here, jump into the Volundr forge.
Complete the first wave like normal, and get ready to spring into action with a longish range weapon — a sniper or scout will do just fine. Between waves, two shield drones will spawn on either side of the arena.
The first drone is on the left side facing the forge, floating around on the far left tree in the distant island.
Bungie via Polygon
The second is in the cave area to the right of the forge, floating around on the ceiling near some stalactites.
Bungie via Polygon
Once you’ve killed both drones, you should see a Maximum Temper buff on the lefthand side of the screen. Complete the rest of the forge like normal. When you kill the boss, you’ll notice that a Black Armory box has dropped near the forge. Open it to receive your first key.
Interact with the key in your inventory to slot it into the lock on your Mysterious Box.
Gofannon key
This key is probably the easiest to get on your own. Set yourself up with the same weapons as you did in Volundr. Between the first and second wave, stand around the crashed ship at the very back of the arena.
One shield drone will be floating around in the skeleton of the ship.:no_upscale()/cdn.vox-cdn.com/uploads/chorus_asset/file/13685164/Destiny_2_Screenshot_2018.12.14___00.16.31.24.png)
Bungie via Polygon
The second is to your left if you’re looking at the ship, floating around a pillar sticking out of the ground.
Bungie via Polygon
After getting the Maximum Temper buff, collect your key from the box just like last time.
Izanami key
To get this key on your own, you’ll definitely need a sniper rifle. After the first wave, as you’re looking back at the entrance to the forge, position yourself on the island on the right.
Drone one is on the island you’re standing on. Look toward the forge and you’ll see a small pillar poking out that’ll have the drone floating around it.
Bungie via Polygon
Drone two is across the vast pit, and is floating around a darker pillar farther away from the edge, close to the cave entrance to the arena.
Bungie via Polygon
Finish the forge with Maximum Temper activated and claim the third key.
Forging the fourth key
Now that the Bergusia forge is open, Ada-1 is offering the key mold for the fourth and final key. You’ll need to build this thing through a long and occasionally obnoxious quest line. But the reward is well worth it.
Return to the Leviathan
Your first step is going to be in the underbelly of the Leviathan to kill Watchers. Even if you aren’t a raider or play solo, you’ll still be able to complete this step relatively easily. Equip an exotic that speeds you up if you can — Dunemarchers or Transversive steps are great here, but Mida Multi-tool also works — as it’ll make this next part much easier.
Bungie via Polygon
Spawn in the Leviathan and ignore the Cabal standing on the bridge. Drop down to a secret level before where they are standing and you’ll find a small room with six levers.
Going left to right, you need to pull the levers quickly in this order: 1 — 5 — 3 — 2 — 4 — 6. This is easy to do in a group and manageable on your own. If you’ve done this right, you’ll see a message that says “the way is open.”
Walk up the ramps until you get to the most open area. Walk forward and there’ll be a pool of death-water (don’t fall in this if you can help it; it’s called death-water for a reason) with a pipe sticking out of it. Follow the path and jump along the pipes until you reach a big fan. Pull the lever in the room to your left and ride the waves up the shaft.
Bungie via Polygon
You’ll be presented with a choice: Go forward or turn left. Take the left turn and make your way down the hallway until you reach the door to Engine. You can use any room to farm this, but in our experience Engine is the fastest to clear and get through.
Open the door and kill as many Watchers as you can before they go immune. Once their shields come up, you’ll need to clear the Cabal and then clean up the rest of the Watchers.
Bungie via Polygon
Now that you have four lenses for the four Watchers you killed, walk back out the door you came in, let it shut behind you and start this process all over again. Once you’ve collected 24 lenses from the Watchers, you’ll be given a new task.
Public Events and Strikes
Now you’ll need to collect Glimmering Amethyst for Ada-1. This stuff drops naturally throughout the game, and you can collect it from Strike chests, Public Events or random chests out in the world.
We ran through a handful of public events in the EDZ — a really easy cycle starts there every few minutes. However, speed running through the Lake of Shadows strike via the director is much faster. Complete 20 Public Events or 10 strikes to complete this step of the quest.
Temper Bergusia
Now you’ll need to run a Bergusia forge and kill shield drones. These two are pretty easy to find, even if you’re just running on your own. They spawn between the first and second rounds as usual.
If you’re looking from the entrance, the first drone is on a pillar to the left of the forge, disconnected from everything.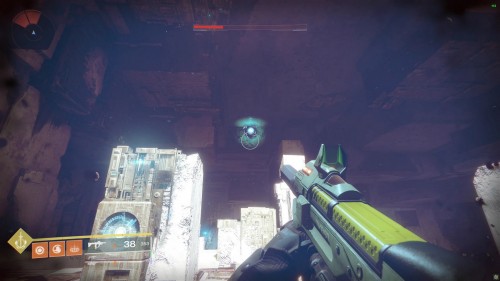
Bungie via Polygon
The second drone is on the right of the forge from the entrance, floating next to a red pipe and a Black Armory crate.
Bungie via Polygon
Now that the forge has Maximum Temper, finish Bergusia and collect your key from the box as usual.
Completing a rare bounty
Insert all four keys into your Mysterious Box and return to Ada-1 in the Tower. She’ll ask you to get an Obsidian Crystal. Remember our warning earlier about the rare bounty? Hopefully you have one on you.
Turn in the rare bounty from Ada-1 to receive the Obsidian Crystal.
If you’re still missing a rare bounty, do all of Ada-1’s normal bounties every day until you get one.
Do Shattered Throne
Here is the first step that will require a coordinated team for most people.
You’ll need to go into Shattered Throne and defeat Dul Incaru, the final boss. If you need help with that, we’ve got a Shattered Throne guide for you already.
Keep in mind that this dungeon is only available every three weeks, when the Dreaming City curse is at its most intense. If it’s Shattered Throne week, you’ll probably want to grind on this quest as hard as you can so you don’t get locked out for nearly another month.
Do the Pyramidion quest
After you do Shattered Throne, you’ll need to do a tough version of the Pyramidion. Even at 650, this mission is not for the faint of heart, so we suggest getting a crew together instead of attempting it solo. If your Fireteam wipes, you go back to orbit. Be careful in there.
It’s worth mentioning that you also need to launch this via a quest on Io, not through the Strike node itself. If you just complete the normal Pyramidion strike naturally, you’ll get nothing toward the quest. Go to the quest node on Io and be prepared for your equipment to lock. Keep in mind that Solar Singe and Heavyweight are also on, so Sleeper Simulant is your friend here.
